Powering Up: Lab Automation With Labgrid and CI
Tim Orling, Konsulko Group
& Trevor Gamblin, BayLibre
Open Source Summit Europe 2025

Tim Orling, Konsulko Group
& Trevor Gamblin, BayLibre
Open Source Summit Europe 2025
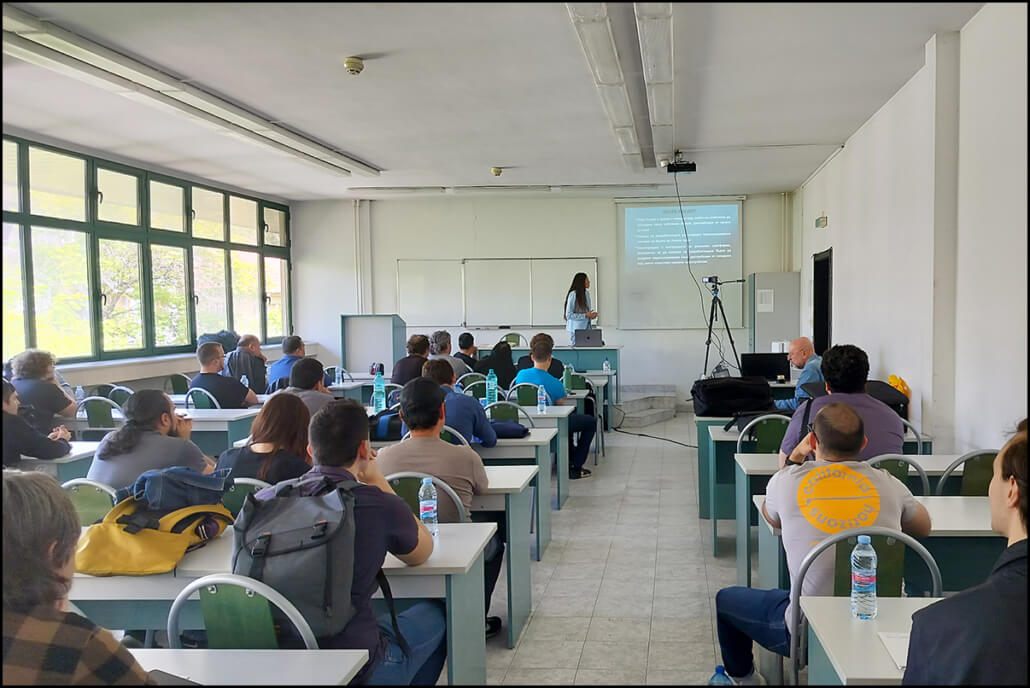
We’re heading to Austria for Open Source Summit Europe, with a large contingent of our engineers, as well as four speakers for this always important conference.
Principal Engineer Scott Murray will join the Linux Foundation’s Walt Miner to present “What’s Happening with Automotive Grade Linux and How Our Update to Yocto 5.0 Went.” Walt and Scott will share some lessons learned from upgrading from the 4.0 to 5.0 versions of the Yocto Project and provide an update on the latest AGL features included in the Ricefish release.
Vitaly Wool, Principal Engineer and GM of Konsulko AB will discuss “Rusty Swapping: Rewriting a Zswap Backend in Rust.” Rust has gained popularity as the second Linux kernel high-level language. Recently, Vitaly rewrote a zswap backend called zblock in Rust. This talk will cover the main principles of zblock (which stay the same no matter which language is used), the obstacles met while implementing it in Rust, and finally the comparison of the two.
Principal Engineer Tim Orling will present “Are You Ready For Scarthgap? Best Practices For The Latest Yocto Project LTS Release.” Tim will discuss setting up your own “distribution” and board-support package (BSP), and share techniques for managing and discovering layers. He’ll discuss best practices to ensure your public layers are ready for the Layer Index, and investigate meta-lts-mixin layers. He’ll look at the latest tools for Software Bill of Materials (SBOM), license compliance (SPDX), and software vulnerabilities (CVEs), and share ways to leverage new IDE tools added in this release.
At Yocto Project Developer Day 2024 (co-located with OSEE) Senior Engineer Leon Anavi will provide a “Side-by-side Comparison of Dual A/B Update Solutions with the Yocto Project.” Leon’s talk will provide a detailed exploration of Mender, RAUC, and swupdate, comparing them on the same hardware platforms. He’ll discuss their advantages and disadvantages and how to select the most appropriate open-source solution for specific projects. Leon will delve into various use cases and practical examples, concluding with a side-by-side comparison.
We hope you’ll be able to join us in Vienna.
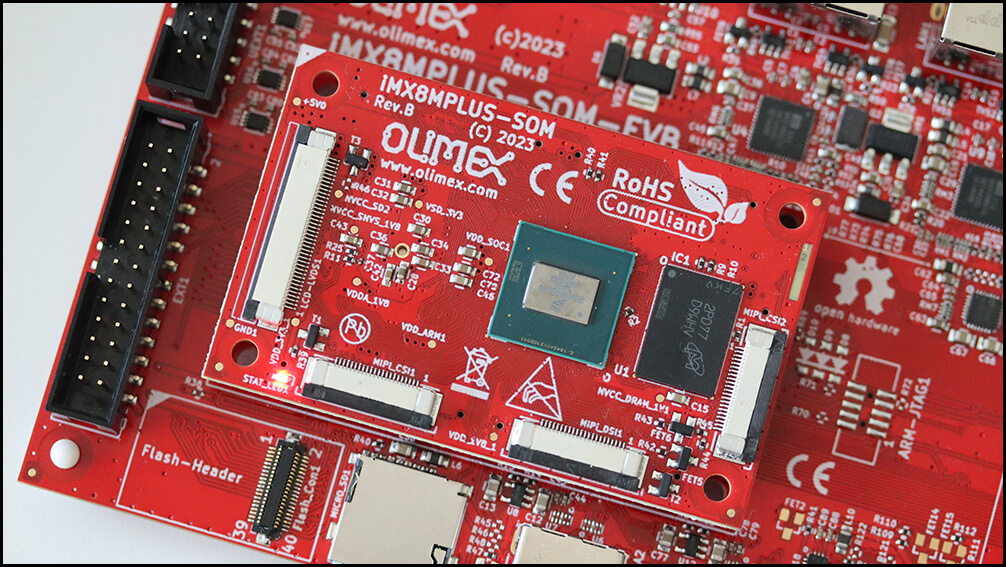
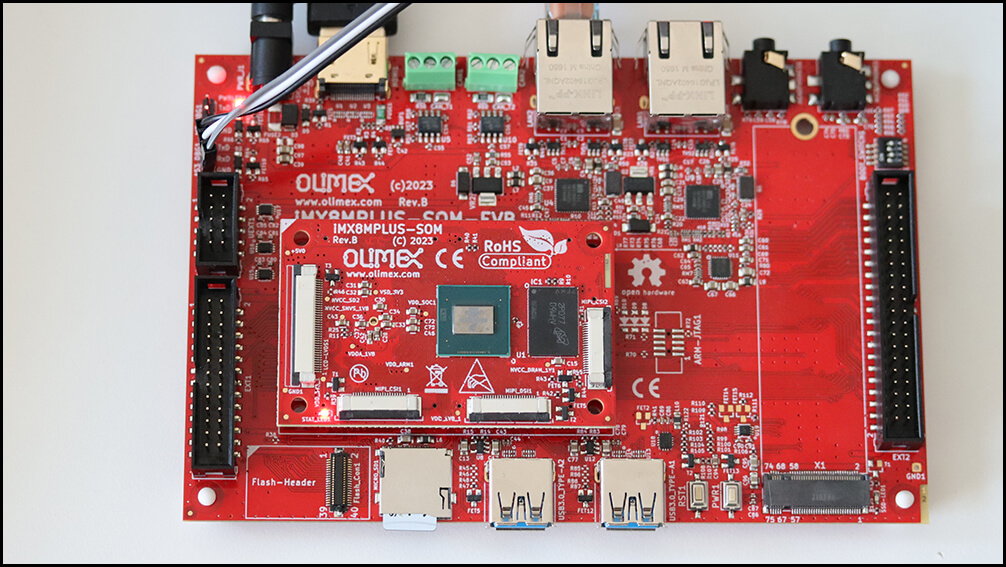
Software over-the-air (OTA) updates are essential for any modern embedded Linux device. In part 1, we explored A/B software updates using RAUC and qbee.io. For our demonstrations, we utilized the new open source hardware Olimex’s iMX8MPlus System on Module (SOM) and Evaluation Board (EVB). The NXP i.MX8MP is a robust microprocessor, ideal for industrial-grade applications and widely adopted across various industries. In part 2, we will use Mender to update the same hardware.
Mender.io is an open-source platform designed for managing and deploying over-the-air (OTA) updates to embedded devices. It provides a reliable and secure method to keep devices up-to-date, minimizing downtime and reducing the risks of manual updates. Mender supports an open-source A/B update scheme and offers an optional proprietary implementation for delta updates.
As a turnkey solution, Mender features a web interface for comprehensive device management and is available as a Software-as-a-Service (SaaS) for small and medium businesses, as well as hosted or on-premise solutions for large enterprises. It supports robust update strategies, rollback mechanisms, and add-ons for configuring, monitoring, and troubleshooting devices. Mender is a state-of-the-art solution for maintaining and managing fleets of connected devices across various industries.
Here are the steps to build core-image-base with Mender for Olimex:
pip install kas
git clone -b scarthgap https://github.com/mendersoftware/meta-mender-community
mkdir -p meta-mender-community/mender-nxp && cd meta-mender-community/mender-nxp
cat <<EOF > debug-image.yml
header:
  version: 14

local_conf_header:
  developer-features: |
    EXTRA_IMAGE_FEATURES = "debug-tweaks"
EOF
kas build ../kas/olimex-imx8mp-evb.yml:debug-image.yml
Initiating the build process from scratch is a bit of a marathon, as kas and bitbake need to download all the source code and execute a plethora of tasks. Feel free to grab a cup of tea (or maybe a whole teapot) while you wait!
Using kas and BitBake will result in the production of an image file. After the build process is complete, you will find the generated image at the following relative path: build/tmp/deploy/images/olimex-imx8mp-evb/core-image-base-olimex-imx8mp-evb.sdimg. This path indicates the location within the build directory where the final image is stored, ready for deployment to Olimex iMX8MP-SOM-4GB-IND and iMX8MP-SOM-EVB-IND.
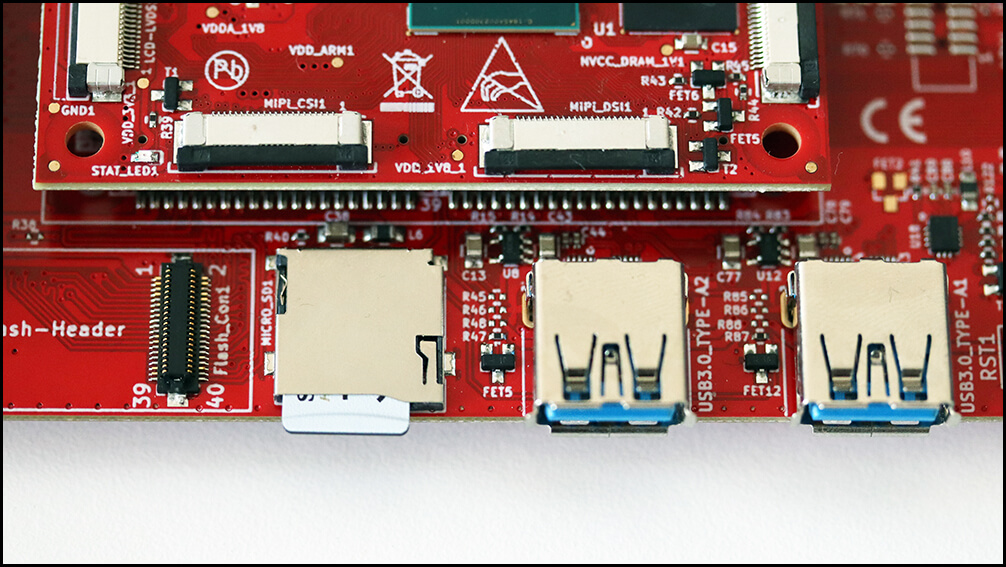
The core-image-base-olimex-imx8mp-evb.sdimg file must be flashed onto a microSD card to be used with your device. This can be accomplished using various applications such as dd or bmaptool for command-line options. If you prefer a user-friendly application with a graphical interface, you can use Balena Etcher, which simplifies the flashing process and provides a straightforward GUI.
To set up and verify your Olimex iMX8MP-SOM-EVB-IND board, follow these steps:
mender-update show-provides
mender-update show-artifact
mender-update --version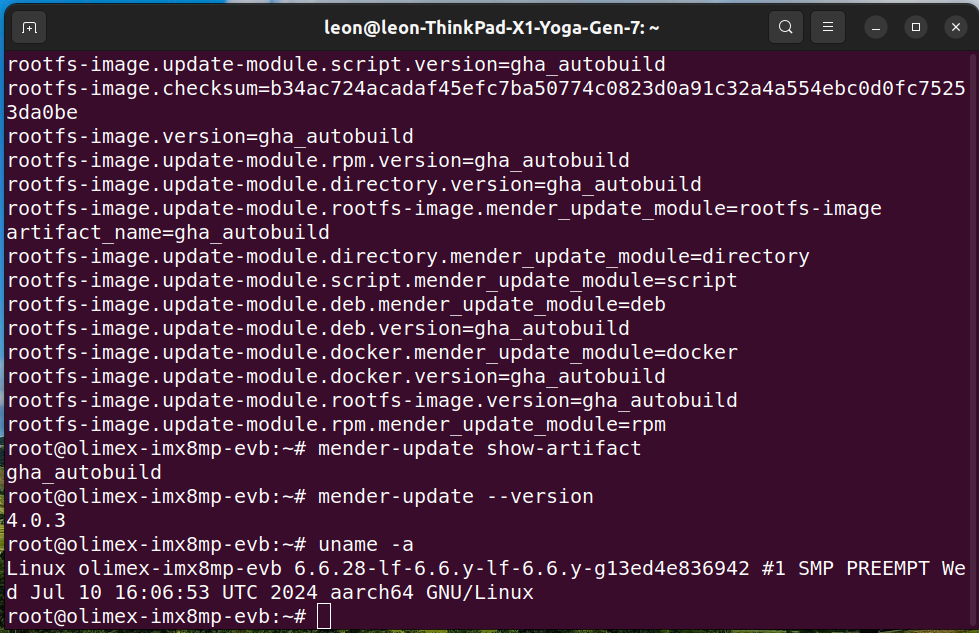
A Mender artifact refers to a package format used by the Mender update manager for over-the-air (OTA) software updates. It contains all the necessary components such as firmware, scripts, configuration files, and metadata required to update a device’s software reliably and securely. The layer meta-mender/meta-mender-core is essential for integrating Mender’s functionality into the Yocto Project and OpenEmbedded build system as it provides required classes and scripts that automate the creation of Mender artifacts as part of the build process.
Follow the steps below to build a Mender Artifact for iMX8MP-SOM-EVB-IND that extends the system with the addition of the simple text editor nano:
nano:cat <<EOF > update-image.yml
header:
version: 14
local_conf_header:
update-image: |
IMAGE_INSTALL:append = " nano"
EOF
core-image-base and its corresponding Mender Artifact using:kas build ../kas/olimex-imx8mp-evb.yml:debug-image.yml:update-image.yml
nano at the file path build/tmp/deploy/images/olimex-imx8mp-evb/core-image-base-olimex-imx8mp-evb.mender.Mender serves as a comprehensive update solution, featuring a central server that acts as a hub for storing and orchestrating software updates across fleets of devices via over-the-air deployment. Using Mender’s intuitive web UI or REST APIs, you can efficiently manage devices, upload software releases, and execute seamless deployments to distribute updates across your devices. Alternatively, Mender can operate in standalone mode, independent of a server.
To perform a manual standalone deployment using Mender in the terminal, follow the steps below. In this setup, no Mender Server is involved, and updates are initiated directly on the device.
python3 -m http.server
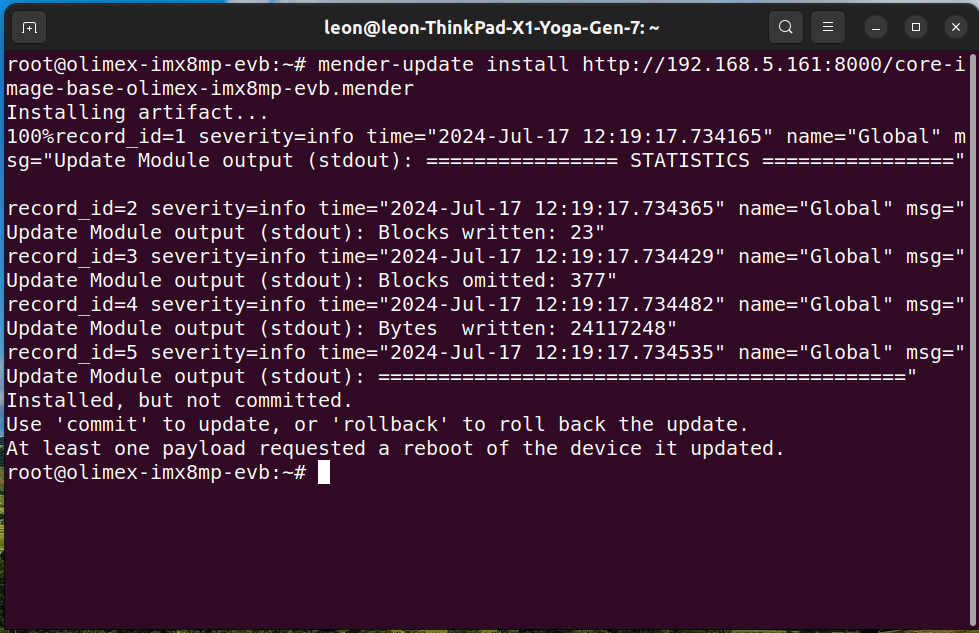
root on Olimex iMX8MP-SOM-4GB-IND and iMX8MP-SOM-EVB-IND and install the Mender Artifact to perform an upgrade of the device:mender-update install http://<server>:8000/core-image-base-olimex-imx8mp-evb.mender
NOTE: Replace <server> with the IP address of the machine on which the Python3 HTTP server is running.
reboot
root on the board and verify that nano text editor has been installed.mender-update commit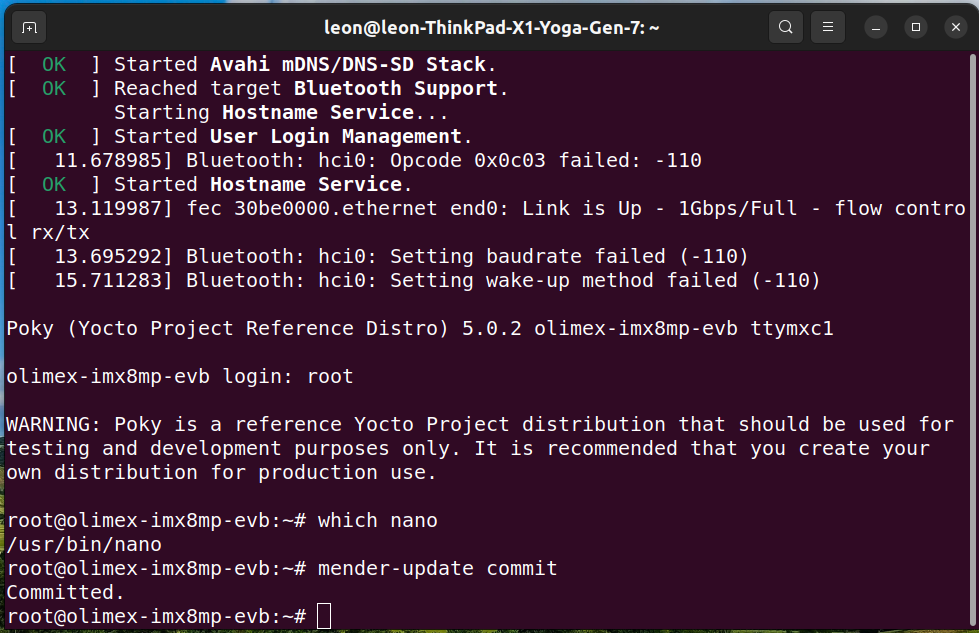
This example illustrates the seamless integration of Mender using the Yocto Project release Scarthgap on an embedded computer powered by the NXP i.MX8MP SoC. It demonstrates how you can effectively manage updates across fleets of devices using the Mender server. Furthermore, Mender also provides additional tools for remote troubleshooting, ensuring smooth operations in the field.
The Mender client is an application that runs on embedded devices. In a production setup, it connects to the Mender server to perform automatic updates by downloading and installing Mender Artifacts as they become available. Initially, the Mender client was developed in Go. However, a strategic decision was made to rewrite it in C++ to reduce the application’s footprint and support more platforms, including real-time operating systems (RTOS).
In comparison, RAUC, the alternative A/B open-source solution explored in part one, also has an application running on the embedded Linux device, but it is written in C. Unlike Mender, RAUC does not provide a server to manage devices, so a third-party solution such as qbee.io or Eclipse hawkBit is required.
Another notable technical difference is that RAUC integration through meta-rauc-nxp relies on a wks file where the A and B partitions are explicitly specified. In contrast, meta-mender-nxp uses classes and special variables provided by Mender to define those partitions, and BitBake generates a temporary wks file while building Mender-enabled images.
In terms of security, both Mender and RAUC support signing and verification of updates. Mender supports signing artifacts using RSA with a recommended key length of at least 3072 bits or ECDSA with curve P-256. RAUC employs X.509 cryptography for signing and verifying update bundles.
Leveraging the insights and experiences discussed in parts 1 and 2 of this article, here is a side-by-side comparison of the key features of Mender and RAUC:
| Feature | Mender | RAUC |
|---|---|---|
| A/B updates | Yes | Yes |
| Roll-back | Yes | Yes |
| Configure add-on | Available | No |
| Monitor add-on | Available | No |
| Troubleshoot add-on | Available | No |
| Client implementation | C++ | C |
| Client license | Apache 2.0 | LGPL-2.1 |
| Yocto Project integration | Yes | Yes |
| Management server | Yes | 3rd-party |
Mender.io provides a comprehensive, turnkey solution that covers everything from embedded devices to cloud-based software-as-a-service for managing fleets of connected devices. It also offers convenient add-ons and proprietary delta updates. Meanwhile, RAUC reliably integrates seamlessly with both in-house and third-party device management systems. The choice of update technology should be based on your specific requirements and use cases.
Over the years, Konsulko engineers have made significant contributions to the community and crucial embedded Linux open-source projects, including the Yocto Project, OpenEmbedded, the Linux kernel, and U-Boot. We specialize in assisting customers in developing commercial products leveraging these technologies. With expertise in BSP bring-up on diverse hardware platforms for embedded devices, our services encompass a wide range of open-source solutions for software updates. Contact us to discuss the best update strategy and technology for your embedded product requirements.
Software over-the-air (OTA) updates are essential for embedded Linux devices as they ensure timely application of security patches, fix vulnerabilities, and enhance security features to protect against threats. They offer a convenient way to deliver new features, performance improvements, and bug fixes without needing physical access to the device, keeping it up-to-date and functional.
Several high-quality open-source OTA solutions are available today, allowing developers to leverage and customize existing systems rather than creating proprietary ones, saving both time and money. In this series of articles, we will explore and compare software update strategies using the A/B scheme, where two identical copies of the root filesystem are maintained, one active and one for the next update. Popular OTA update solutions like Mender, RAUC, and Swupdate implement this approach. This article will focus on RAUC using a typical development setup. In part 2 we will implement software updates with Mender. For our demonstration, we will use the i.MX8MP, a versatile microprocessor from NXP Semiconductors known for its industrial-grade reliability and popularity in smart home devices, industrial automation, medical equipment, and multimedia systems.
Recently, Olimex launched an open-source hardware iMX8MPlus System on Module (SOM) and Evaluation Board (EVB) tailored for industrial applications. Leon Anavi, Senior Engineer at Konsulko Group, contributed support for Olimex iMX8MP-SOM-4GB-IND and iMX8MP-SOM-EVB-IND to the community-maintained Yocto and OpenEmbedded BSP layers. This effort encompassed Linux kernel and U-Boot uplift. Subsequently, leveraging his role as founder and maintainer of the meta-rauc-community layer, Leon integrated support for RAUC software updates on these boards and seamlessly integrated them with qbee cloud service.
Qbee.io is a comprehensive cloud platform for managing and maintaining IoT and edge devices. Using the qbee-agent running on the embedded devices, it offers features such as configuration management, remote accesss, monitorning, security and OTA software updates based on RAUC. These capabilities enable businesses to efficiently oversee their distributed technology infrastructure, ensuring devices remain up-to-date, secure, and perform optimally. Earlier in 2024 Tim Orling, Konsulko Group Principal Software Engineer, implemented image update with qbee and RAUC on Raspberry Pi 5.
This technical article will guide you through the exacts steps to build a basic image for Olimex iMX8MP-SOM-4GB-IND and iMX8MP-SOM-EVB-IND using Yocto Project release 5.0 LTS (scarthgap) as well as to perform a software update using qbee and RAUC.
git clone -b scarthgap https://git.yoctoproject.org/poky poky-olimex-imx8mp
cd poky-olimex-imx8mp
git clone -b scarthgap https://github.com/Freescale/meta-freescale.git
git clone -b scarthgap https://github.com/Freescale/meta-freescale-3rdparty.git
git clone -b scarthgap https://github.com/Freescale/meta-freescale-distro.git
git clone -b scarthgap https://github.com/rauc/meta-rauc.git
git clone -b scarthgap https://github.com/rauc/meta-rauc-community.git
git clone -b master https://github.com/qbee-io/meta-qbee.git
git clone -b scarthgap git://git.openembedded.org/meta-openembedded
source oe-init-build-env
bitbake-layers add-layer ../meta-openembedded/meta-oe
bitbake-layers add-layer ../meta-freescale
bitbake-layers add-layer ../meta-freescale-3rdparty
bitbake-layers add-layer ../meta-freescale-distro
bitbake-layers add-layer ../meta-rauc
bitbake-layers add-layer ../meta-rauc-community/meta-rauc-nxp
bitbake-layers add-layer ../meta-qbee/meta-qbee
conf/local.conf by appending the following configurations to the end of the file:MACHINE = "olimex-imx8mp-evb"
INIT_MANAGER = "systemd"
ACCEPT_FSL_EULA = "1"
WKS_FILE = "dual-imx-boot-bootpart.wks.in"
DISTRO_FEATURES:append = " rauc"
IMAGE_FSTYPES:append = " ext4"
IMAGE_BOOT_FILES:append = " boot.scr"
IMAGE_INSTALL:append = " rauc-grow-data-part"
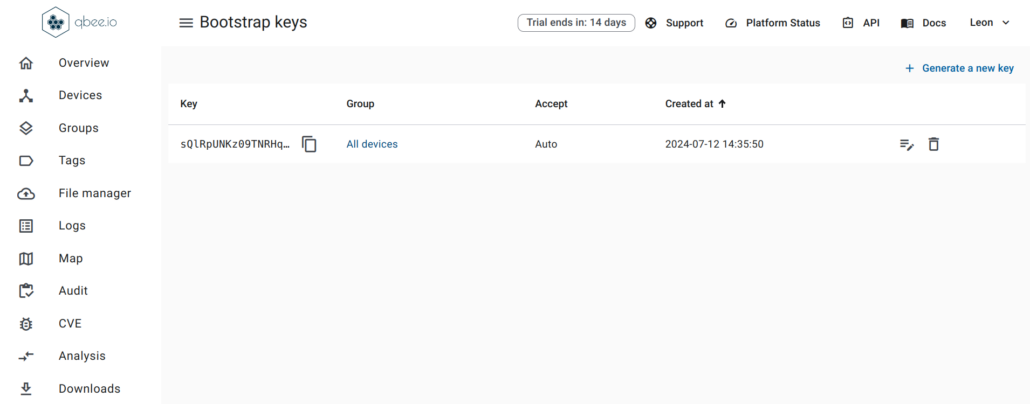
<bootstrap_key> with the qbee bootstrap key and append to conf/local.conf:QBEE_BOOTSTRAP_KEY = "<bootstrap_key>"
bitbake core-image-base
Creating an image from the ground up is a time-consuming process that requires numerous Yocto/OpenEmbedded recipes and configurations. Please be patient as bitbake systematically manages each step.
tmp/deploy/images/olimex-imx8mp-evb/core-image-base-olimex-imx8mp-evb.rootfs.wic.gz to microSD card.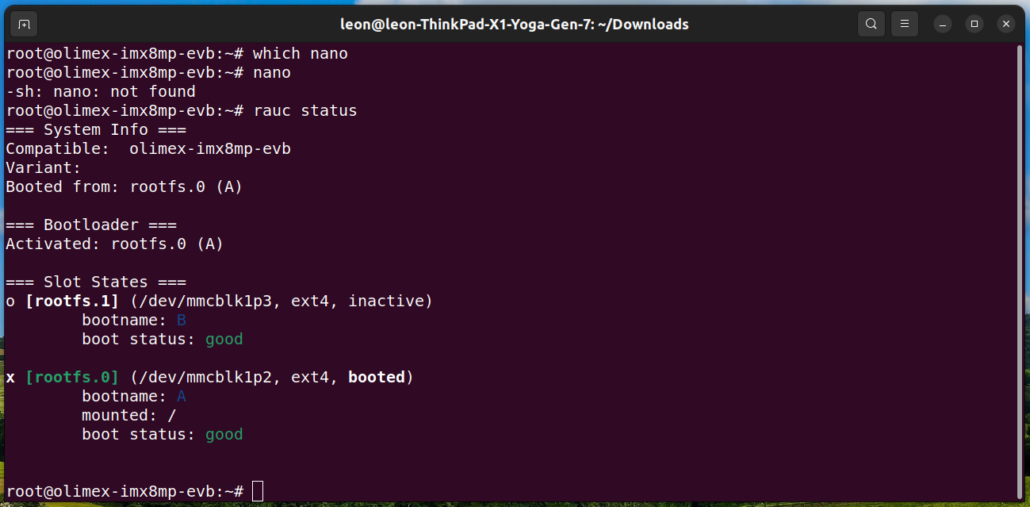
olimex-imx8mp-evb has successfully connected: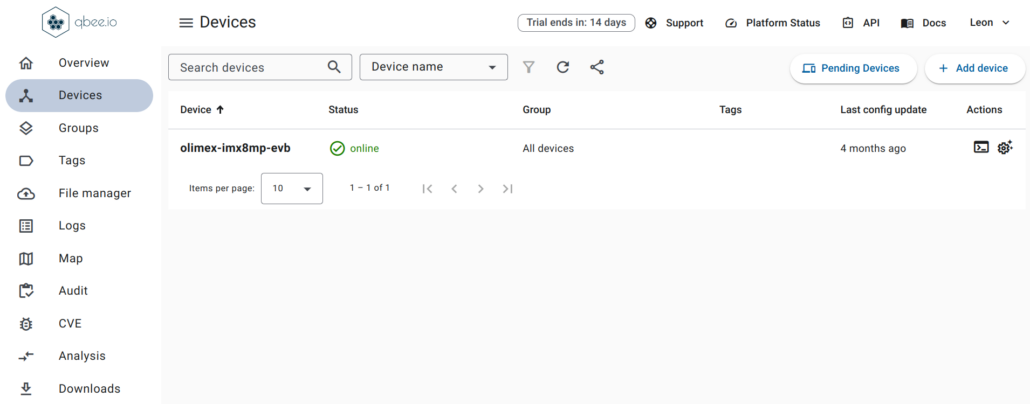
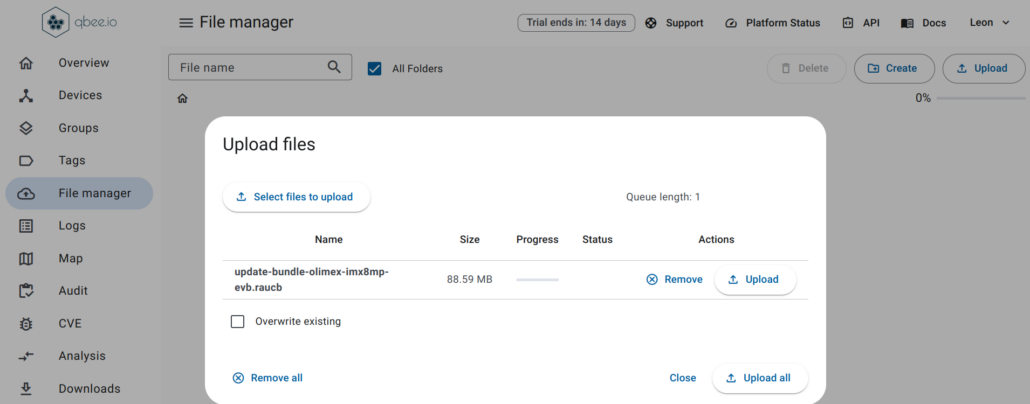
A RAUC update bundle comprises the file system image(s) or archive(s) designated for system installation, accompanied by a manifest detailing the images for installation, encompassing options and meta-information. Additionally, it may include scripts designated for execution before, during or after the installation process. To sign and verify the update bundles RAUC uses SSL keys. Layer meta-rauc-beaglebone contains a keyring containing all keys and a recipe for a simple RAUC update bundle for demonstration purposes only.
Follow the steps below to create RAUC update bundle that extends the system by adding the popular text based editor nano:
conf/local.conf:IMAGE_INSTALL:append = " nano"
bitbake update-bundle
Please follow the steps below to upload the RAUC bundle to qbee.io and update the board:
olimex-imx8mp-evb and go to tab Configure. From Settings > OTA enable RAUC image updates: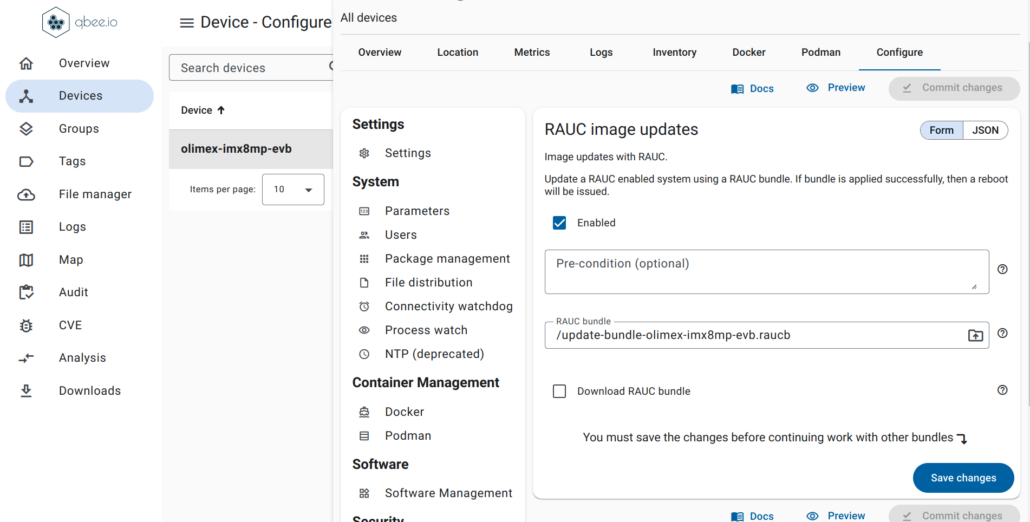
nano is present: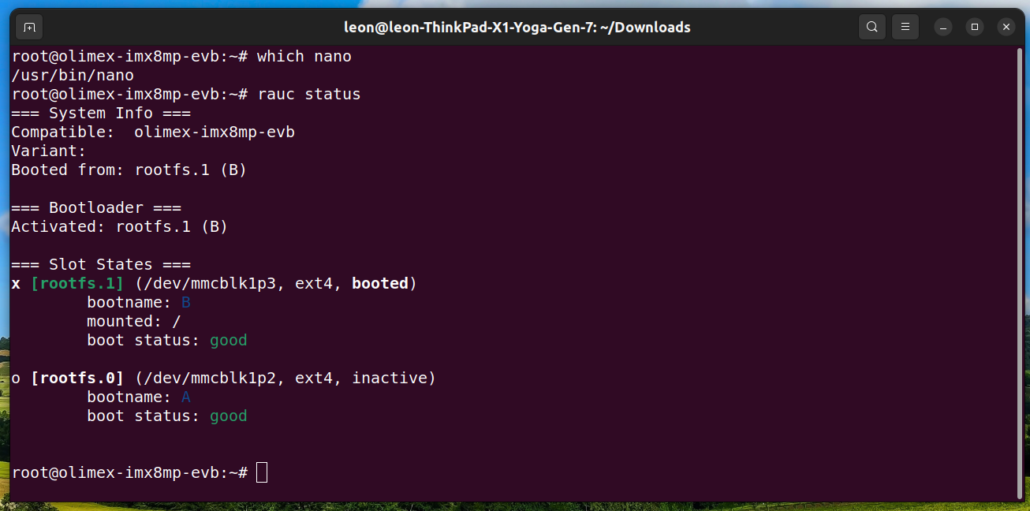
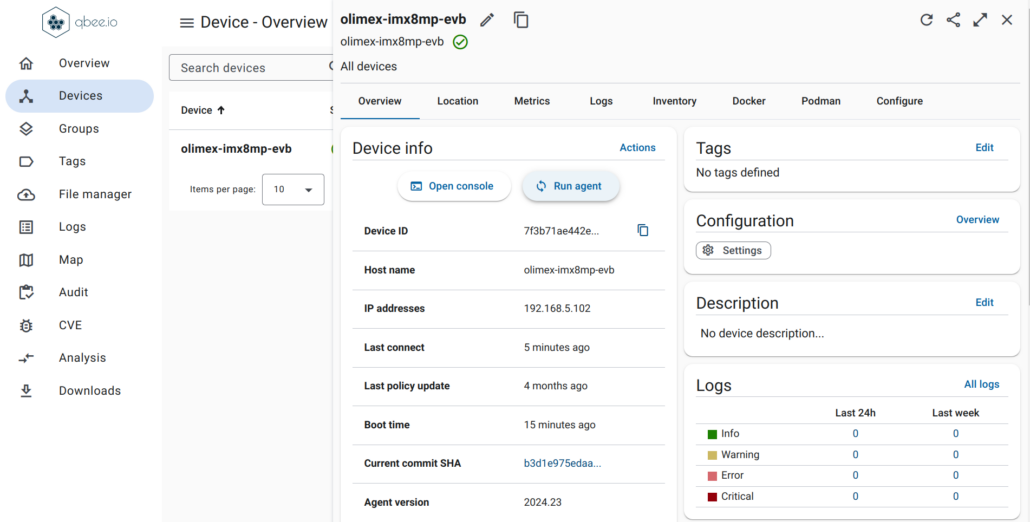
olimex-imx8mp-evb, navigate to the Logs tab, and review the logs related to the RAUC update.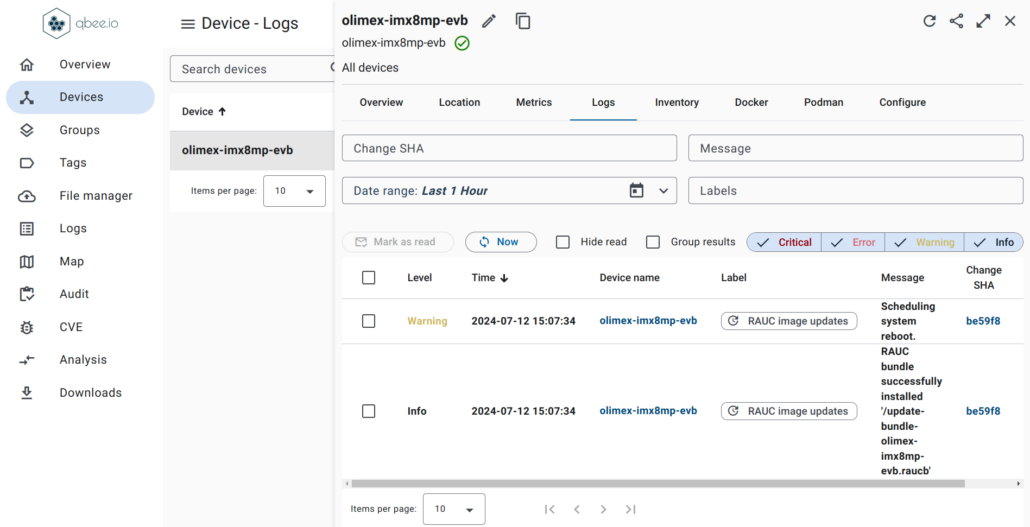
With qbee.io, multiple IoT devices can be grouped together and managed as a fleet from the cloud service. In practical product development scenarios, enhancing the Yocto Project and OpenEmbedded workflow can be achieved through a few straightforward commands to streamline continuous integration (CI).
The second part of the article will detail the exact steps to build, boot, and update an image on the Olimex iMX8MP-SOM-4GB-IND and iMX8MP-SOM-EVB-IND hardware, this time using Mender instead of RAUC, with the Yocto Project release 5.0 LTS (scarthgap).
Konsulko engineers have played pivotal roles as contributors and mentors in the commercial product space from the early days of OpenEmbedded and the Yocto Project. Our team excels in utilizing RAUC, Mender, Swupdate and a range of other open-source tools to deliver comprehensive software update solutions. Contact us to discuss your specific product requirements and discover how Konsulko engineers can improve your embedded Linux development projects.
Over the years Konsulko Group engineers made many upstream contributions to various open source OTA (over-the-air) update solutions for embedded Linux devices. Recently Leon Anavi, Konsulko Group Senior Engineer and maintainer of meta-rauc-community ported RAUC to Radxa Rock Pi 4 Model B. This is the first Rockchip device supported in meta-rauc-community.
RAUC is one of the popular solutions that provide OTA updates for Embedded Linux devices. RAUC is developed with focus on stability, security and flexibility and is compatible with all popular build systems.
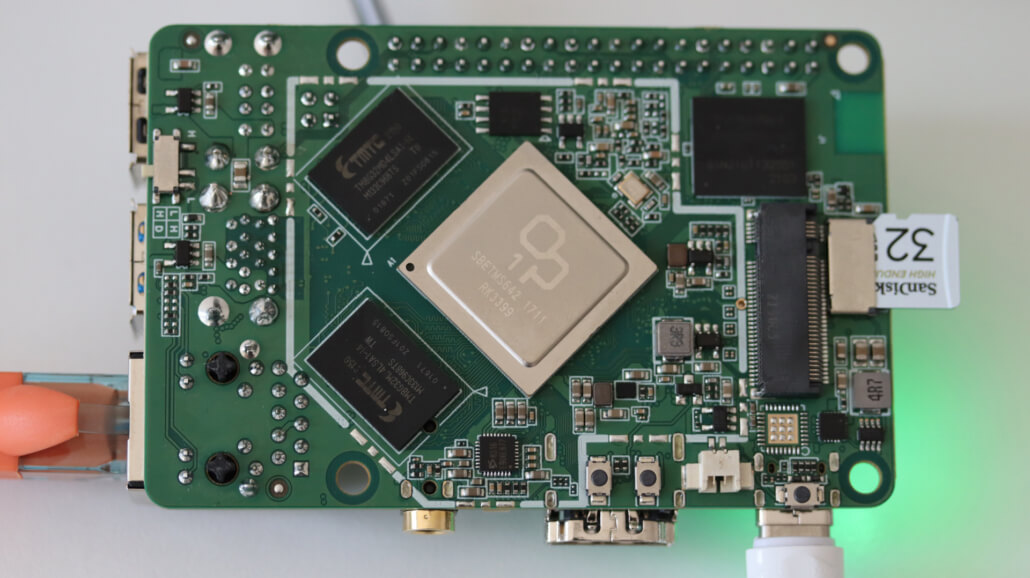
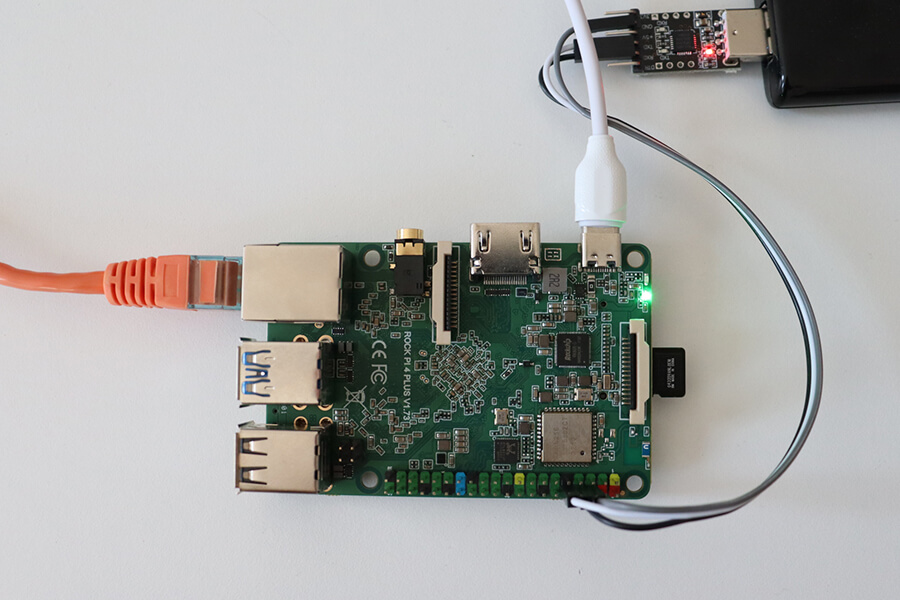
The Radxa Rock Pi 4 Model B is a single-board computer with a Rockchip RK3399 processor, 4GB RAM, and various storage options including microSD card and NVMe SSD. It features Gigabit Ethernet, dual-band Wi-Fi, Bluetooth 5.0, USB 3.0, 4K video output via HDMI and USB-C, and a 40-pin GPIO header compatible with Raspberry Pi. This article explains how to build an image for the Radxa Rock Pi 4 Model B using the Yocto Project and OpenEmbedded, and how to perform software updates with RAUC.
git clone -b scarthgap https://git.yoctoproject.org/poky poky-rauc-rockchip
cd poky-rauc-rockchip
git clone -b scarthgap git://git.yoctoproject.org/meta-arm
git clone -b scarthgap git://git.yoctoproject.org/meta-rockchip
git clone -b scarthgap https://github.com/rauc/meta-rauc.git
git clone -b scarthgap https://github.com/rauc/meta-rauc-community.git
git clone -b scarthgap git://git.openembedded.org/meta-openembedded
source oe-init-build-env
bitbake-layers add-layer ../meta-arm/meta-arm-toolchain
bitbake-layers add-layer ../meta-arm/meta-arm
bitbake-layers add-layer ../meta-rockchip
bitbake-layers add-layer ../meta-openembedded/meta-oe
bitbake-layers add-layer ../meta-rauc
bitbake-layers add-layer ../meta-rauc-community/meta-rauc-rockchip
conf/local.conf by appending the following configurations to the end of the file:MACHINE = "rock-pi-4b"
SERIAL_CONSOLES="115200;ttyS2"
IMAGE_FSTYPES:append = " ext4"
WKS_FILE = "rockchip-dual.wks.in"
MACHINE_FEATURES:append = " rk-u-boot-env"
UBOOT_EXTLINUX_KERNEL_IMAGE="/${KERNEL_IMAGETYPE}"
UBOOT_EXTLINUX_ROOT="root=PARTLABEL=${bootpart}"
UBOOT_EXTLINUX_KERNEL_ARGS = "rootwait rw rootfstype=ext4 rauc.slot=${raucslot}"
WIC_CREATE_EXTRA_ARGS = "--no-fstab-update"
DISTRO_FEATURES:append = " rauc"
INIT_MANAGER = "systemd"
bitbake core-image-base
Building an image from scratch is a lengthy process that involves numerous Yocto/OpenEmbedded recipes and configurations. Please be patient while bitbake methodically handles each task.
tmp/deploy/images/rock-pi-4b/core-image-base-rock-pi-4b.rootfs.wic to microSD card.rauc status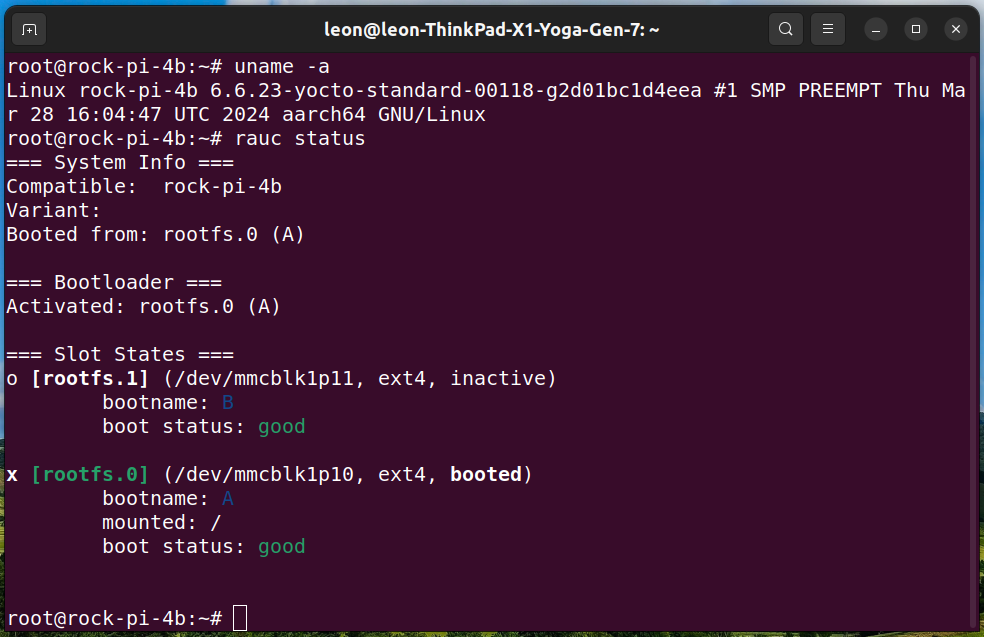
A RAUC update bundle comprises the file system image(s) or archive(s) designated for system installation, accompanied by a manifest detailing the images for installation, encompassing options and meta-information. Additionally, it may include scripts designated for execution before, during or after the installation process. To sign and verify the update bundles RAUC uses SSL keys. Layer meta-rauc-beaglebone contains a keyring containing all keys and a recipe for a simple RAUC update bundle for demonstration purposes only.
Follow the steps below to create RAUC update bundle that extends the system by adding the popular text based editor nano:
conf/local.conf:IMAGE_INSTALL:append = " nano"
bitbake update-bundleFollow the steps below to update core-image-minimal running from a microSD card on Radxa Rock Pi 4 Model B:
cd tmp/deploy/images/rock-pi-4b/
pip3 install --user rangehttpserver
python3 -m RangeHTTPServer
<IP> with the actual IP address of the computer on which the HTTP server is running and execute the following command to install the update:rauc install http://<IP>:8000/update-bundle-rock-pi-4b.raucb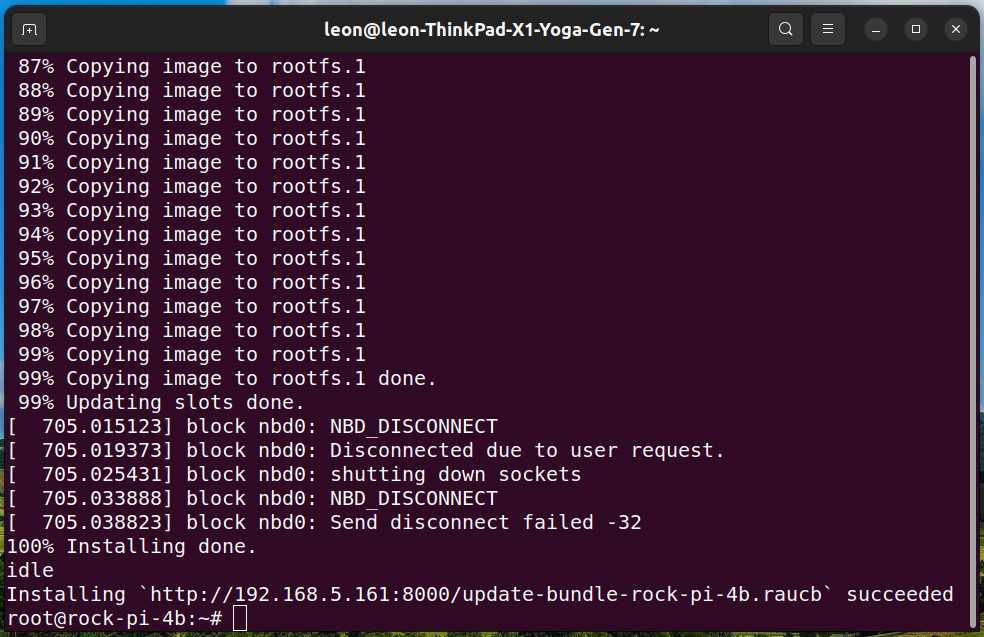
NOTE: As alternative, instead of using an HTTP server, you can transfer the update bundle to Rock Pi 4 Model B and install it from local storage.
reboot
which nano
Check RAUC status to confirm the system have booted from the second partition:
rauc status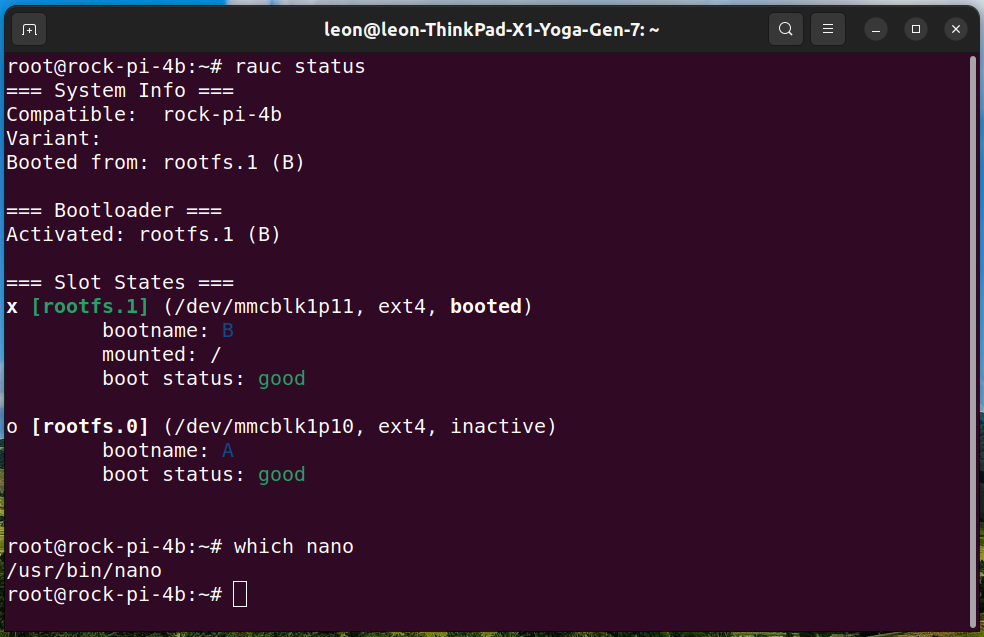
The default serial baud rate for the Radxa Rock Pi 4’s U-Boot and kernel console is 1500000. However, many USB-to-UART cables, such as those using the popular Silicon Labs CP2102 chip, cannot handle this high speed. To avoid these issues, a patch is applied to rock-pi-4-rk3399_defconfig through u-boot_%.bbappend, setting U-Boot’s baud rate to 115200. Additionally, for the kernel, we set SERIAL_CONSOLES="115200;ttyS2" in conf/local.conf. This ensures that both U-Boot and the Linux kernel operate at a baud rate of 115200 in our demonstration.
The Radxa Rock Pi 4 Model B uses U-Boot with extlinux support to boot. For RAUC integration, it employs a boot.scr script, which handles the A/B system switching and passes environment variables to extlinux/extlinux.conf. The rockchip-dual.wks.in file creates two identical partitions (A and B), a data partition, and a fixed-size 32MB boot partition. The boot.scr and extlinux/extlinux.conf files are stored in the boot partition.
In real-world product development, the Yocto Project and OpenEmbedded workflow can be improved with some simple commands to facilitate continuous integration (CI).
Since OpenEmbedded and the Yocto Project began, Konsulko engineers have been key contributors and mentors in developing commercial products. Our team excels in using RAUC, Mender, and other open-source tools for delivering superior software updates. Reach out to us to see how Konsulko engineers can support your embedded product development efforts.
TuxCon is an annual open-source conference held in Plovdiv, Bulgaria, aimed to promote the adoption of open-source hardware and software, and organized by passionate volunteers. Since the conference’s inception in 2014, Konsulko Group engineers have participated and supported this important local event.
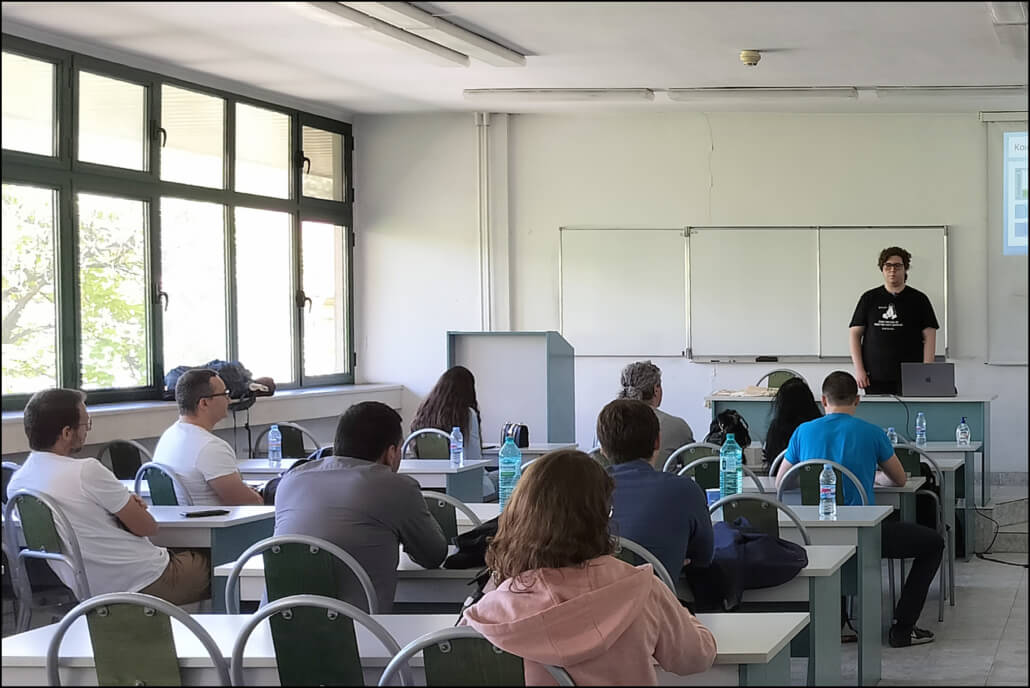
The 2024 edition of TuxCon took place on May 11th and 12th at the Technical University of Sofia, Plovdiv branch, featuring presentations on various interesting topics. This edition featured a couple of talks (in Bulgarian) about the Yocto Project and OpenEmbedded.
Konsulko Group junior engineer Atanas Bunchev spoke at the event, sharing his experience with Balena on Raspberry Pi and PHYTEC phyBOARD-AM62x. Balena.io, commonly known as Balena, is a platform that simplifies the deployment and management of embedded Linux devices using images based on the Yocto Project and OpenEmbedded. It leverages Docker containers for streamlined application deployment across various Internet of Things (IoT), offers centralized device management for monitoring and updates, and supports scalability from prototypes to large-scale projects. Atanas further elaborated on the utilization of Balena AutoKit for conducting automated QA testing on embedded Linux devices.
The second talk about the Yocto Project at TuxCon 2024 was delivered by Sadika Hasan, a senior-year student from “Paisii Hilendarski” University of Plovdiv. She demonstrated how to create a custom Linux distribution and Software Development Kit (SDK) by extending Poky, the Yocto Project’s reference distribution. Additionally, she covered the integration of the custom SDK with Visual Studio Code and the remote debugging of a C++ application on a Raspberry Pi Zero W 2.
Sadika’s presentation is part of her bachelor thesis, supervised by Professor Dimitar Tokmakov from ECIT (Electronics and Information and Communication Technology) department of “Paisii Hilendarski” University of Plovdiv and Konsulko engineer Leon Anavi.
Professor Tokmakov, with the assistance of engineer Nikolay Nedelev from Romit LTD, is actively involved in the ECOVEM project (European Center of Vocational Excellence in Microelectronics). As part of their efforts, two students from PU developed diploma theses for their Bachelor of Science degrees utilizing the Yocto Project. These theses were based on real-life problem solving and the practical experience of the Konsulko Group with industrial embedded Linux devices.
From the early days of OpenEmbedded and the Yocto Project, Konsulko engineers have actively contributed upstream and engaged with the community, offering their expertise in developing high-quality commercial products. If you are developing a new product, get in touch to see how Konsulko’s engineering expertise can enhance your project. Additionally, if you are a Linux software developer passionate about open source, we invite you to explore potential opportunities to join the Konsulko team.
Mender is an open-source over-the-air (OTA) software update technology for embedded Linux devices and Internet of Things (IoT) ecosystem. It allows developers to remotely manage and update software on embedded Linux devices, ensuring that they remain secure, up-to-date, and functional throughout their lifecycle. Mender simplifies the process of launching a new project by offering official and community-supported board integrations for a wide range of devices and operating systems. These integrations include support for Debian family and the Yocto Project, making it easier for developers to get started with their projects seamlessly.
The Yocto Project is an open-source collaboration project by the Linux Foundation to create custom Linux-based systems for embedded devices. It uses the OpenEmbedded build automation framework with the build tool bitbake and provides Poky as a reference Linux distribution. The Yocto Project follows a regular release cycle, typically with a new version every six months, alongside long-term supported releases available every two years. Currently, the most recent LTS release is version 5.0, codenamed Scarthgap, which became available on April 30, 2024.
Recently, Senior Engineer Leon Anavi from Konsulko Group ported Mender to Raspberry Pi 5. This effort builds upon his previous contributions, where he added Raspberry Pi 5 support to the Yocto Project BSP (Board Support Package) layer meta-raspberrypi. This progress was made possible through sponsorship from the computer emergency response team of the Government of the Grand Duchy of Luxembourg (GOVCERT.LU). If you’re considering using Mender on Raspberry Pi or any other hardware platform for your embedded product needs, feel free to reach out to us to discuss further.
Raspberry Pi 5 introduces significant hardware differences compared to its predecessors. To enable Mender updates on this platform, we require U-Boot version v2024.04 or later. Unfortunately, the Yocto Project release Scarphgap ships with U-Boot version v2024.01, which isn’t compatible. To address this compatibility issue and obtain the necessary U-Boot version, our setup utilizes the scarthgap/u-boot branch from the meta-lts-mixins layer. Tim Orling, Principal Software Engineer at Konsulko Group, contributed the patches in meta-lts-mixins for U-Boot v2024.04.

Raspberry Pi 5 is the first model of the famous single board computers that features a dedicated UART connector is a three-pin header compatible with the Raspberry Pi Debug Connector specification. It can be used with Raspberry Pi Debug Probe, a USB device that provides both a UART serial port and a standard Arm Serial Wire Debug (SWD) interface.
The article offers a practical guide, outlining the exact steps to build a Mender-enabled image for Raspberry Pi 5 and execute an A/B update. To streamline the build setup, we’ll utilize KAS. This Python-based open-source tool effectively handles various Yocto/OpenEmbedded layers. KAS executes builds within a Docker container to ensure consistency and reliable build outcomes, regardless of the primary GNU/Linux distribution on the build machine.
Follow the steps below to build core-image-minimal with Mender for Raspberry Pi 5:
kas tool (optionally, you can install globally for all users. Run as root, respectively under sudo then):pip install kas
git clone -b scarthgap https://github.com/mendersoftware/meta-mender-community
mkdir -p meta-mender-community/mender-rpi5 && cd meta-mender-community/mender-rpi5
kas build ../kas/raspberrypi5.yml
tmp/deploy/images/raspberrypi5/core-image-minimal-raspberrypi5.sdimg to a microSD card and boot it on Raspberry Pi 5.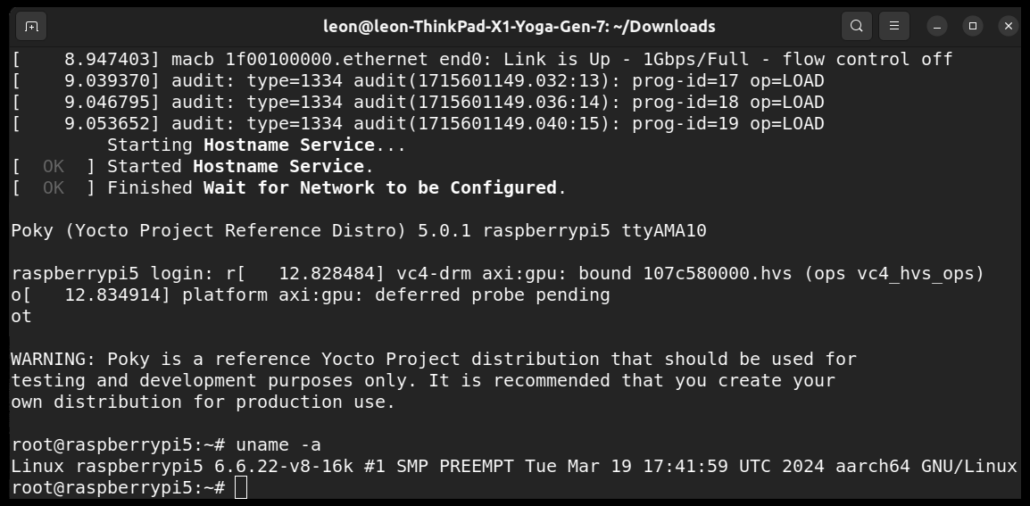
Follow the steps below to build a Mender Artifact for Raspberry Pi 5 that provides the simple text editor nano:
kas shell ../kas/raspberrypi5.yml
conf/local.conf:IMAGE_INSTALL:append = " nano"
core-image-minimal and a Mender Artifact for it:bitbake core-image-minimal
nano will be generated as file tmp/deploy/images/raspberrypi5/core-image-minimal-raspberrypi5.menderAs an end to end update solution, Mender provides aserver as the central hub for storing and orchestrating software updates across fleets of devices through over-the-air deployment. Through Mender’s user-friendly web UI or REST APIs, you can easily oversee device management, upload software releases, and create seamless deployments to distribute updates to your devices. However, it is also possible to use Mender in standalone mode without a server.
Follow the steps below to manually perform a standalone deployment with Mender in the terminal. In this scenario, no Mender Server is utilized, and the deployments are triggered directly at the device.
python3 -m http.server
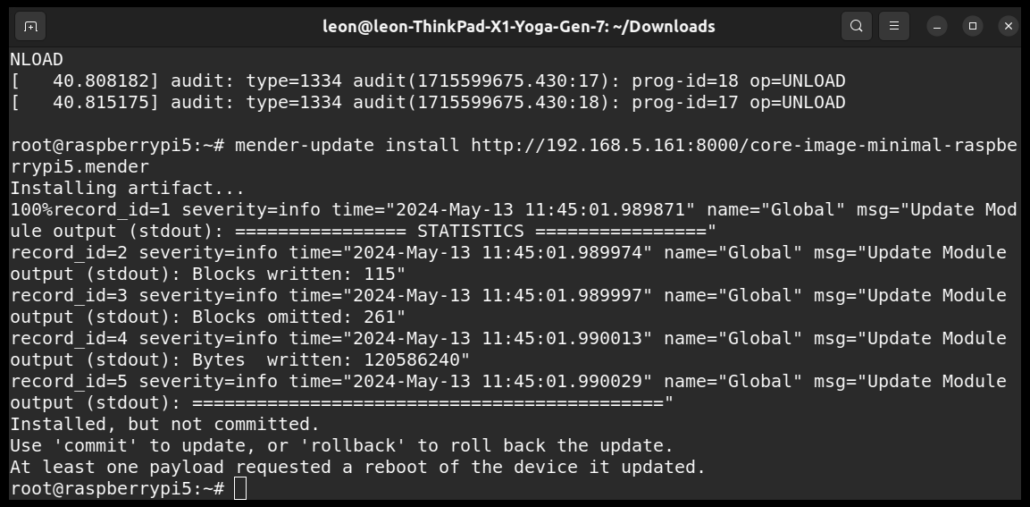
root on Raspberry Pi 5 and install the Mender Artifact to perform an upgrade of the device:mender-update install http://<server>:8000/core-image-minimal-raspberrypi5.mender
NOTE: Replace <server> with the IP address of the machine on which the Python3 HTTP server is running.
reboot
root on Raspberry Pi 5 and verify that nano text editor has been installed.
mender-update commit
This straightforward example showcases the seamless integration of Mender with Raspberry Pi 5 using the Yocto Project release Scarthgap. You can follow up and manage updates of fleets of Raspberry Pi 5 devices through the Mender server. Additionally, Mender offers convenient add-ons for remote troubleshooting, ensuring smooth operations in the field.
Since the earliest days of the OpenEmbedded build framework and the Yocto Project, Konsulko engineers have been active contributors to the community, aiding customers in crafting commercial products using these technologies. Our expertise extends beyond Mender, encompassing various open-source solutions for software updates. Feel free to get in touch to explore how we can assist with your embedded product requirements.
Integrity Measurement Architecture (IMA-measurement) is a subsystem in the Linux kernel designed to provide a framework for maintaining the integrity of files on a system. The primary purpose of IMA is to ensure that only trusted code and data are executed on a system and that the integrity of critical system components is maintained.
IMA was merged into the mainline Linux kernel in 2004 with the release of version 2.6.30. It evolved over time, adding features such as TPM integration, extended support, and continued maintenance, becoming a key component for ensuring the integrity of files in Linux-based systems. IMA works by calculating cryptographic hashes of files at various points in their lifecycle, such as when they are accessed, executed, or modified.
This article shares the exacts steps to build a minimal Linux distribution with IMA support for QEMU x86-64 using the Yocto Project and OpenEmbedded. The Yocto Project is an open-source collaboration project that enables developers to create lightweight, optimized, and customizable Linux distributions for embedded devices while maintaining control over the software components and configurations included in the system. To enable IMA, we use Yocto/OpenEmbedded layers meta-security and meta-integrity. These layers offer a comprehensive suite of security tools and hardening utilities designed for Linux kernels, along with libraries that facilitate the implementation of robust security mechanisms.
Recently Leon Anavi, Konsulko Group Senior Engineer, contributed a couple of patches to the upstream of meta-security/meta-integrity to simplify using integrity-image-minimal. This is a small image provided as an example to demonstrate IMA support.
The following steps outline the process of building an image with Integrity Measurement Architecture (IMA) using the Yocto Project and OpenEmbedded. This demonstration uses the default debug keys provided in the “data” directory of layer meta-integrity. Because everyone has access to these private keys, for devices in production you must create your own private keys and use them instead. Enabling the audit kernel subsystem provides additional informational integrity auditing messages useful for debugging any appraisal issues that may arise during the development process.
Kindly be aware that this article utilizes source code derived from the primary branches of associated Yocto/OE layers. Consequently, we are selecting specific git commits that have been confirmed to function reliably. These commits will be part of the next long-term support (LTS) release of the Yocto Project which is version 5.0 with codename Scarthgap. It is scheduled for release in April 2024 and will be supported for 4 years until April 2028.
git clone git://git.yoctoproject.org/poky poky-qemu
cd poky-qemu
git checkout e31be0b0e6ed6855787ebfbacc15bdbf1b9e511c
git clone git://git.yoctoproject.org/meta-security
cd meta-security
git checkout 30e755c59204cbd64c3aa12e64ab33041f6f02c0q
git clone git://git.openembedded.org/meta-openembedded
cd meta-openembedded
git checkout 57db42741df341718b9bb4b1b8f20d2e2fcf7010
source oe-init-build-env
bitbake-layers add-layer ../meta-openembedded/meta-oe
bitbake-layers add-layer ../meta-security
bitbake-layers add-layer ../meta-security/meta-integrity
conf/local.conf:DISTRO_FEATURES:append = " integrity ima"
IMAGE_CLASSES += "ima-evm-rootfs"
IMA_EVM_KEY_DIR = "${INTEGRITY_BASE}/data/debug-keys"
IMA_EVM_PRIVKEY = "${IMA_EVM_KEY_DIR}/privkey_ima.pem"
IMA_EVM_X509 = "${IMA_EVM_KEY_DIR}/x509_ima.der"
IMA_EVM_ROOT_CA = "${IMA_EVM_KEY_DIR}/ima-local-ca.pem"
IMA_EVM_POLICY = "${INTEGRITY_BASE}/recipes-security/ima_policy_hashed/files/ima_policy_hashed"
SRC_URI:append:pn-linux-yocto = " file://audit.cfg"
CORE_IMAGE_EXTRA_INSTALL += "auditd"
QB_KERNEL_CMDLINE_APPEND:remove:pn-integrity-image-minimal = "ima_policy=tcb ima_appraise=fix"
QB_KERNEL_CMDLINE_APPEND:append:pn-integrity-image-minimal = " ima_appraise=log ima_appraise_tcb integrity_audit=1"
bitbake integrity-image-minimal
After building the image, we can launch it. QEMU, short for Quick Emulator, is an open-source virtualization software that allows users to emulate various hardware platforms and run operating systems on different host systems. We will use it to run and test the image. By utilizing the “nographic” option, QEMU disables the video console, setting the console to “ttys0”. This feature is particularly beneficial when remotely accessing a build server over SSH. To verify the effectiveness of the appraisal process, attempt modifying a file, then confirm that the verification of the altered file subsequently fails.
runqemu nographic
/etc/hostname using evmctl:evmctl ima_verify /etc/hostname
The expected output should resemble:
Poky (Yocto Project Reference Distro) 4.3+snapshot-e31be0b0e6ed6855787ebfbacc15bdbf1b9e511c qemux86-64 /dev/ttyS0

qemux86-64 login: root
root@qemux86-64:~# evmctl ima_verify /etc/hostname
key 1: 6730eefd /etc/keys/x509_evm.der
/etc/hostname: verification is OK
/etc/hostname:echo test > /etc/hostname
/etc/hostname again:evmctl ima_verify /etc/hostname
Now the verification fails because the file has been modified. The anticipated output should be similar to:
root@qemux86-64:~# echo test > /etc/hostname
root@qemux86-64:~# evmctl ima_verify /etc/hostname
key 1: 6730eefd /etc/keys/x509_evm.der
/etc/hostname: verification failed: 0 ((null))
This simple example serves as a demonstration of how Linux IMA operates, using QEMU as a platform. However, to implement Linux IMA on real-world devices, Konsulko Group offers assistance with hardware bring-up and integration of the suitable Yocto/OE BSP (Board Support Package) layers.
Since the inception of OpenEmbedded and the Yocto Project, Konsulko engineers have actively contributed to the community and provided guidance for developing commercial products. We specialize in U-Boot, Linux kernel, RAUC, Mender, and various other open source projects for embedded Linux devices. Contact us to explore how Konsulko engineers can assist with your embedded product development endeavors.
Konsulko Group has made many upstream contributions to OTA (over-the-air) update solutions for embedded Linux devices. RAUC is a popular open source option as it has been meticulously developed with a keen emphasis on stability, security, and adaptability. Notably, RAUC seamlessly integrates with major build systems such as Yocto Project/OpenEmbedded, Buildroot, and PTXdist.
Functioning across diverse usage scenarios, one of RAUC’s elementary yet impactful functionalities is the A/B update mechanism. In this setup, two identical root filesystems, denoted as A and B, are maintained. The device boots from one of these, while the other serves as the target for updates.
Post-update completion, the bootloader directs the system to boot from the freshly updated partition during the subsequent system startup. RAUC incorporates the ‘verity’ update bundle format. It extends the capabilities of RAUC by introducing built-in support for HTTP(S) network streaming, adaptive delta-like updates, and comprehensive update bundle encryption.
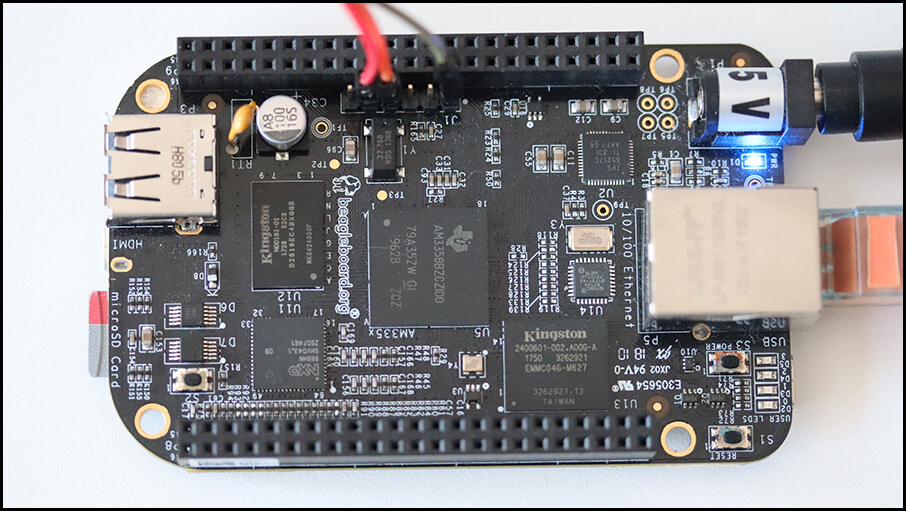
In previous blog posts, Konsulko Group engineers have demonstrated RAUC on Raspberry Pi and NXP devices such as SolidRun Cubox-i and HummingBoard. Recently Leon Anavi, Konsulko Group Senior Engineer and maintainer of meta-rauc-community ported RAUC to BeagleBone Black.
This article provides, as an example, the exact steps how to integrate RAUC with Yocto Project and OpenEmbedded for booting from a microSD card on BeagleBone Black.
Released in 2013, BeagleBone Black is a single-board computer (SBC) developed by the BeagleBoard.org Foundation. It was certified by the Open Source Hardware Association with OSHWA UID US000236. The chipset on BeagleBone Black is Texas Instruments Sitara AM3358 with 1GHz ARM Cortex-A8 CPU and SGX 3D graphics engine. Because of this the demonstrated integration is a suitable reference for other embedded devices equipped Texas Instruments chipsets.
The hardware used for this step by step tutorial is:
RAUC, a robust and powerful open-source solution, demands advanced skills for initial integration. In general, to incorporate RAUC in a Yocto Project and OpenEmbedded image for BeagleBone Black the following actions have to be performed:
Leon Anavi has already done all these actions for core-image-minimal in Yocto/OpenEmbedded layer meta-rauc-community/meta-rauc-beaglebone. The layer is available at GitHub. Please follow the steps below to build core-image-minimal for BeagleBone Black with it:
git clone -b kirkstone https://git.yoctoproject.org/poky poky-rauc-bbb
cd poky-rauc-bbbgit clone -b kirkstone https://github.com/rauc/meta-rauc.git
git clone -b kirkstone https://github.com/rauc/meta-rauc-community.git
nano which will be used for the demonstration:git clone -b kirkstone git://git.openembedded.org/meta-openembedded
Initialize the build environment:
source oe-init-build-env
conf/bblayers.conf:bitbake-layers add-layer ../meta-openembedded/meta-oe
bitbake-layers add-layer ../meta-rauc
bitbake-layers add-layer ../meta-rauc-community/meta-rauc-beaglebone
conf/local.conf by appending the following configurations to the end of the file:MACHINE = "beaglebone-yocto"
# Use systemd as init manager
INIT_MANAGER = "systemd"
# Add RAUC to the image
IMAGE_INSTALL:append = " rauc"
DISTRO_FEATURES:append = " rauc"
bitbake core-image-minimal
The image creation process from scratch is time-consuming, encompassing various Yocto/OpenEmbedded recipes and configurations. Kindly await completion as bitbake diligently executes each tasks.
tmp/deploy/images/beaglebone-yocto/core-image-minimal-beaglebone-yocto.wic.xz to microSD card.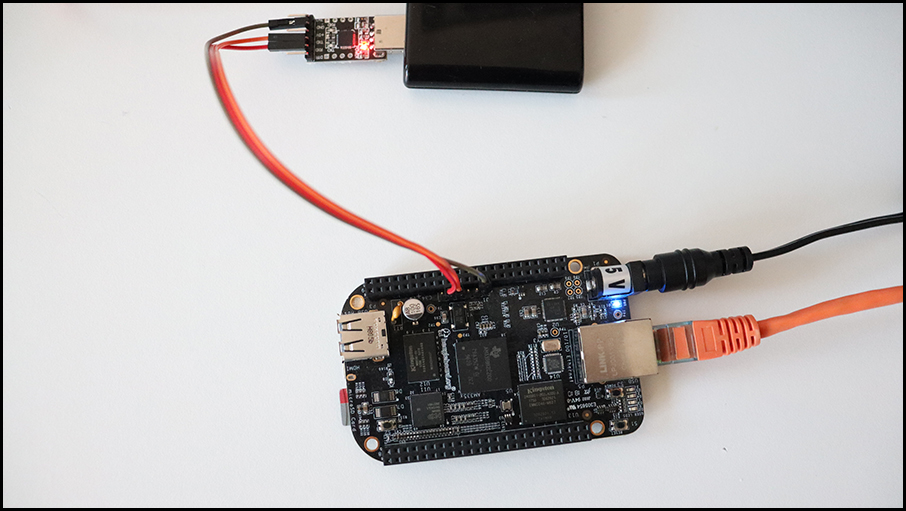
Press and hold button S2 while plugging in the 5V DC power supply to turn on BeagleBone Black and boot from microSD card.
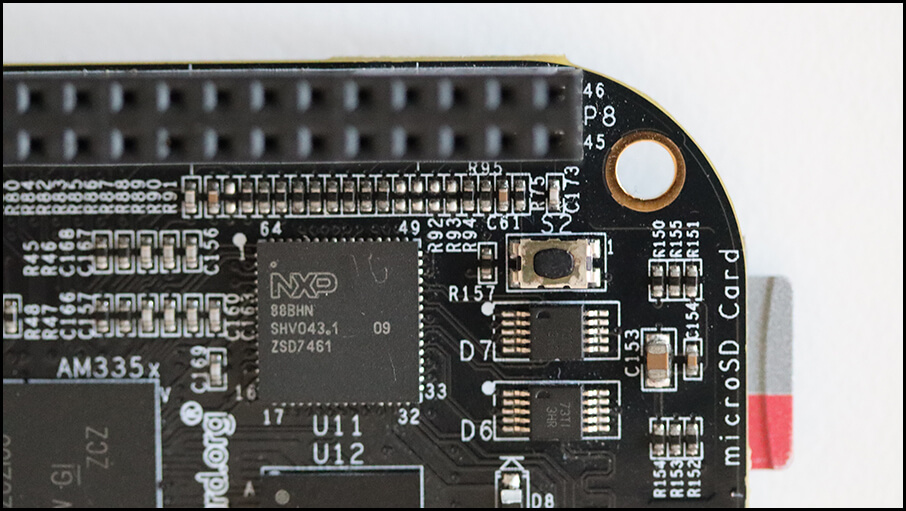
BeagleBone black board has an onboard button labeled as S2. It is situated near the microSD card slot. Press and hold it while powering the board to boot from microSD card.
root without a password and check RAUC status:rauc status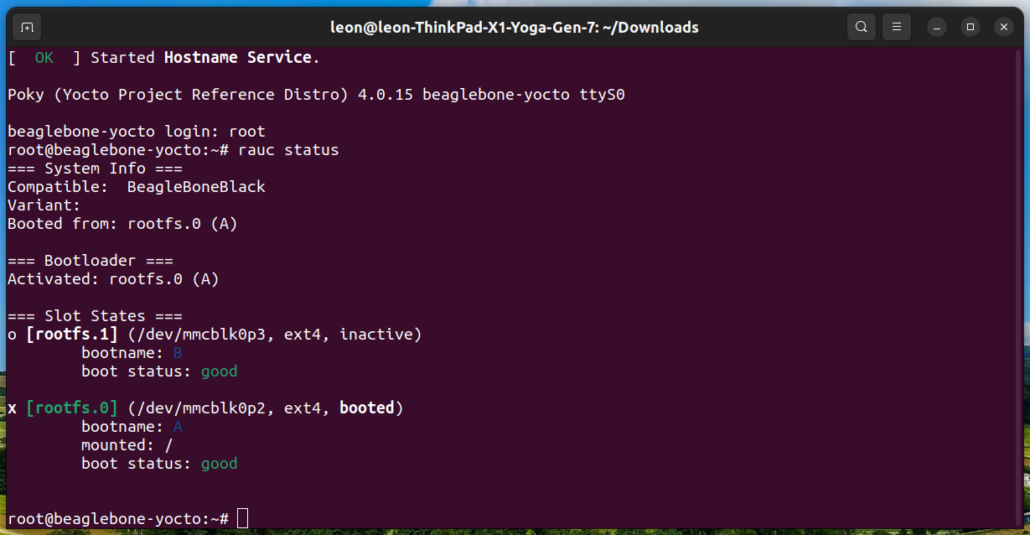
On the screenshot BeagleBone Black has been booted from RAUC slot rootfs.0 (A) on the microSD card.
NOTE: The meta-rauc-beaglebone layer includes a core-image-minimal.bbappend file, housing essential configurations for RAUC functionality. Apply these configurations similarly to other images intended for use in your embedded Linux device.
A RAUC update bundle comprises the file system image(s) or archive(s) designated for system installation, accompanied by a manifest detailing the images for installation, encompassing options and meta-information. Additionally, it may include scripts designated for execution before, during or after the installation process. To sign and verify the update bundles RAUC uses SSL keys. Layer meta-rauc-beaglebone contains a keyring containing all keys and a recipe for a simple RAUC update bundle for demonstration purposes only.
Follow the steps below to create RAUC update bundle that extends the system by adding the popular text based editor nano:
conf/local.conf:IMAGE_INSTALL:append = " nano"
bitbake update-bundle
Following a successful execution, bitbake will produce the update-bundle-beaglebone-yocto.raucb file.
Follow the steps below to update core-image-minimal running from a microSD card on BeagleBone Black:
update-bundle-beaglebone-yocto.raucb) is available and within the same network as BeagleBone Black, for example:cd tmp/deploy/images/beaglebone-yocto/
pip3 install --user rangehttpserver
python3 -m RangeHTTPServer
<IP> with the actual IP address of the computer on which the HTTP server is running and execute the following command to install the update:rauc install http://<IP>:8000/update-bundle-beaglebone-yocto.raucb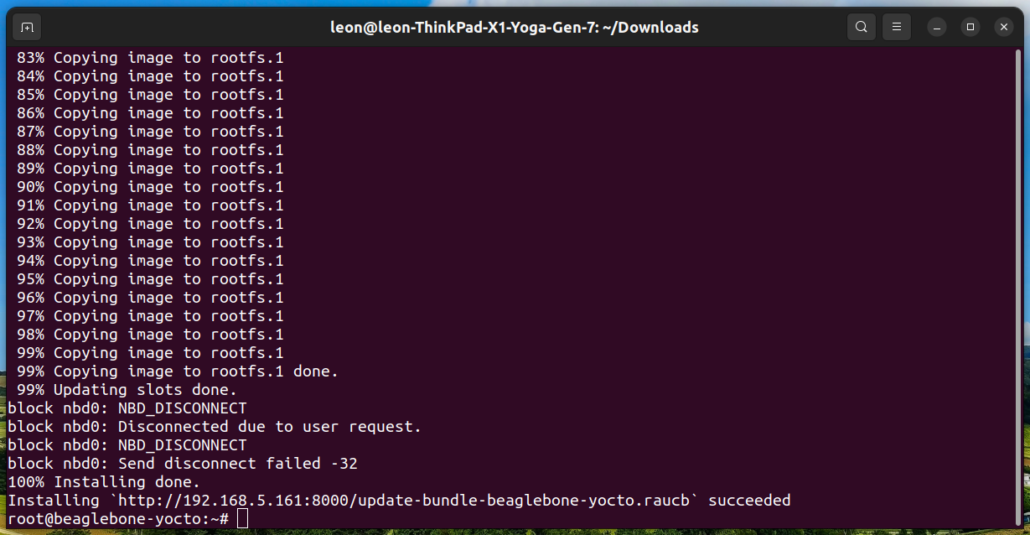
The screenshot show successful installation of the RAUC updated bundle on BeagleBone Black.
reboot
NOTE: As alternative, instead of using an HTTP server, you can transfer the update bundle to BeagleBone Black and install it from local storage.
nano was added to the system:which nano
rauc status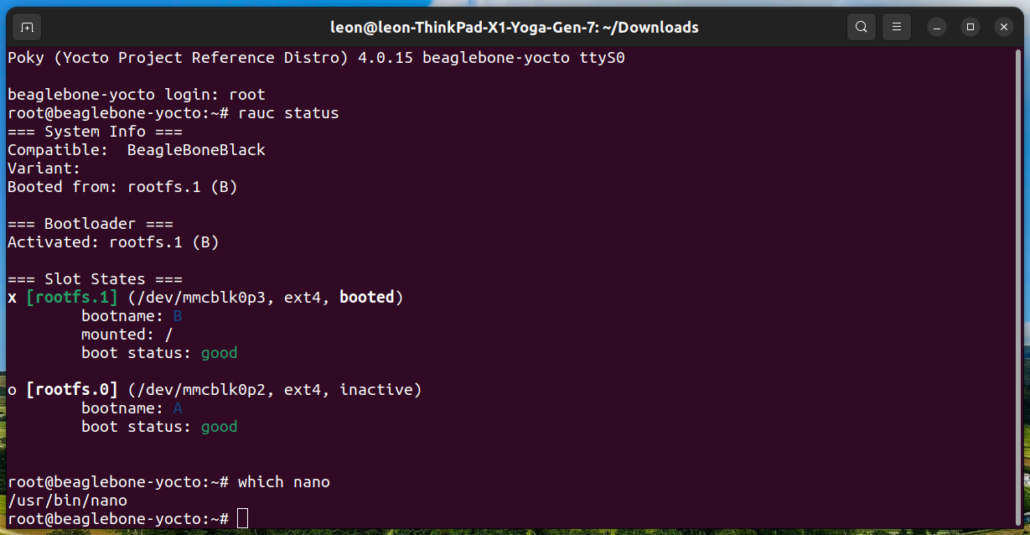
On the screenshot, after sucessful installation of the RAUC update bundle, BeagleBone Black has been booted from RAUC slot rootfs.1 (B) on the microSD card. This slot contains nano.
In real-world product development, the Yocto Project and OpenEmbedded workflow can be enhanced with a few commands for easy implementation of continuous integration (CI).
From the dawn of OpenEmbedded and the Yocto Project, Konsulko engineers have been community contributors and guides for crafting commercial products. Our expertise spans RAUC, Mender, and various open-source solutions for top-notch software updates. Please get in touch with us to discuss how Konsulko engineers can help your own embedded product development.