Konsulko engineers will be giving two talks at Embedded Open Source Summit (EOSS), a new Linux Foundation umbrella event held in Prague, Czech Republic, June 27-30, 2023. Attending virtually is also an option. Incorporated into EOSS are the Embedded Linux Conference (ELC) and the Automotive Linux Summit Europe (ALS).
The Vehicle Signal Specification (VSS) has been included in the AGL UCB by incorporating the KUKSA.val project. Scott will provide an update on the work done for the upcoming Prickly Pike UCB release.
The meta-tegra BSP layer supports the NVIDIA Jetson family of systems-on-module and has an active OpenEmbedded for Tegra community. Tim and Ilies will discuss changes in the latest SDKs including the bootloader and the trusted OS, and how these affect secure boot and disk encryption implementations. They will also discuss changes needed to support over the air updates and cover how the community keeps up with upstream Open Embedded/Yocto Project changes, as well as the roadmap for support for future Jetson platforms and Yocto Project releases.
Please join Scott, Tim, and a good-sized contingent of our engineers in Prague (or virtually). Register here.
https://www.konsulko.com/wp-content/uploads/2023/06/EOSS-1.png11971196Konsulko Grouphttps://www.konsulko.com/wp-content/uploads/2021/03/KonsulkoGroup-fullcolorlogo-340x156-1.pngKonsulko Group2023-06-12 14:26:522023-09-27 08:47:05Konsulko Group to speak at EOSS / ELC / ALS in Prague
(This article was written by open source software enthusiast and Konsulko Group intern Atanas Bunchev, working with Konsulko Senior Engineer Leon Anavi.)
Konsulko Group often works with Mender.io to provide secure, risk tolerant and efficient Over-The-Air updates for any software on an embedded device. This includes both solutions for robust system updates as well as updates of single applications. Mender is compatible with any Linux based OS, including popular build systems such as Yocto Project/OpenEmbedded, Buildroot and OpenWrt.
Aside from OTA updates Mender also offers several add-ons. These are optional extensions that provide functionality for use cases beyond the core OTA updates features.
One such use case is remote troubleshooting. In practice deployed devices in the field are often hard to reach or retrieve. Troubleshooting individual devices becomes resource inefficient and in some cases they have to be replaced even when it’s just a small software or configuration issue. Our experience has shown in these situations Mender’s Add-ons have proven to be extremely useful.
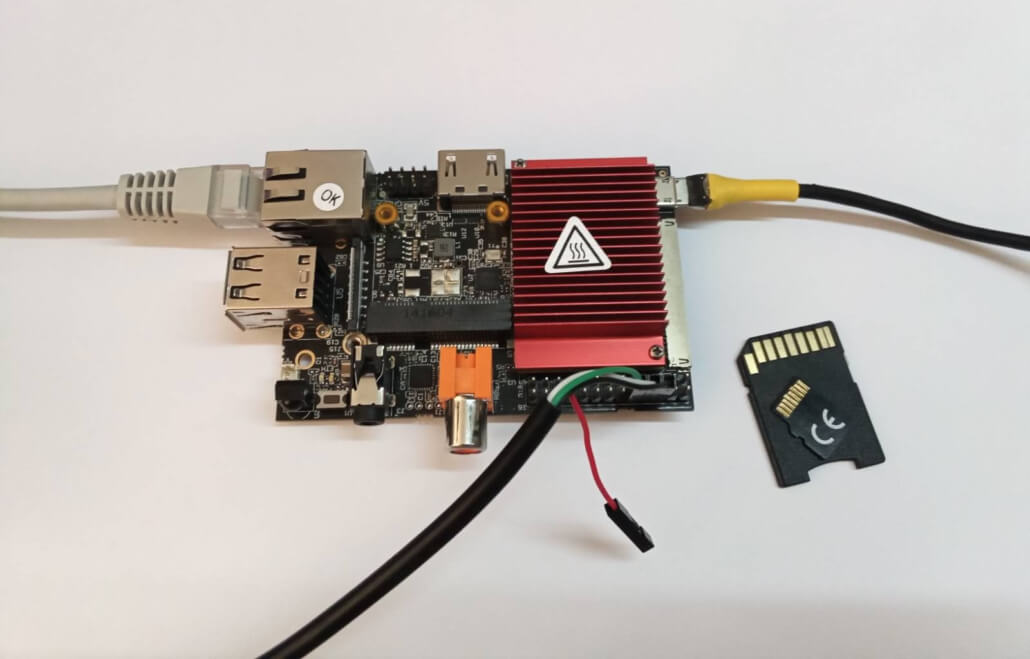
This article provides as an example, the exact steps how to integrate Mender with The Yocto Project and OpenEmbedded for SolidRun CuBox-I and HummingBoard as well as a demonstration of the Mender Troubleshooting package, more specifically the File Transfer and Remote Terminal Add-ons. With the File Transfer add-on files can be downloaded and uploaded to any accepted device. Remote Terminal add-on allows remote interactive command execution from the Mender UI.
These add-ons are very valuable for system administration and mantainance of Internet of Things or fleets of connected industrial devices. For an example, we will troubleshoot an embedded Linux device remotely with systemd using Mender add-ons. We will upload tools to gather system boot-up performance statistics, run them on the device thanks to the Remote Terminal and download logs for further debugging.
Generic RJ45 network cable with Internet connection
Optionally UART to USB adapter for debugging the setup section
Building a Linux Distribution with Yocto/OpenEmbedded
The Mender Community provides a set of examples for integration with various hardware platforms using Yocto/OpenEmbedded in the meta-mender-community repository. Sub-layer meta-mender-nxp in this repository contains the integration for Cubox-I/HummingBoard.
The meta-mender-nxp layer uses Google Repo to provide easy and simple setup and build process for the examples:
To configure the build system we have to append to conf/local.conf inside the build directory.
First we are going to set the build target machine:
MACHINE = "cubox-i"
Then we have to accept the end user agreement required by the BSP layer:
ACCEPT_FSL_EULA = "1"
Note:Usually to enable Mender’s Troubleshooting features we have to add mender-connecttoIMAGE_INSTALL. In our case this is already added by the meta-mender-demo layer.
Mender configuration
We have to provide our device with MENDER_SERVER_URL and MENDER_TENANT_TOKEN. For that reason we have to register at https://mender.io/.
Mender provides a free demo profile with limitation of 1 year and up to 10 devices which can be used to experiment with all of Mender’s features.
In fact, when sourcing the setup-environment script we get most of the mender-specific configuration appended to local.conf. This includes a description of how to get our tenant token:
# Build for Hosted Mender
#
# To get your tenant token:
#    - log in to https://hosted.mender.io
#    - click your email at the top right and then "My organization"
#    - press the "COPY TO CLIPBOARD"
#    - assign content of clipboard to MENDER_TENANT_TOKEN
#
#MENDER_SERVER_URL = "https://hosted.mender.io"
#MENDER_TENANT_TOKEN = ""
Note:If using the European server one has to setMENDER_SERVER_URL = "https://eu.hosted.mender.io"
Once we assign our tenant token and remove the # in front of MENDER_SERVER_URL and MENDER_TENANT_TOKEN we’re ready to build our system.
Building and flashing the system image to a microSD card
Build an example image with Yocto:
$ bitbake core-image-base
Building an image from scratch is a long process involving a lot of tasks. Please patiently wait until bitbake completes all tasks.
Once the build is complete flash the image to the microSD card (replace /dev/sdX with the proper device path) and boot it on the HummingBoard:
Once the board finishes booting it will poll the Mender server. By design the connection has to be established from the board to the server. Mender does not open any ports on the board to provide better security therefore the device has to initiate the connection.
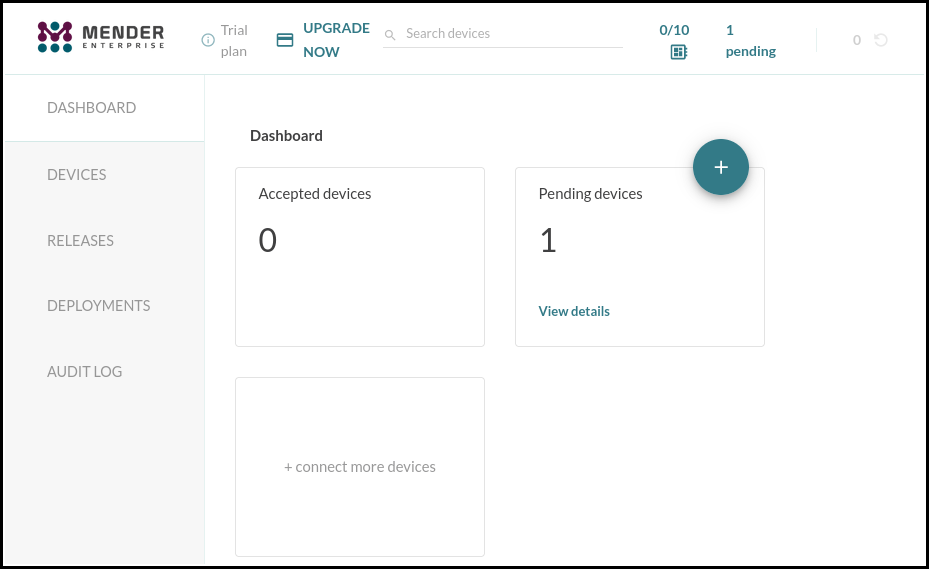
When the connection is established the Mender control panel will indicate one pending device.
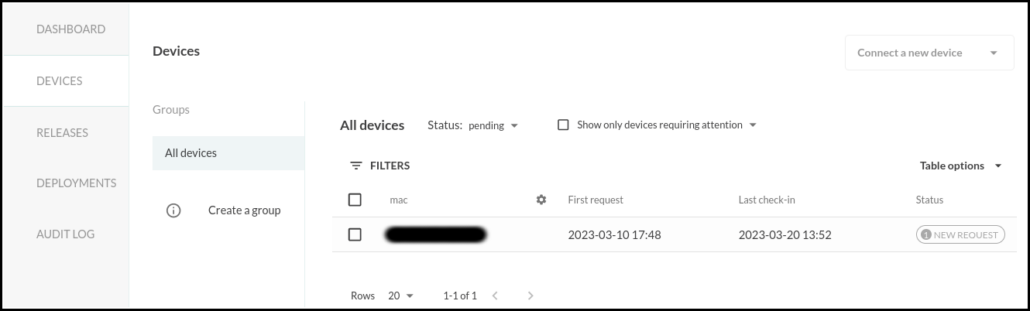
To accept the request click on View details under Pending devices.
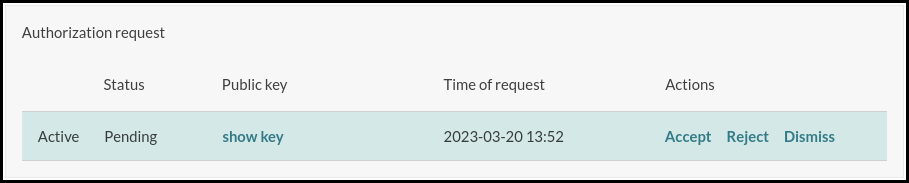
Select the new device and press accept in the Authorization request section.
Once the connection is accepted head over to the Troubleshooting tab in the Device information section. Here you can launch a remote terminal and transfer files.
The next part of the article will demonstrate preparing, uploading and using systemd-analyze to fetch data about the boot process.
Preparing troubleshooting software
To compile systemd-analyze we have to add it to our image in conf/local.conf:
IMAGE_INSTALL:append = " systemd-analyze"
Rebuild systemd to get the systemd-analyze binary:
$ bitbake systemd -c compile
When using the do_compile command Yocto/OpenEmbedded will preserve the compiled binaries.
Find the systemd-analyze binary and libsystemd-shared-<version>.so shared library:
Note:As of the time of writing of this article these files should reside in locations similar to./tmp/work/cortexa9t2hf-neon-poky-linux-gnueabi/systemd/1_250.5-r0/build/systemd-analyze and ./tmp/work/cortexa9t2hf-neon-poky-linux-gnueabi/systemd/1_250.5-r0/build/src/shared/libsystemd-shared-250.so. These paths depend on the exact version of systemd as well as the build configuration and may not be correct in your case.
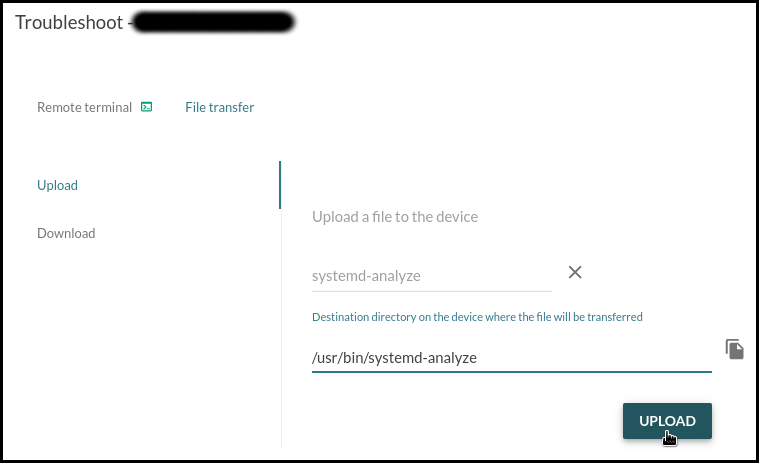
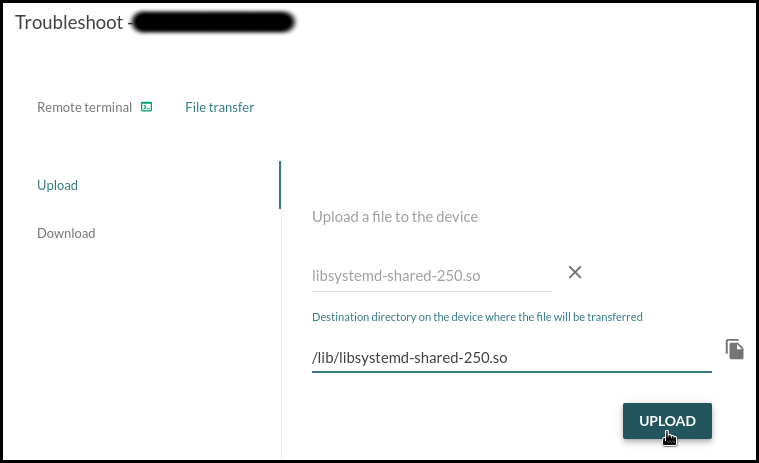
Uploading the troubleshooting software
Upload these files to the board using Mender’s File Transfer utility:
systemd-analyze into /usr/bin/
libsystemd-shared-<version>.so into /usr/lib/
Fetching service initialization logs
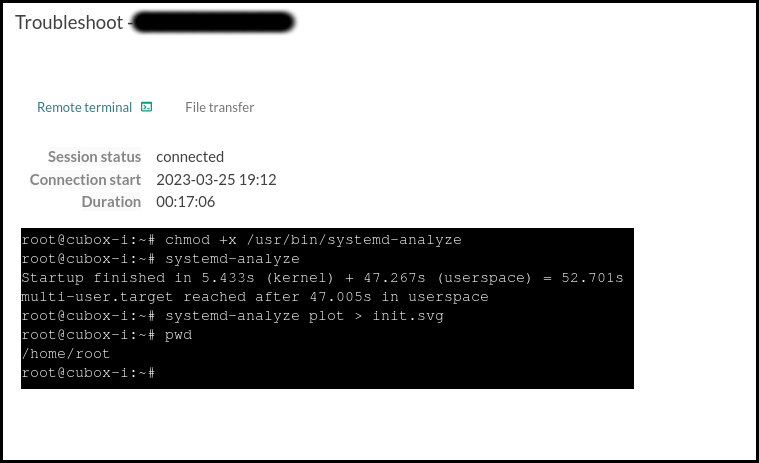
Once the troubleshooting software is uploaded we can use the Remote Terminal to execute it.
Permit execution of the systemd-analyze binary:
# chmod +x /usr/bin/systemd-analyze
Check the time it took for the system to initialize:
# systemd-analyze
Export a graphic of all enabled services and the time they took to initialize:
# systemd-analyze plot > init.svg
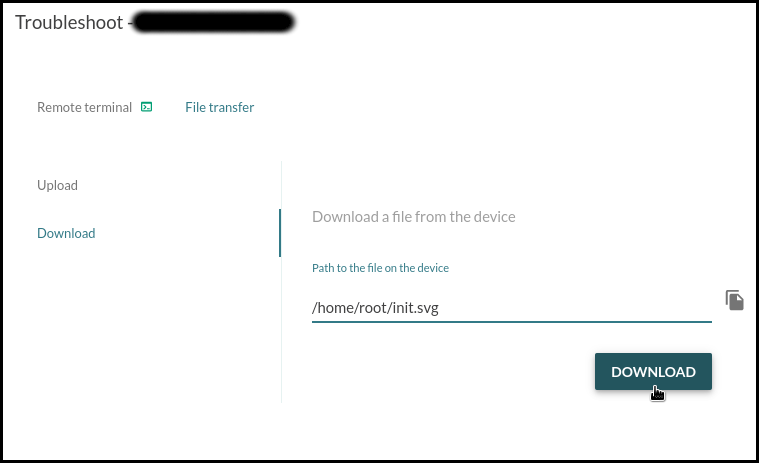
Download init.svg:
This graphic shows that the device needs around a minute to reach multi-user.target. The longest task is the resizing of the /data partition that runs on first boot and the second longest is the filesystem check for mmcblk1p1 that runs every time the system boots.
Here is another graphic generated after a reboot:
This article demonstrates how to use Mender’s Remote terminal and File Transfer troubleshooting utilities to upload and execute the systemd-analyze binary to profile the initialization process of systemd services. These troubleshooting utilities can be used for variety of different tasks. After debugging a single device and finding an appropriate fix, Mender is capable of performing an A/B or delta software update to all devices or specific group of devices in the field.
Since the earliest days of the OpenEmbedded build framework and the Yocto Project, Konsulko engineers have been contributing to the community and helping customers build commercial products with these technologies. We have experience with RAUC, Mender and other open source solutions for software updates. Please contact us to discuss your own embedded product needs.
https://www.konsulko.com/wp-content/uploads/2023/04/mender-add-ons-graphic.png798798Konsulko Grouphttps://www.konsulko.com/wp-content/uploads/2021/03/KonsulkoGroup-fullcolorlogo-340x156-1.pngKonsulko Group2023-04-03 10:50:122023-05-01 10:51:41Mender Add-ons: Remote Troubleshooting Devices in the Field
(This article was written by open source software enthusiast and Konsulko Group intern Atanas Bunchev, working with Konsulko Senior Engineer Leon Anavi.)
RAUC is one of the popular solutions that provide OTA (over-the-air) updates for Embedded Linux devices. RAUC is developed with focus on stability, security and flexibility and is compatible with all popular build systems: The Yocto Project/OpenEmbedded, Buildroot and PTXdist.
RAUC is capable of covering various use cases the most simple one being A/B updates.
The A/B updates scenario consists of having 2 identical root filesystems (named A and B), booting from one of them and performing the update on the other. After the update is complete the bootloader will boot from the updated partition on the next system boot. Recently the ‘verity’ update bundle format was introduced in RAUC. This new groundbreaking feature improves the verification process and most importantly allows extending RAUC by built-in HTTP(S) network streaming support, adaptive delta-like updates, and full update bundle encryption.
This article provides an example for setting up RAUC for A/B updates scenario on a HummingBoard board. The hardware used for the example is:
HummingBoard Pro board
32GB microSD card
UART to USB adapter
RAUC is a robust, powerful and flexible open source solution that requires advanced skills for initial integration. To use RAUC in an image built with the Yocto Project and OpenEmbedded for CuBox-I/HummingBoard one needs to:
Use U-Boot as a bootloader
Enable SquashFS in the Linux kernel configuration
Use ext4 root file system
Design specific storage partitioning for the certain use case and configure RAUC accordingly
Provide a custom U-Boot script to properly switch between RAUC slots
Prepare a certificate and keyring to use for signing and verifying RAUC update bundles.
Building a Linux Distribution with RAUC
I’ve recently contributed to meta-rauc-community, a repository containing minimal RAUC example layers for Yocto/OpenEmbedded.
The following steps will show how to use the meta-rauc-nxp layer from that repository to build and update a minimal Linux distribution. The update will install nano (the text editor) to the system.
Download the reference Yocto distribution, Poky. We’ll use the latest long term support version, kirkstone.
$ git clone -b kirkstone https://git.yoctoproject.org/poky
$ cd poky
Adjust conf/local.conf by adding the following configurations to the end of the file:
# HummingBoard specifications are very similar to Cubox-I
MACHINE = "cubox-i"

# Accept end user agreement required by the BSP layer.
ACCEPT_FSL_EULA = "1"

# Use systemd as init manager
INIT_MANAGER = "systemd"

# Add RAUC to the image
IMAGE_INSTALL:append = " rauc"
DISTRO_FEATURES:append = " rauc"

# Generate ext4 image of the filesystem
IMAGE_FSTYPES:append = " ext4"

# Use the file containing the partition table specification
WKS_FILE = "sdimage-dual-cubox-i.wks.in"
WKS_FILES:prepend = "sdimage-dual-cubox-i.wks.in "

# Add 150 000 KBytes free space to the root filesystem
# (Adding software with updates require space.)
IMAGE_ROOTFS_EXTRA_SPACE:append = " + 150000"

# Add the boot script to the boot partition
IMAGE_BOOT_FILES:append = " boot.scr"
Note that whitespace inside quotes is intentional and important.
To sign and verify the update bundles RAUC uses SSL keys. A keyring containing all keys that will be used for update bundles needs to be installed on the target.
meta-rauc-community provides a script that would generate example keys and configure the current build environment accordingly. (The script has to be called after sourcing oe-init-build-env)
$ ../meta-rauc-community/create-example-keys.sh
Build a minimal bootable image:
$ bitbake core-image-minimal
Building an image from scratch is a long process involving a lot of tasks. Please patiently wait until bitbake completes all tasks.
It’s strongly recommended to zero-fill the u-boot environment sectors before flashing the image on the microSD card (replace /dev/sdX with the proper device path):
$ dd if=/dev/zero of=/dev/sdX seek=2032 count=16
After the build is done, flash the image to a microSD card (replace /dev/sdX with the proper device path) and boot it on the HummingBoard:
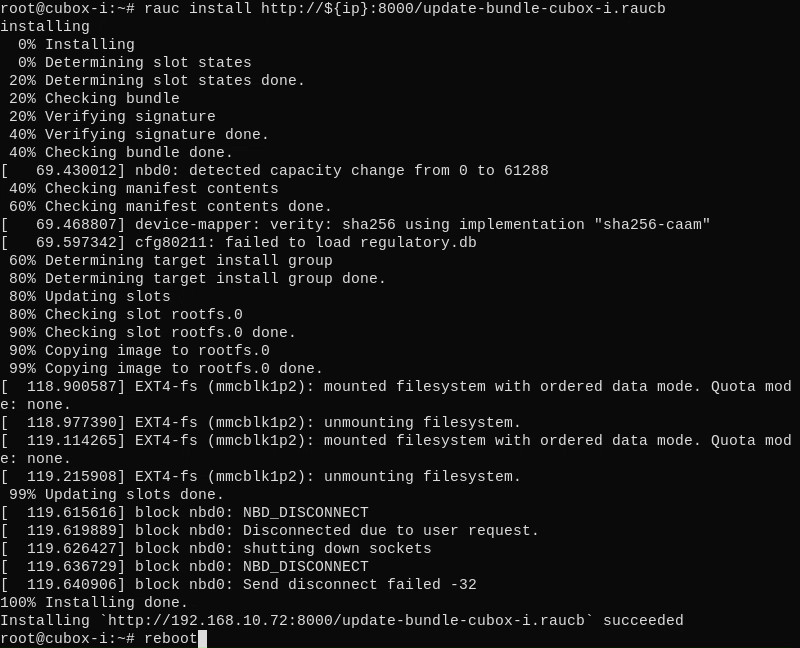
One of the latest RAUC features is the verity bundle format. This format allows updates to be done without storing the whole bundle on the device in advance, which is useful for devices with limited space. One of the requirements for this feature is hosting the bundle on a server that supports HTTP Range Requests.
As alternative, you can transfer the bundle to the device and install it from local storage.
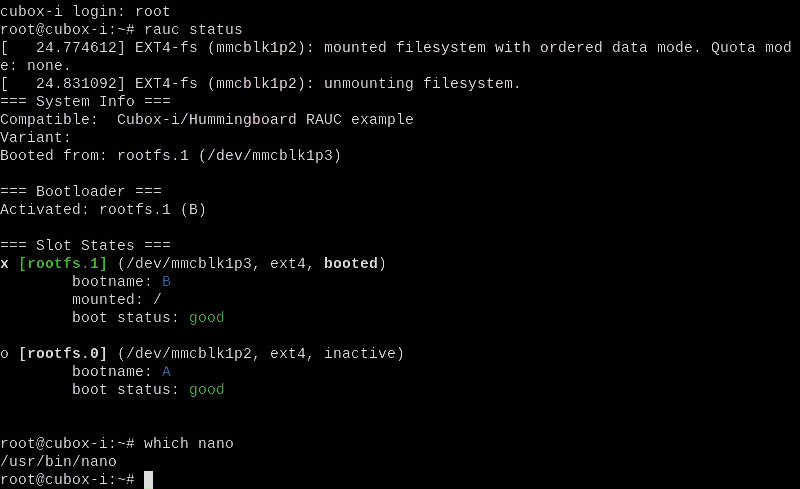
Verify that nano was added to the system:
# which nano
Check RAUC status to confirm the system have booted from the second partition:
# rauc status
For real-world products, this build procedure with the Yocto Project and OpenEmbedded can be optimized further with just a few commands for easy implementation of continuous integration (CI).
Since the earliest days of the OpenEmbedded build framework and Yocto Project, Konsulko engineers have been contributing to the community and helping customers build commercial products with these technologies. We have experience with RAUC, Mender and other open source solutions for software updates. Please contact us to discuss your own embedded product development.
https://www.konsulko.com/wp-content/uploads/2023/02/RAUC-Hummingboard-1.png16001600Konsulko Grouphttps://www.konsulko.com/wp-content/uploads/2021/03/KonsulkoGroup-fullcolorlogo-340x156-1.pngKonsulko Group2023-02-16 15:51:012023-05-01 10:52:03Setting up RAUC on CuBox-I/HummingBoard for Software Updates
Taking place February 4 & 5, 2023 in the beautiful city of Brussels (Belgium), FOSDEM is a two-day event organized by volunteers to promote the widespread use of free and open source software.
Leon’s tutorial provides the exact steps to build-from-scratch core-image-weston, setup RDP and remotely access the embedded device using wlfreerdp (for Wayland) or xfreerdp (for X11) from a personal computer with Linux in the same network. Examples will be based on the kirkstone long-term support release of Yocto Project.
Leon will also discuss the advantages and the disadvantages of RDP as well as some troubleshooting guidelines.
2022 went by quickly with Konsulko engineers working closely with our customers, our partners and the open source community. For the tenth straight year, Konsulko Group has helped our clients build outstanding commercial products with Embedded Linux, Yocto Project and OpenEmbedded, as well as deploying Over-the-Air (OTA) software updating.
We had particular success with our Konsulko Continuous Time Engagement™ offering, providing dedicated engineering resources for two of the world’s largest semiconductor companies. This model provides guaranteed engineering time for an agreed period. KCTE has allowed our customers to use our engineers on a variety of their requirements, and switch between these tasks as the rest of their project and in-house engineering required.
Of course, many of our clients prefer Konsulko OnDemand Time Engagement™, SOW-based engineering for high level consulting, on-demand support, and specific tasks within a larger project. KOTE is also best for longer term engagements without a hard deadline that can be stopped and started as necessary, and projects with an expected pause (such as bring-up of new hardware which almost always results in a re-spin of the PCB).
Partnerships and Conferences
We continue our strong relationship with the Linux Foundation and Automotive Grade Linux. We worked with mender.io and PHYTEC, providing support and development for their customers. With our friends at ICS, we presented at a joint webinar in August, Software Update Mechanisms: Selecting the Best Solution by Konsulko’s Leon Anavi and ICS’ Jeff Tranter.
Our Konsulko engineers were active participants (often in person, sometimes virtually) in conferences and developer gatherings. Leon Anavi, Vitaly and Maria Wool, and Tim Orling made presentations at the Embedded Linux Conferences (North America and Europe), FOSDEM and Yocto Project Summits:
The bar is pretty high for joining Konsulko Group. Some of our team have thirty years experience with embedded software and Linux. Most have over twenty and all have over fifteen years, working (and playing) with Linux and the open source community. So we were happy to welcome Denys Dmytriyenko and António Oliveira to Konsulko Group this year.
Denys is a long time Open Source Software developer, contributing code to many FOSS projects, like glibc, PostgreSQL, KDE, MythTV, LIRC, OpenEmbedded, and Yocto Project. Before joining Konsulko Group, he worked as Software Developer and Architect for Texas Instruments for almost 20 years on numerous Embedded Linux (MIPS and ARM-based) products. Since 2011 Denys has served on the OpenEmbedded Board of Directors, and since 2019, on the Yocto Project Technical Steering Committee. He is a long time contributor and maintainer of numerous recipes and layers in the OpenEmbedded/Yocto Project universe.
António has worked in development of highly optimized hardware and software ranging from deeply embedded microcontrollers to full-fledged graphical user interfaces. During this time, he has gained extensive experience in build automation tools, analog and digital circuits, powerline communications, and low power and low frequency radio communications. An active member of the open source community, he has contributed to Yocto Project and the Linux kernel. In addition to his work as an embedded engineer, António served eight years on the executive board of his local parish in Portugal, including four years on the municipal council.
We hope you will have the opportunity to work with Denys, António and the rest of Konsulko Group in 2023.
https://www.konsulko.com/wp-content/uploads/2022/11/2022-THE-YEAR-IN-REVIEW.png12001200Konsulko Grouphttps://www.konsulko.com/wp-content/uploads/2021/03/KonsulkoGroup-fullcolorlogo-340x156-1.pngKonsulko Group2022-12-13 12:26:162023-02-26 11:02:50Konsulko Group: The Year in Review 2022
Software Update Mechanisms: Selecting the Best Solution for Your Embedded Linux Device
August 18, 2022 at 1 pm EDT/7pm CET
Get the foundation you need to make an informed decision on the right solution for your software update needs. Leon Anavi of Konsulko Group and Jeff Tranter of ICS will examine several different industry approaches, including A/B updates with a dual-redundant scheme, delta updates, container-based updates and combined strategies, as well as the leading technologies that support these approaches.
You can find complete information and register here for the free webinar on the ICS website. Hope you’ll join us on August 18.
https://www.konsulko.com/wp-content/uploads/2022/07/ICS-Konsulko-Webinar-600x600-1.png600600Konsulko Grouphttps://www.konsulko.com/wp-content/uploads/2021/03/KonsulkoGroup-fullcolorlogo-340x156-1.pngKonsulko Group2022-07-18 12:19:062023-02-26 10:58:23Pick the Right Software Update Solution for Your Product
Better still, if you’d like to set up an appointment at the show to talk with us about your company’s embedded products and your software development requirements, please contact us to set up a meeting.
https://www.konsulko.com/wp-content/uploads/2022/05/GERMANFLAGEMBWLDRING.png13991399Konsulko Grouphttps://www.konsulko.com/wp-content/uploads/2021/03/KonsulkoGroup-fullcolorlogo-340x156-1.pngKonsulko Group2022-06-06 15:39:482022-06-06 15:39:49Join us at Embedded World in Nuremberg, June 21-23, 2022
This talk will look at the advantages and disadvantages of widely-used industry approaches: A/B updates with dual redundant scheme, delta updates, container-based updates and combined strategies. Open source technologies such as Mender, RAUC and libostree-based solutions implement these strategies and provide tools to manage updates of multiple devices. Leon will discuss how to choose an appropriate open source solution to implement for a specific project.
XIP stands for eXecute In Place, allowing code to be executed directly from flash without copying the code to RAM first, making it possible to run Linux on such RISC-V devices as Kendryte K210, which has only 8 MB of SRAM, not only for demonstration purposes but for real applications as well. This talk will cover running edge computing specifically on K210 under Linux with XIP enabled.
Part of Open Source Summit North America
These and many other excellent presentations at ELC are part of the Linux Foundation’s Open Source Summit. We hope you will join us in June.
https://www.konsulko.com/wp-content/uploads/2022/05/Austin3-copy.png10861086Konsulko Grouphttps://www.konsulko.com/wp-content/uploads/2021/03/KonsulkoGroup-fullcolorlogo-340x156-1.pngKonsulko Group2022-05-18 10:01:202022-12-26 08:11:14Konsulko Group speaking at Embedded Linux Conference Austin
At Konsulko Group, we’ve participated in the “virtual” developer conferences created out of necessity over the past couple of years. We eagerly awaited the return of the face-to-face meetings of the embedded community.
Our first opportunity was the Embedded Linux Conference in Seattle last September. Although major components were still virtual, those who where able to attend in person experienced the event “together“ in ways that even the best remote simulation cannot achieve.
So we are very much looking forward to ELC (part of Open Source Summit North America 2022) in Austin, Texas, and the return of Embedded World in Nuremberg, Germany. Unfortunately, the pandemic initially forced rescheduling of both. Now they will occur on exactly the same dates (starting June 21, 2022) half a world apart, making it impossible to attend both onsite.
Which conference should you attend?
Unless you live in Texas or Germany, choosing by geography may not be the best option. The conferences are very different.
ELC is the premier event for companies and developers using Linux in embedded products. It gathers the technical experts working on embedded systems and applications for education and collaboration, historically paving the way for transformation in these far reaching areas.
ELC is also always a good time.
For 20 years, Embedded World has combined
an exhibition for engineers and technical management, and
a world-leading conference at the intersection of applied research and industrial applications.
The trade show is massive, filling several halls, with many of Konsulko’s friends and partners exhibiting year after year. (If you go, be sure to stop by the Automotive Grade Linux stand in Hall 4.)
We hope to see you at one of these important events in June.
https://www.konsulko.com/wp-content/uploads/2022/03/Austin-Nuremberg-square.png11341134Konsulko Grouphttps://www.konsulko.com/wp-content/uploads/2021/03/KonsulkoGroup-fullcolorlogo-340x156-1.pngKonsulko Group2022-03-31 12:44:392022-03-31 12:48:46Embedded Linux engineers have a choice to make in June
Adding a feature to a linux-yocto based kernel is fairly well documented. This makes sense because it is the most common thing you might want to do: “My board needs support for this sensor added to our BSP.”
Konsulko Group recently helped a customer that had exactly the opposite problem, a standard feature in linux-intel (which includes linux-yocto.inc and inherits the kernel-yocto class) needed to be removed. The SoC (in the Intel™ “Bay Trail” family) and the off-the-shelf industrial PC had a problem. When USB 3.0 (xHCI) support is enabled, the default BIOS settings (xHCI Mode = Auto) would cause the system to lock-up upon either warm reboot or shutdown. Given that these systems are deeply embedded in the field—where simply “hooking up a display, keyboard and mouse” is cost prohibitive—we needed to find an option that would not prevent OTA updates.
You might think you could apply a patch via SRC_URI to kmeta (yocto-kernel-cache), but this isn’t supported in the Yocto Project kernel tooling. Instead we can apply kernel config fragments that disable the problematic xHCI feature. The trade off is that USB 3.x devices won’t be able to run at full speed, but the systems in question have no need for USB 3.0 (they are a classic IoT gateway use case).
Determining your existing kernel configuration
The first thing you want to do in this situation is determine what your (default) kernel configuration is. In our case, Konsulko and our customer are using the ‘dunfell’ (3.1.x) branch of meta-intel with MACHINE="intel-corei7-64". Upon building an image or the kernel (e.g. bitbake virtual/kernel or bitbake linux-intel), the kernel configuration can be found at the following path:
Where the kernel version is 5.4.170, the (shortened) git commit hash of the kernel cache is 98cce1c95f and the (shortened) git commit hash of the kernel source is 36f93ff941.
Modifying the kernel configuration with menuconfig
The documented way to modify the kernel configuration is with:
bitbake -c menuconfig linux-intel
This approach works fine, but you must remember to copy the resulting .config to defconfig in your recipe’s SRC_URI.
Alternatively you can create your kernel config fragments in the kernel build directory and then add them to your kernel recipe. The fragments can be created with the help of the diffconfig script in the kernel source tree.
Also note that you must have already run:
$ bitbake -c kernel_configme -f linux-intel
or previously built the kernel in order for the .config to be present.
Modifying the kernel configuration with devtool
It will come as no surprise that my preferred way to modify the kernel configuration is to run:
$ devtool menuconfig linux-intel
But you will get an error:
ERROR: No recipe named 'linux-intel' in your workspace
So first we must get the kernel recipe into our workspace:
$ devtool modify linux-intel
Now we are able to run:
$ devtool menuconfig linux-intel
One benefit of this approach is that devtool will run the required steps that need to happen before menuconfig can be run (most notably the do_kernel_configme task).
Determining the changes needed
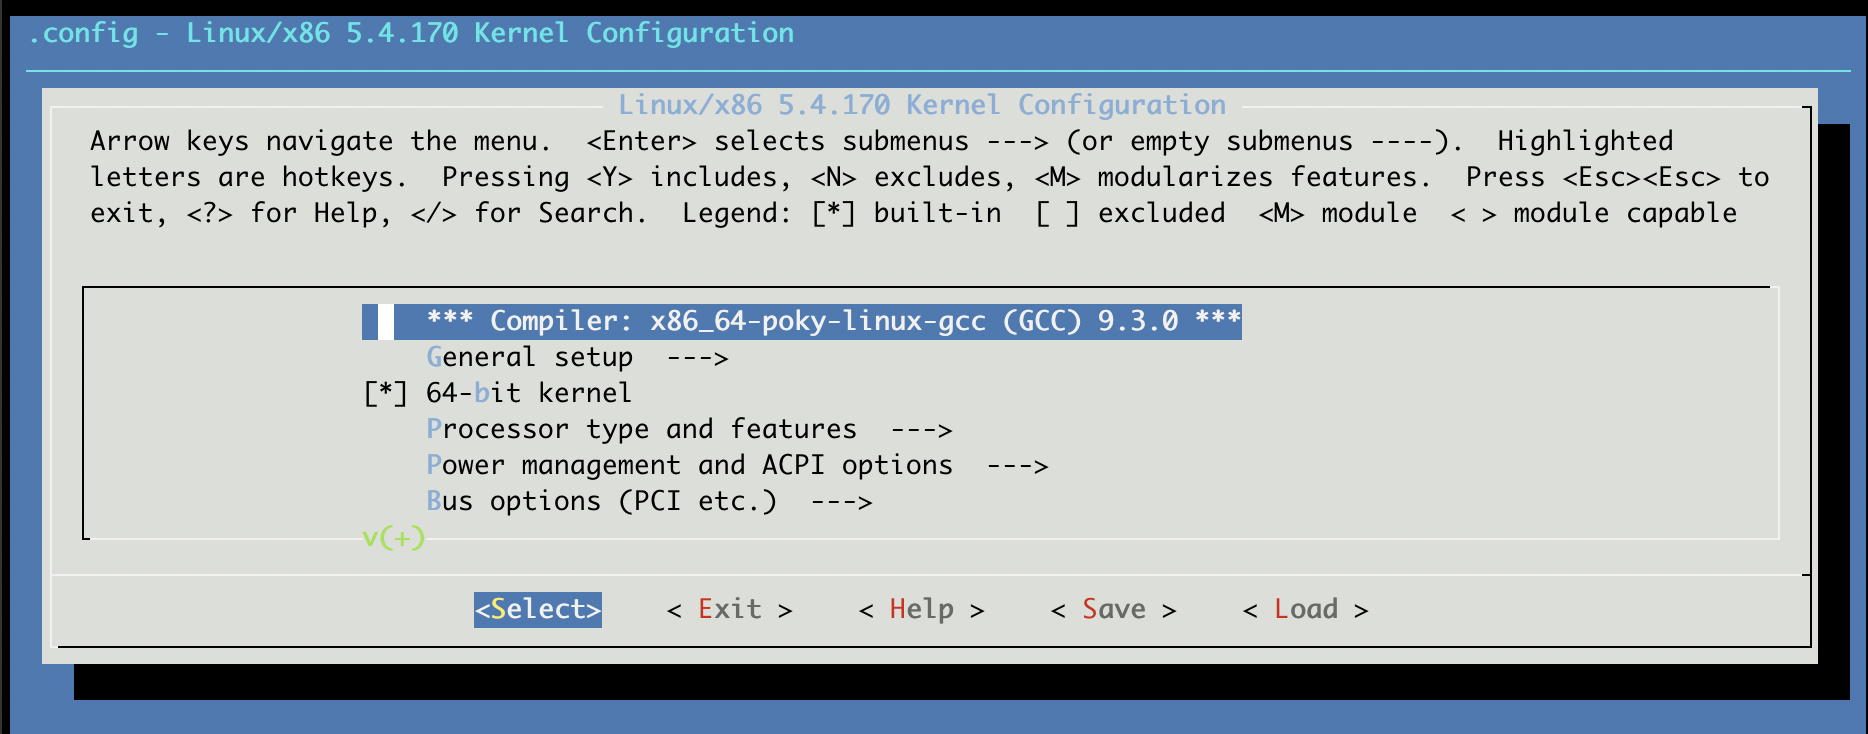
Regardless of which method you used to run menuconfig, you will now be presented with the text UI:
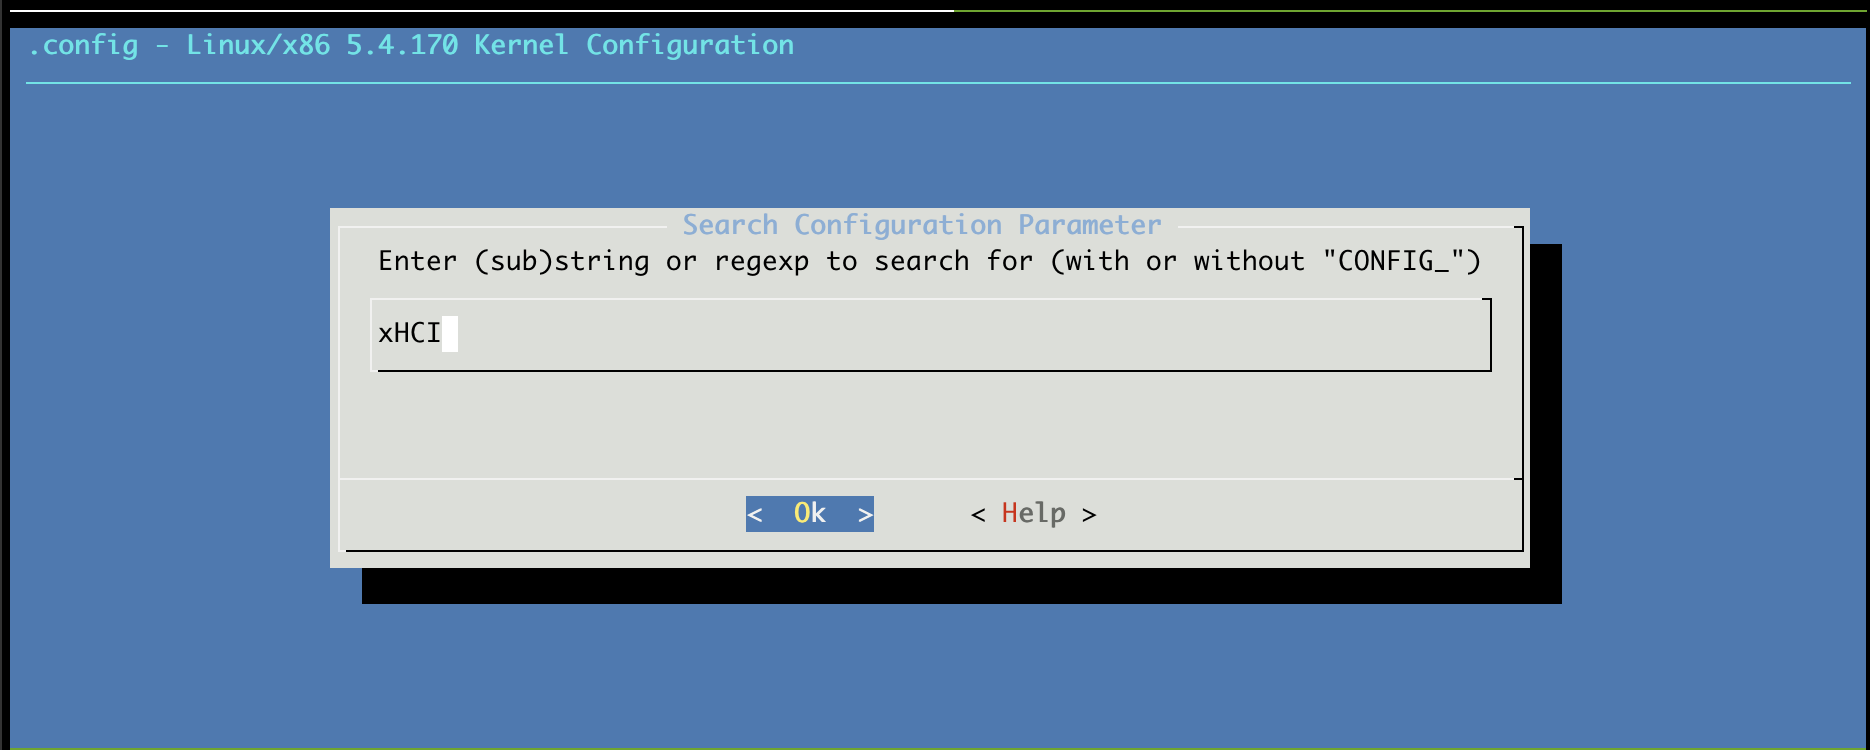
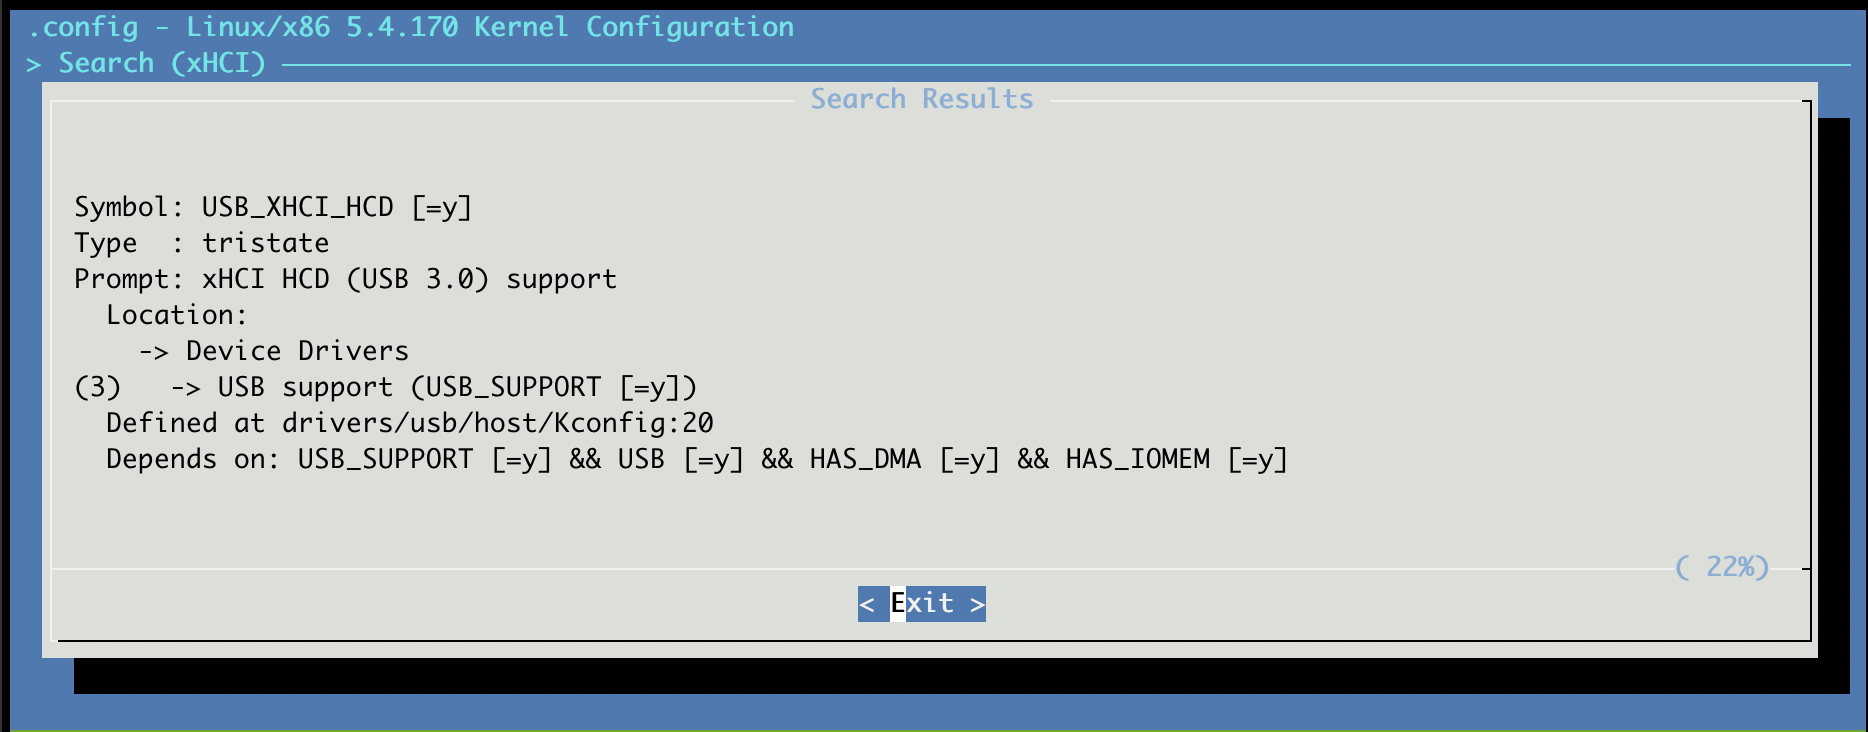
Since Konsulko and our customer already knew we needed to change the xHCI enablement, we can quickly </> for Search and then enter xHCI.
This gives us several results, but the ones that we care about have [=y](built-in) next to them:
CONFIG_USB_XHCI_HCD
CONFIG_USB_XHCI_PCI
CONFIG_USB_XHCI_PLATFORM
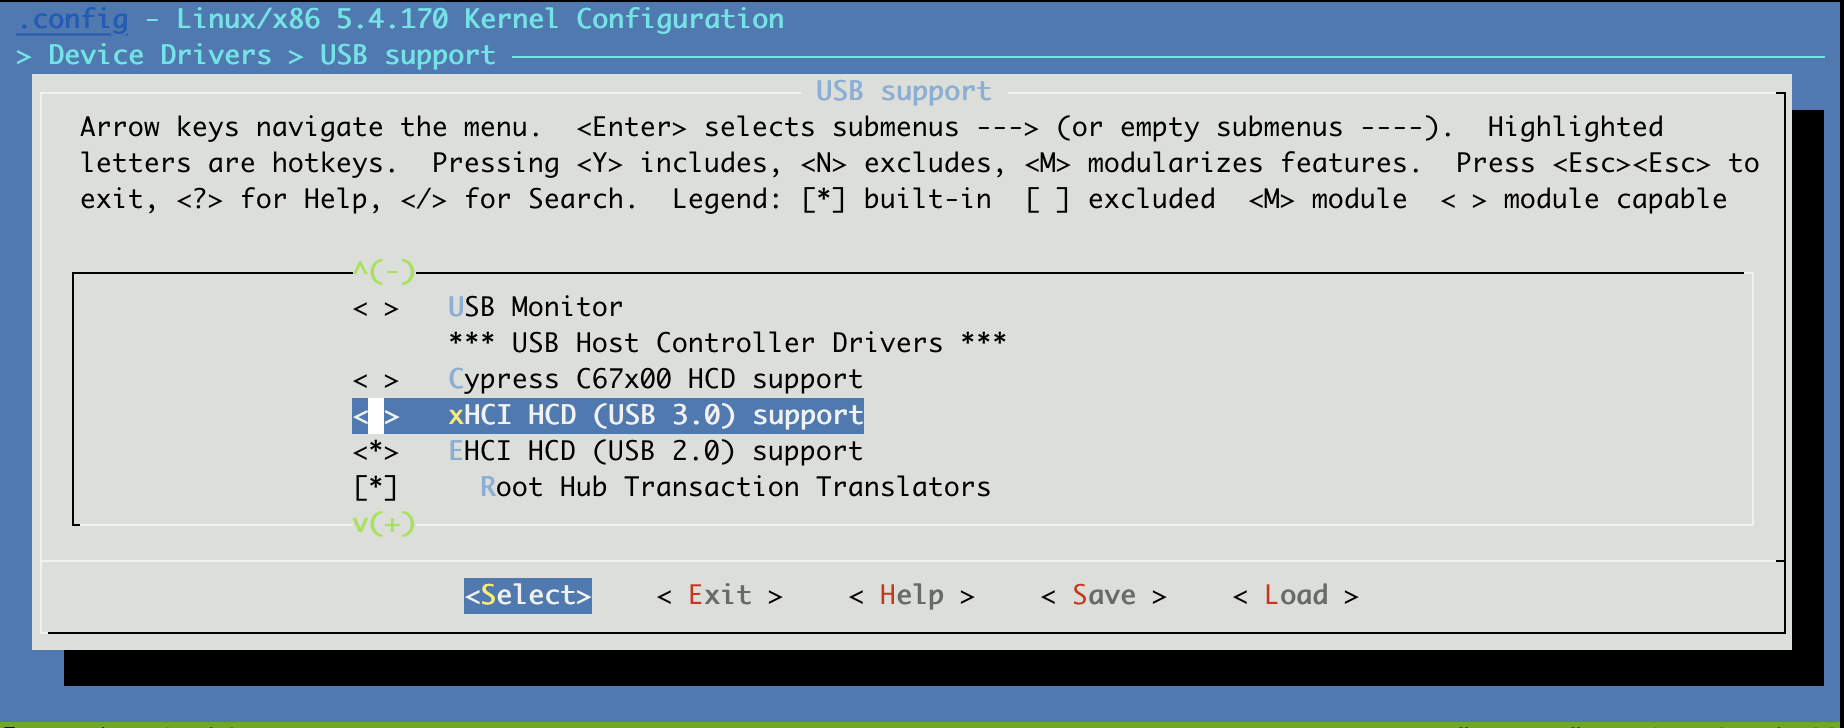
The top level item that needs to be disabled (set to N) is CONFIG_USB_XHCI_HCD:
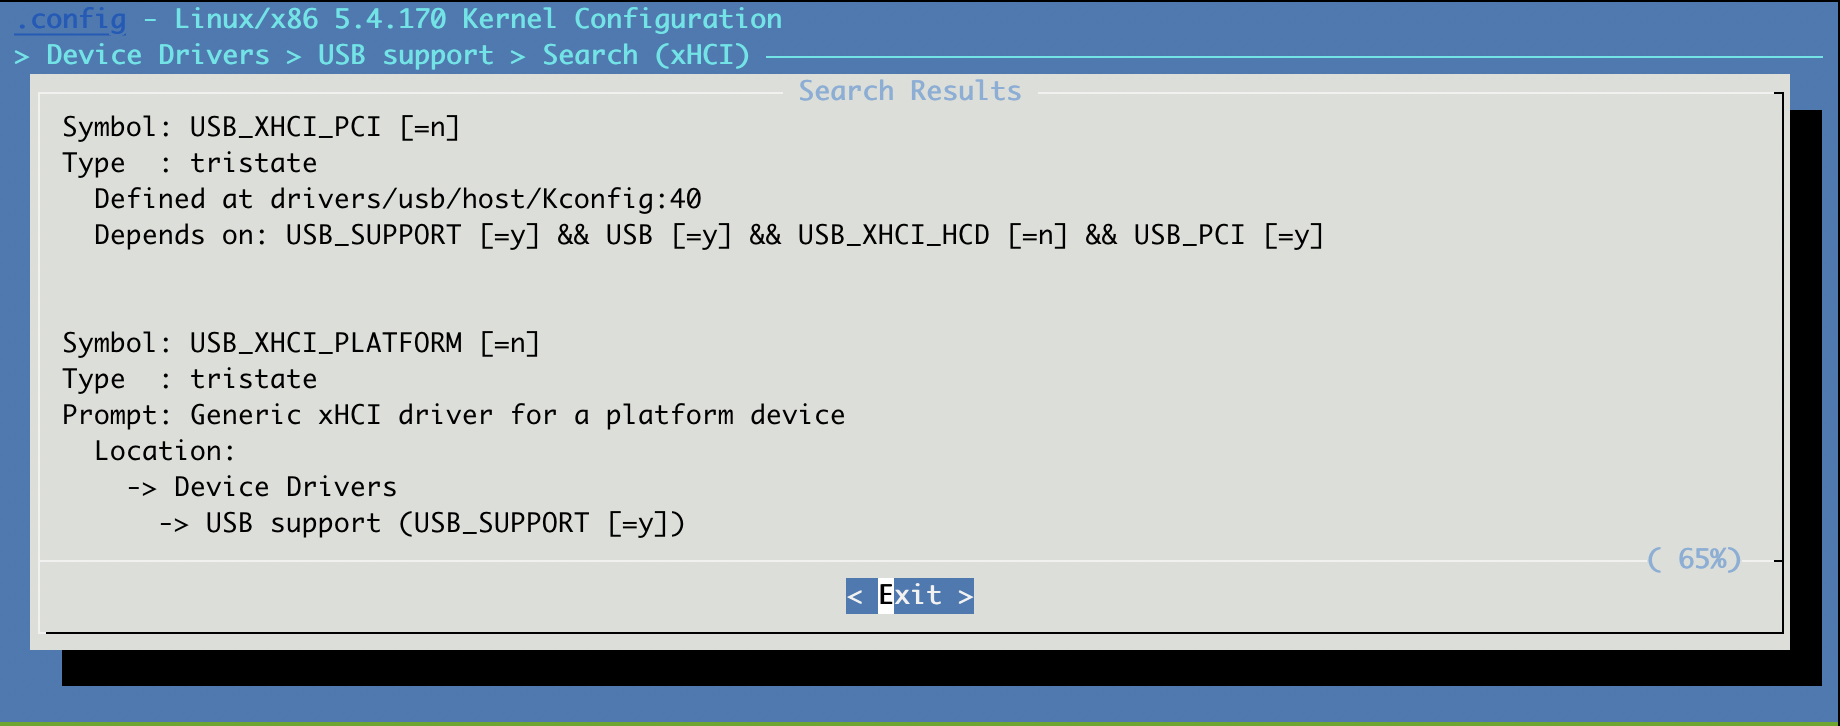
After this we can spot check the other values are also disabled (by using </> for Search again): CONFIG_USB_XHCI_PCI and CONFIG_USB_XHCI_PLATFORM:
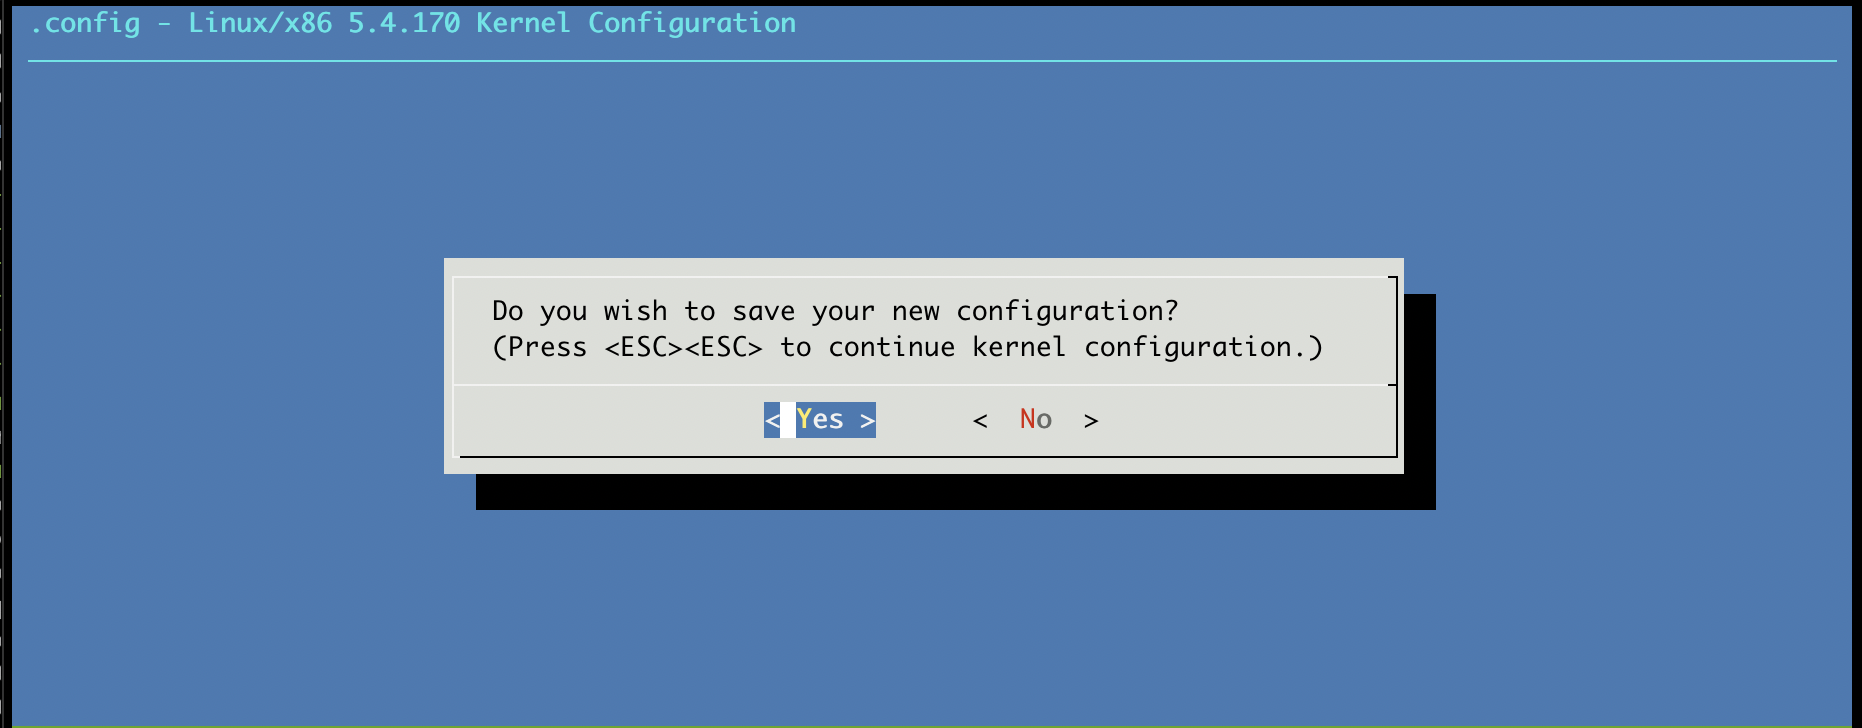
Satisfied that we have the needed change, we can save our configuration. Press the <E> key or click on < Exit > to exit the sub-menus until you are at the top of the stack. Press the <S> key or click on < Save > to save the configuration. At they prompt, press enter or click on <Yes>.
Now, the benefit of the devtool workflow comes into play, because we are rewarded with:
INFO: Updating config fragment <build>/workspace/sources/linux-intel/oe-local-files/devtool-fragment.cfg
The contents of this file are what you might expect:
# CONFIG_USB_XHCI_HCD is not set
Applying our configuration change
If we don’t already have one, we need a layer into which to put our changes:
Now—as long as our layer has high enough priority and no other recipes add kernel config fragments which conflict with our change—we should be able to build the kernel and inspect the resulting .config:
$ popd
$ bitbake linux-intel
$ grep -R XHCI tmp/work/corei7-64-intel-common-poky-linux/linux-intel/5.4.170+gitAUTOINC+98cce1c95f_36f93ff941-r0/linux-corei7-64-intel-common-standard-build/.config
# CONFIG_USB_XHCI_HCD is not set
# CONFIG_USB_ROLES_INTEL_XHCI is not set
We should also be able to run dmesg | grep xhci on the target and we would not expect to see any messages.
Summary
A Konsulko Group customer had a hardware problem that required us to remove a kernel feature. By using tools like devtool, we were able to fairly easily make a change to the kernel configuration and capture those changes in a persistent way with a .cfg fragment and a .bbappend. This approach solved the problem and allowed OTA updates to proceed to these deeply embedded devices in the field. Please contact us to discuss how Konsulko can help you with the unique requirements of your commercial project.
https://www.konsulko.com/wp-content/uploads/2022/02/How-KG-removes-a-feature-1.png12001200Tim Orlinghttps://www.konsulko.com/wp-content/uploads/2021/03/KonsulkoGroup-fullcolorlogo-340x156-1.pngTim Orling2022-02-21 18:53:112023-05-01 11:19:22Using kernel config fragments to remove an unwanted feature