EOSS (which incorporates the Embedded Linux Conference) is an umbrella event for open source embedded projects and developer communities to come together under one roof for important collaboration, discussions and education.
Rust has gained popularity as the “second” Linux kernel high-level language. There’s been discussions about its applicability in various kernel subsystems which yielded tentative conclusions. Engineers have been advised by kernel gurus to use Rust for subsystem implementations rather than for drivers.
Vitaly will explain how he rewrote a zswap backend called zblock in Rust, then compare the performance and complexity of the two implementations.
Tim Orling
Tim, who serves on the board of directors of OpenEmbedded, will speak at the Yocto Project half-day mini-summit “Journey to Scarthgap 5.0” on Monday, April 15. With other YP community leaders, he will deep dive into upcoming features and improvements in the upcoming LTS release.
The rest of the week, you may find Tim in and around the Yocto Project booth in the exhibition hall. Please stop by with all your Yocto questions.
https://www.konsulko.com/wp-content/uploads/2024/04/EOSS-Seattle-2024-1.png900900Konsulko Grouphttps://www.konsulko.com/wp-content/uploads/2021/03/KonsulkoGroup-fullcolorlogo-340x156-1.pngKonsulko Group2024-04-14 13:52:332024-04-14 13:52:34Konsulko Group speaks at EOSS North America 2024 in Seattle
Balena.io, commonly known as Balena, is a platform simplifying IoT device deployment and management. It uses Docker containers for easy application deployment across various embedded Linux devices, offers centralized device management for monitoring and updates, and supports scalability from prototypes to large-scale projects. With over-the-air (OTA) updates and monitoring tools, Balena streamlines IoT application development and management. Balena supports over a 100 device types with robust and resilient remote updates, combined with a powerful toolset for monitoring, maintaining and debugging.
Recently PHYTEC took interest into having their AM62x-based development board added to the list of Balena-supported devices and Konsulko was on the task. The process of bringing Balena support for a new board consists of creating a custom Yocto-based Board Support Repository and having it pass an automated testing procedure run on the actual hardware.
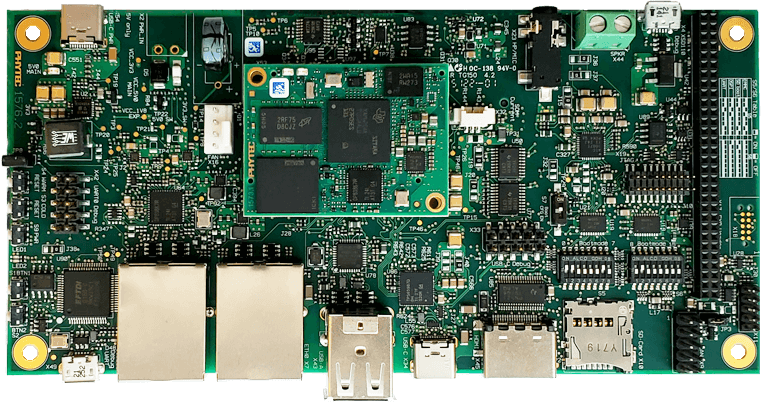
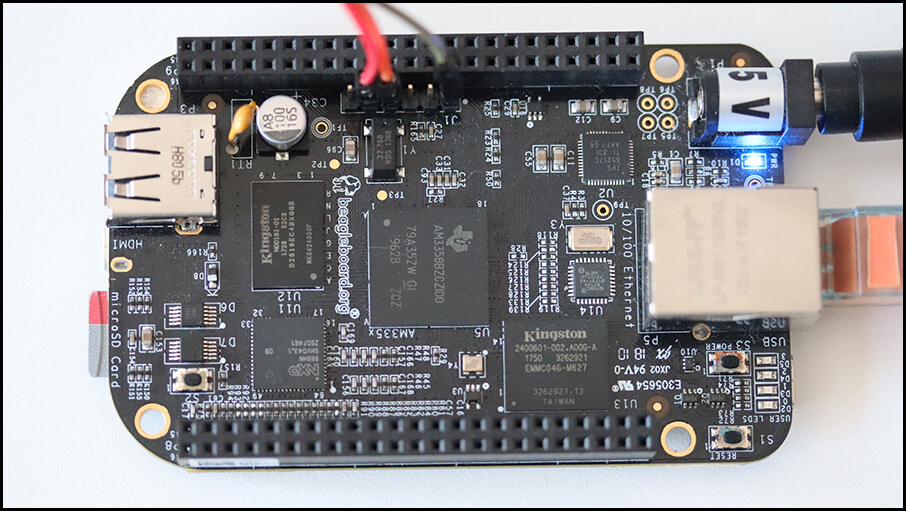
At the heart of the phyBOARD-AM62x is the industrial PHYTEC phyCORE-AM62x. This versatile System-on-Module (SoM) is powered by Texas Instruments AM62x Sitara processor and is equipped with Ethernet, CAN, UART, I2C, SPI, dual display, MIPI CSI-2 camera and audio. The phyBOARD-AM62x offers a modern FTDI interface allowing software download and debugging, perfect for development. Paired alongside the M.2 connectorized WiFi and Bluetooth module extensions makes a perfect product for IoT devices.
Konsulko engineers created balena-phytec git repository which is currently publicly available at the BalenaOS GitHub organization. It is based on the Yocto/OpenEmbedded board support package (BSP) layers meta-ti and meta-phytec. The repository provides all necessary modifications to run BalenaOS (Balena’s specific Linux distribution) on the phyBOARD-AM62x, including a new Yocto/OpenEmbedded integration layer meta-balena-phytec that extends the recipes for the U-Boot bootloader and Linux kernel.
Texas Instruments AM62x SoCs come with a RTI/WWDT Windowed Watchdog Timer which would turn off the board when not serviced within a specific time interval. RTI only supports a windowed mode, where the watchdog can only be petted during the open window; not too early or not too late. However, due to the nature of systemd utilized by BalenaOS, it is unable to ping the watchdog within the designated open window period, as it attempts to ping at watchdog_timeout/2 ticks. Therefore the systemd watchdog has been disabled by a BitBake append file for systemd in layer meta-balena-phytec.
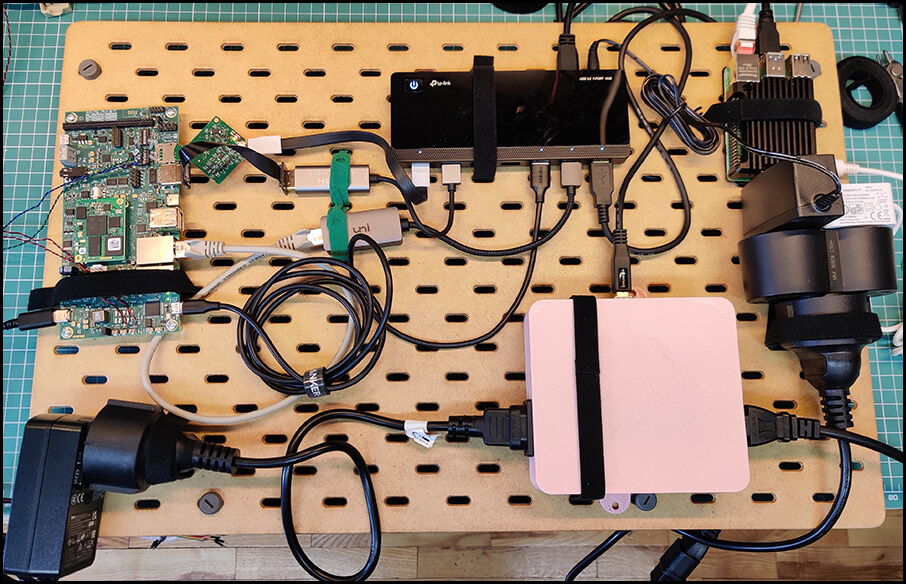
To finish the task Konsulko and Balena engineers ran a special test suite on the board using the Balena AutoKit. Shortened from Automation Kit, the AutoKit is a complete hardware solution for automated interaction with embedded Linux device. It features SD card multiplexing, Ethernet and power control, serial communication, HDMI capture and support for other USB peripherals.
The rest of the article covers a step-by-step guide for connecting the phyBOARD-AM62x to BalenaCloud and deploying a simple containerized application on it, as well as demonstration of some of the basic features provided by BalenaCloud’s Dashboard.
Downloading an Image
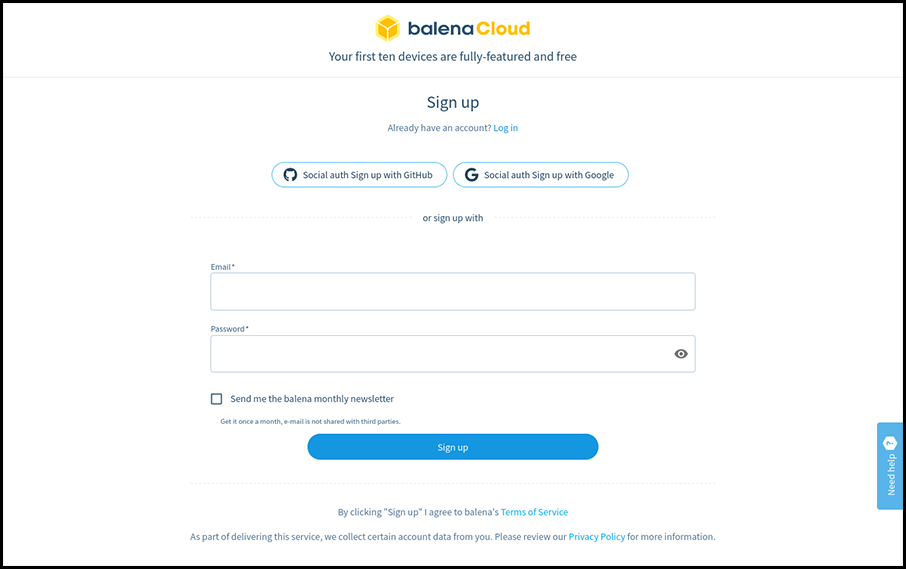
The first thing you have to do is to register at https://dashboard.balena-cloud.com/signup. Every user is allowed to have up to 10 devices with all features enabled for free. While the software that Balena develops is open source, the usage of their cloud infrastructure with more than 10 connected IoT devices requires a plan subscription, with better plans coming with more devices and better support response time.
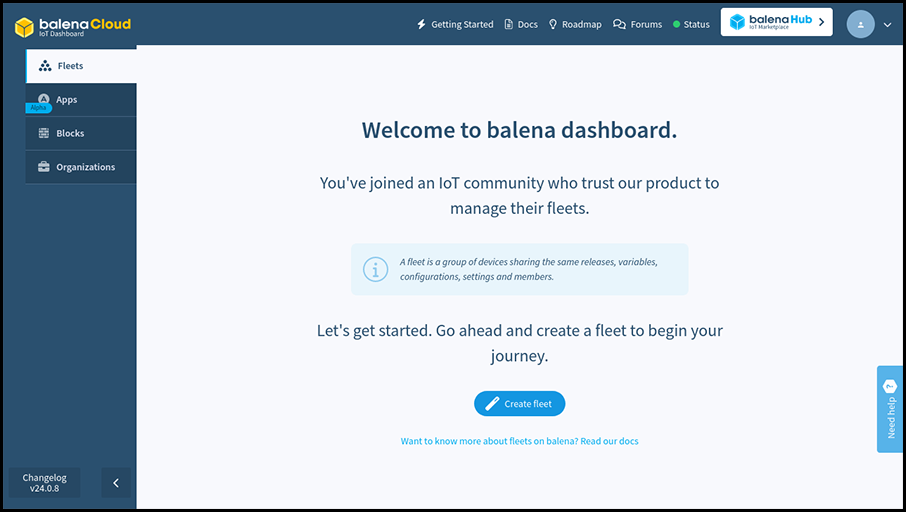
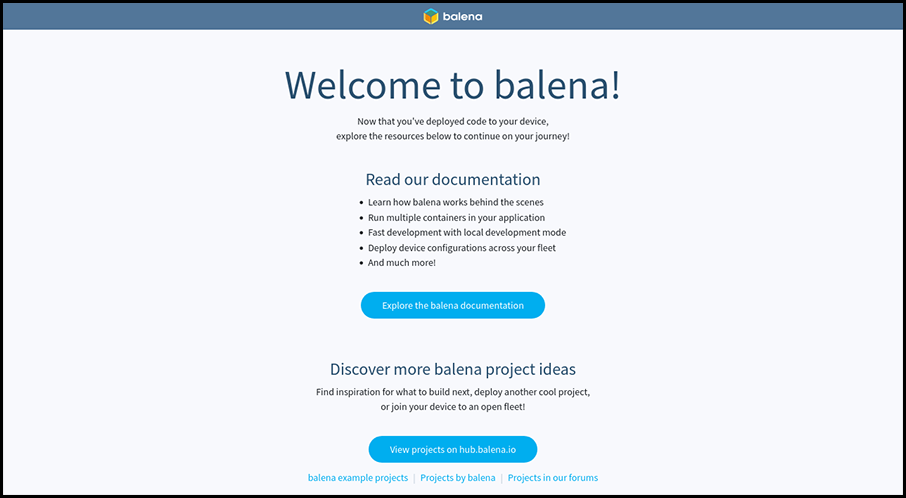
Once you register and confirm your e-mail you’ll be welcomed with a screen providing an introduction to Balena and inviting you to create a fleet.
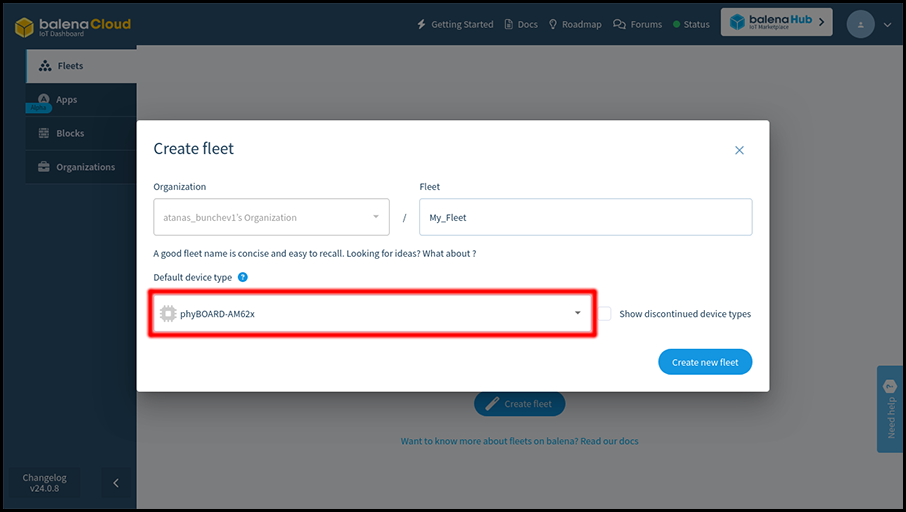
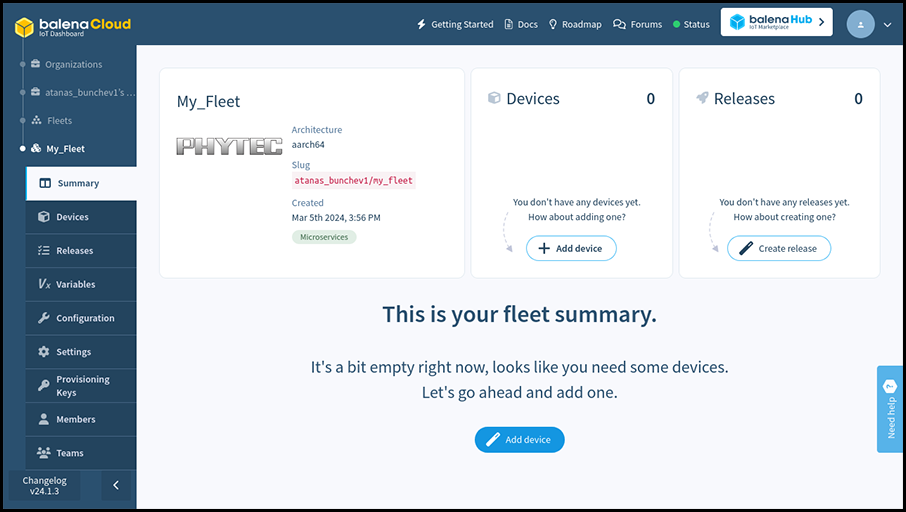
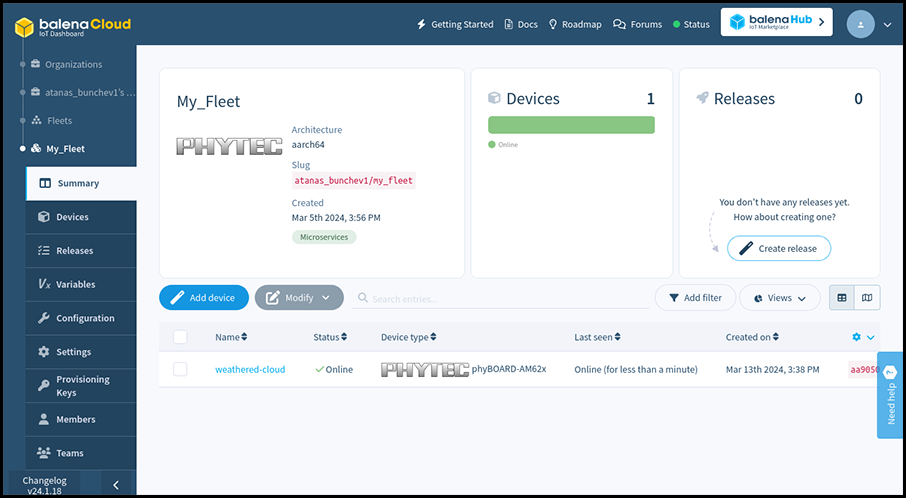
A fleet is a group of devices with identical configuration and with the same applications deployed on them. Create a new fleet and set the device type to phyBOARD-AM62x.
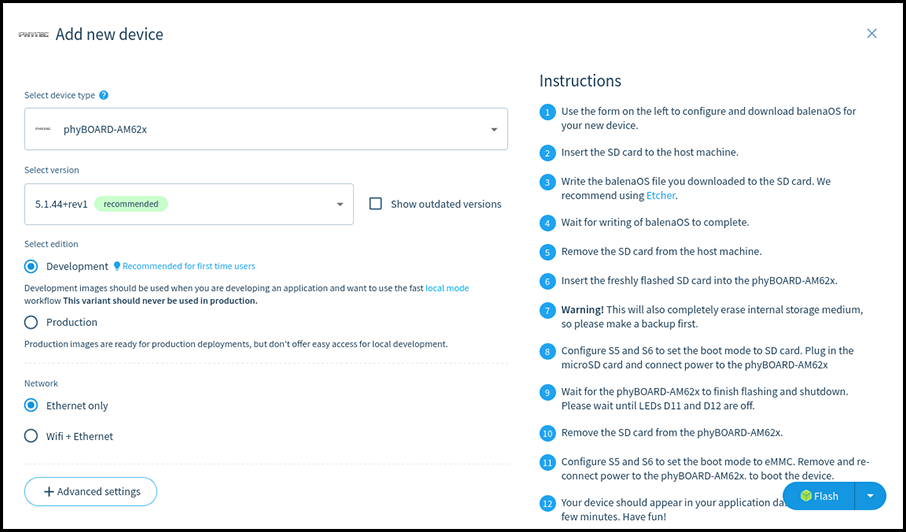
Once your fleet is created click the “Add device” button. Select the Development edition, as it includes a few quality of life modifications for developers, such as passwordless ssh access as root on port 22222.
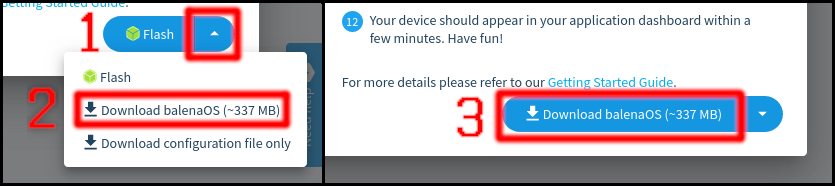
Once you have picked the configuration for the new image you can download it by selecting the Download balenaOS option from the menu next to the Flash button and pressing on that button after that.
Alternatively if you have balenaEtcher installed you can directly click on the Flash button. That way balenaEtcher will start up with the correct URL for the image already selected, leaving only the output device selection to you.
The third option – downloading a configuration file – is applicable when having a custom BalenaOS image that you want to configure for a given fleet.
Flashing the Installation media
Once the image is downloaded you need to flash it on a microSD card. There are several ways of flashing an image. One way is to use a graphical tool for the task, such as balenaEtcher or Rufus(keep in mind that some of these will expect you to unzip the image in advance).
Another way to do is to use the Linux shell. Replace <your_image>.img.zip with the compressed image you downloaded and <your_image>.img with the extracted file. Replace /dev/sdX with the path to the microSD card.
Keep in mind that flashing an image on a microSD card will delete all data stored on the microSD card.
Installing Balena on the phyBOARD-AM62x
Note: The following procedure will delete all data on the internal eMMC storage of your phyBOARD-AM62x.
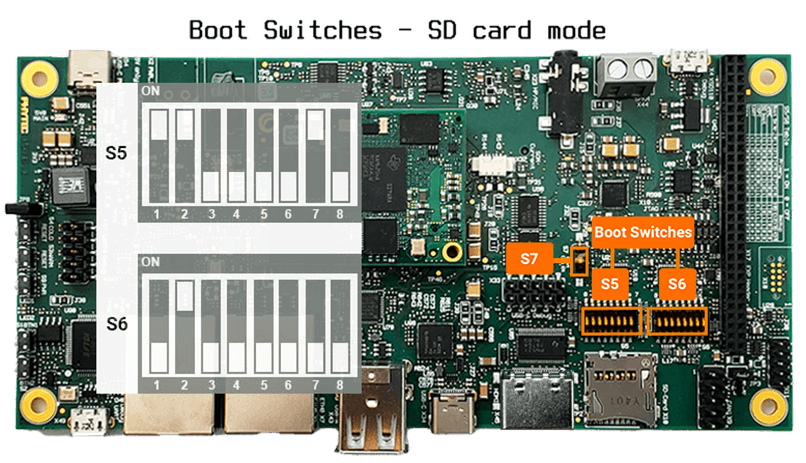
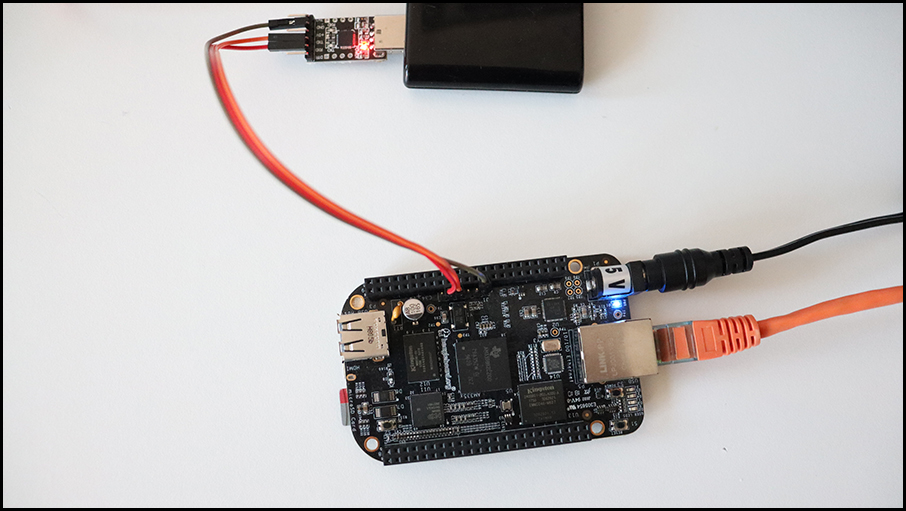
Plug in the newly-flashed microSD card into the phyBOARD-AM62x board. Make sure the boot switches are set to SD card mode. Power on the board and wait for the installation to the internal eMMC to finish.
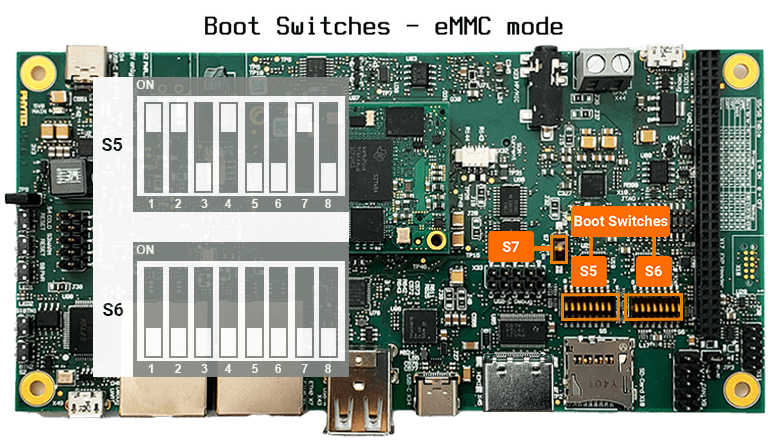
Once the installation is complete the board will turn off. This is indicated by LEDs D11 and D12 turning off.
As the installation on the internal eMMC has finished, set the boot mode to eMMC. Disconnect the microSD card, connect phyBOARD-AM62x to Ethernet and power it on.
In few moments the board will show up on the fleet page at the Dashboard.
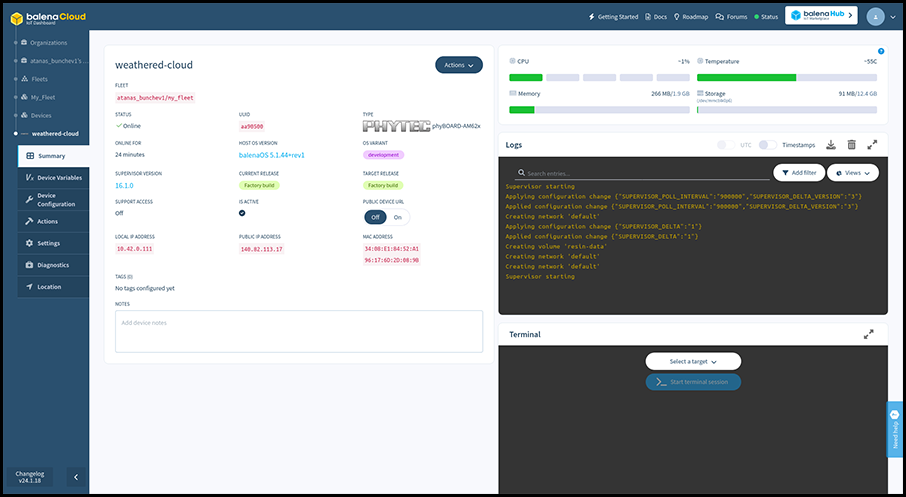
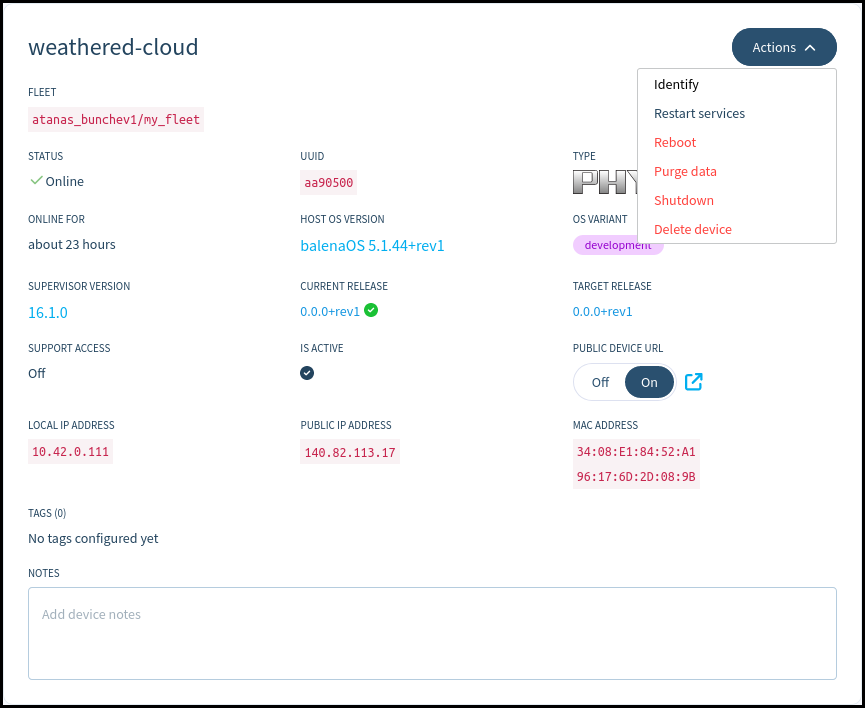
Clicking on phyBOARD-AM62x in the table will open a dedicated page for the board that shows details and current status information.
On the left you can see the fleet containing the phyBOARD-AM62x, its online status, its unique UUID, the Host OS and Balena Supervisor versions, the local and public IP address of the board. You can enable or disable the Public Device URL of the board, as well as use the Actions menu to manage the board.
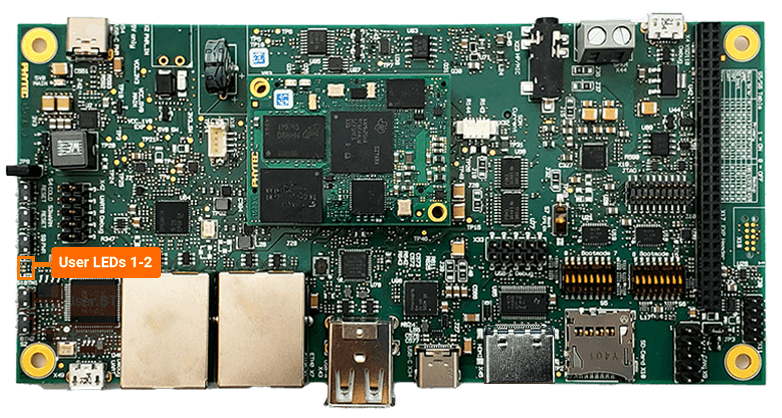
The Identify action will make a specific LED on phyBOARD-AM62x blink for half a minute to make identifying the exact board easier – a very useful feature when having a bunch of similar boards lying around. On phyBOARD-AM62x this is User LED 1, a bright red LED at the left edge of the carrier board.
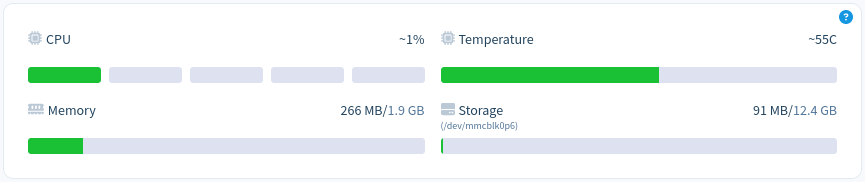
At the upper-right corner you can see the current resource usage on the board, as well as the temperature and free persistent storage space.
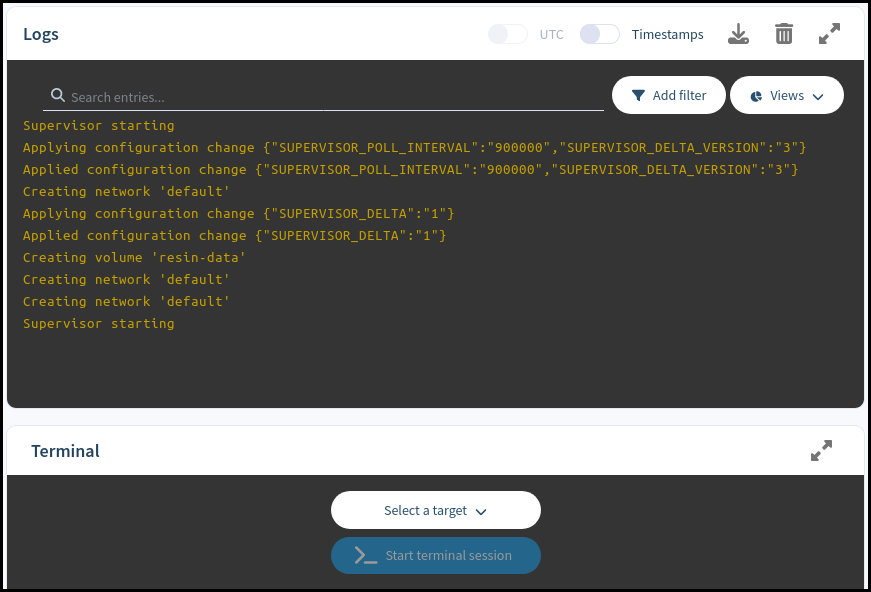
Below them are the Logs and Terminal sections, which can be used for advanced remote debugging and troubleshooting of the board.
Lastly, at the currently empty space at the bottom-left part of the screen we’ll be able to see the status of the containerized applications currently deployed on the board.
Pushing a hello-world application to phyBOARD-AM62x
The last section of this article contains a quick example of how to push a containerized application to a board that runs Balena. The example application that will be deployed is a Docker container consisting of a simple web page hosted with NodeJS Express.
DownloadBalena CLI tool, a Command Line Interface for balenaCloud or openBalena. Select the standalone binary for your workstation – the machine you’re going to use to deploy the application, not the board you’re going to deploy to.
As of the time of writing, the most recent version is balena-cli-v18.1.5-linux-x64-standalone.zip. If you are utilizing a newer release or a different operating system, kindly substitute the filename accordingly.
unzip balena-cli-v18.1.5-linux-x64-standalone.zip
cd balena-cli
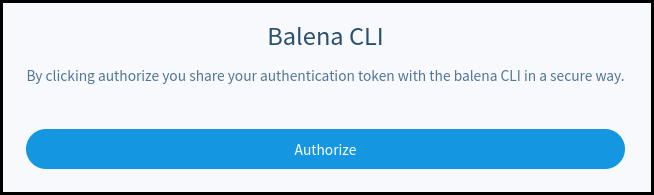
You need to login in your profile from the CLI before you can push anything to your devices. For that task you can use the ./balena login command:
./balena login
 _            _
| |__   __ _ | |  ____  _ __    __ _
| '_ \ / _` || | / __ \| '_ \  / _` |
| |_) | (_) || ||  ___/| | | || (_) |
|_.__/ \__,_||_| \____/|_| |_| \__,_|


Logging in to balena-cloud.com
? How would you like to login? (Use arrow keys)
❯ Web authorization (recommended)
  Credentials
  Authentication token
  I don't have a balena account!
Press Enter to select Web authorization and confirm the authentication request on the web page that opens:
Alternatively, select the Credentials option and insert your username and password.
git clone https://github.com/balena-io-examples/balena-nodejs-hello-world.git
cd balena-nodejs-hello-world
../balena push <fleet name>
Once the application is uploaded you can see it on the board’s page at the web dashboard.
The Hello World example is a web server hosting a single web page. To check it out, you can either visit the board’s local IP address if you’re in the same local network as phyBOARD-AM62x, or enable the PUBLIC DEVICE URL and open the hyperlink that appears next to the switch once enabled.
This article demonstrates how to setup and use the PHYTEC phyBOARD-AM62x development board with Balena, a container-based distribution designed for easy and rapid development of embedded applications, packed with useful device management and troubleshooting features as well as sophisticated monitoring and automation-oriented ones. Get in touch with us to discuss additional features. Our team is ready to help in development of new or already existing Linux embedded projects.
From the earliest days of OpenEmbedded and the Yocto Project, Konsulko engineers have actively contributed upstream and participated in the community, offering their expertise and guidance in developing high-quality commercial products. Our proficiency extends to Balena, RAUC, Mender, and other open-source solutions, ensuring seamless and reliable over-the-air updates. Contact us to explore how Konsulko engineers can contribute to the advancement of your embedded Linux product development.
___
https://www.konsulko.com/wp-content/uploads/2024/04/balenagraphic.png900900Konsulko Grouphttps://www.konsulko.com/wp-content/uploads/2021/03/KonsulkoGroup-fullcolorlogo-340x156-1.pngKonsulko Group2024-04-06 08:13:322024-04-09 07:32:25Balena: Running Containerized Applications on phyBOARD-AM62x
Integrity Measurement Architecture (IMA-measurement) is a subsystem in the Linux kernel designed to provide a framework for maintaining the integrity of files on a system. The primary purpose of IMA is to ensure that only trusted code and data are executed on a system and that the integrity of critical system components is maintained.
IMA was merged into the mainline Linux kernel in 2004 with the release of version 2.6.30. It evolved over time, adding features such as TPM integration, extended support, and continued maintenance, becoming a key component for ensuring the integrity of files in Linux-based systems. IMA works by calculating cryptographic hashes of files at various points in their lifecycle, such as when they are accessed, executed, or modified.
This article shares the exacts steps to build a minimal Linux distribution with IMA support for QEMU x86-64 using the Yocto Project and OpenEmbedded. The Yocto Project is an open-source collaboration project that enables developers to create lightweight, optimized, and customizable Linux distributions for embedded devices while maintaining control over the software components and configurations included in the system. To enable IMA, we use Yocto/OpenEmbedded layers meta-security and meta-integrity. These layers offer a comprehensive suite of security tools and hardening utilities designed for Linux kernels, along with libraries that facilitate the implementation of robust security mechanisms.
The following steps outline the process of building an image with Integrity Measurement Architecture (IMA) using the Yocto Project and OpenEmbedded. This demonstration uses the default debug keys provided in the “data” directory of layer meta-integrity. Because everyone has access to these private keys, for devices in production you must create your own private keys and use them instead. Enabling the audit kernel subsystem provides additional informational integrity auditing messages useful for debugging any appraisal issues that may arise during the development process.
Kindly be aware that this article utilizes source code derived from the primary branches of associated Yocto/OE layers. Consequently, we are selecting specific git commits that have been confirmed to function reliably. These commits will be part of the next long-term support (LTS) release of the Yocto Project which is version 5.0 with codename Scarthgap. It is scheduled for release in April 2024 and will be supported for 4 years until April 2028.
Download the source code:
git clone git://git.yoctoproject.org/poky poky-qemu
cd poky-qemu
git checkout e31be0b0e6ed6855787ebfbacc15bdbf1b9e511c
git clone git://git.yoctoproject.org/meta-security
cd meta-security
git checkout 30e755c59204cbd64c3aa12e64ab33041f6f02c0q
git clone git://git.openembedded.org/meta-openembedded
cd meta-openembedded
git checkout 57db42741df341718b9bb4b1b8f20d2e2fcf7010
After building the image, we can launch it. QEMU, short for Quick Emulator, is an open-source virtualization software that allows users to emulate various hardware platforms and run operating systems on different host systems. We will use it to run and test the image. By utilizing the “nographic” option, QEMU disables the video console, setting the console to “ttys0”. This feature is particularly beneficial when remotely accessing a build server over SSH. To verify the effectiveness of the appraisal process, attempt modifying a file, then confirm that the verification of the altered file subsequently fails.
Launch the image in QEMU:
runqemu nographic
Login and root and verify the integrity of file /etc/hostname using evmctl:
This simple example serves as a demonstration of how Linux IMA operates, using QEMU as a platform. However, to implement Linux IMA on real-world devices, Konsulko Group offers assistance with hardware bring-up and integration of the suitable Yocto/OE BSP (Board Support Package) layers.
Since the inception of OpenEmbedded and the Yocto Project, Konsulko engineers have actively contributed to the community and provided guidance for developing commercial products. We specialize in U-Boot, Linux kernel, RAUC, Mender, and various other open source projects for embedded Linux devices. Contact us to explore how Konsulko engineers can assist with your embedded product development endeavors.
https://www.konsulko.com/wp-content/uploads/2024/02/IMA-Linux.png600600Leon Anavihttps://www.konsulko.com/wp-content/uploads/2021/03/KonsulkoGroup-fullcolorlogo-340x156-1.pngLeon Anavi2024-02-29 08:07:502024-02-29 08:07:52IMA-measurement with Yocto Project and OpenEmbedded
Konsulko Group has made many upstream contributions to OTA (over-the-air) update solutions for embedded Linux devices. RAUC is a popular open source option as it has been meticulously developed with a keen emphasis on stability, security, and adaptability. Notably, RAUC seamlessly integrates with major build systems such as Yocto Project/OpenEmbedded, Buildroot, and PTXdist.
Functioning across diverse usage scenarios, one of RAUC’s elementary yet impactful functionalities is the A/B update mechanism. In this setup, two identical root filesystems, denoted as A and B, are maintained. The device boots from one of these, while the other serves as the target for updates.
Post-update completion, the bootloader directs the system to boot from the freshly updated partition during the subsequent system startup. RAUC incorporates the ‘verity’ update bundle format. It extends the capabilities of RAUC by introducing built-in support for HTTP(S) network streaming, adaptive delta-like updates, and comprehensive update bundle encryption.
This article provides, as an example, the exact steps how to integrate RAUC with Yocto Project and OpenEmbedded for booting from a microSD card on BeagleBone Black.
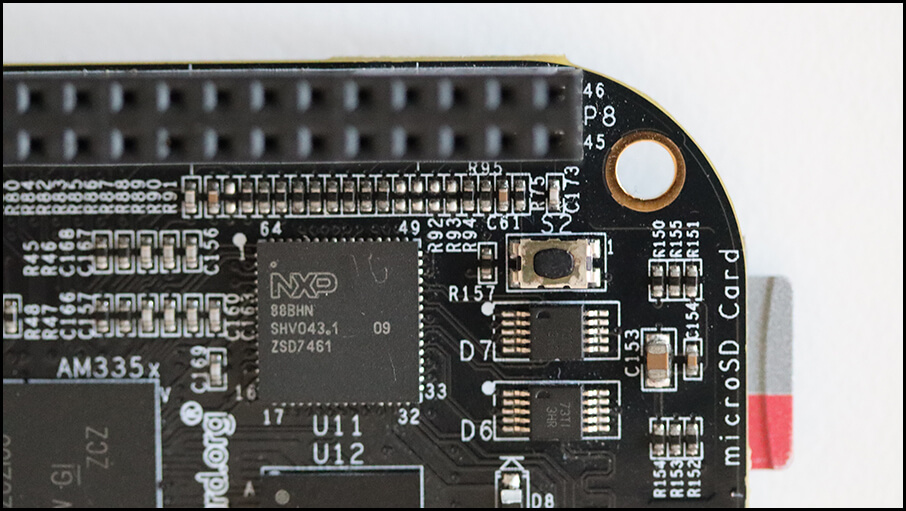
Released in 2013, BeagleBone Black is a single-board computer (SBC) developed by the BeagleBoard.org Foundation. It was certified by the Open Source Hardware Association with OSHWA UID US000236. The chipset on BeagleBone Black is Texas Instruments Sitara AM3358 with 1GHz ARM Cortex-A8 CPU and SGX 3D graphics engine. Because of this the demonstrated integration is a suitable reference for other embedded devices equipped Texas Instruments chipsets.
Required Hardware
The hardware used for this step by step tutorial is:
RAUC, a robust and powerful open-source solution, demands advanced skills for initial integration. In general, to incorporate RAUC in a Yocto Project and OpenEmbedded image for BeagleBone Black the following actions have to be performed:
Use U-Boot as a bootloader
Enable SquashFS in the Linux kernel configuration
Use ext4 root file system
Design specific storage partitioning for the certain use case and configure RAUC accordingly
Provide a custom U-Boot script to properly switch between RAUC slots
Prepare a certificate and keyring to use for signing and verifying RAUC update bundles.
Leon Anavi has already done all these actions for core-image-minimal in Yocto/OpenEmbedded layer meta-rauc-community/meta-rauc-beaglebone. The layer is available at GitHub. Please follow the steps below to build core-image-minimal for BeagleBone Black with it:
Download the long term support (LTS) release Kirkstone reference Yocto distribution, Poky:
git clone -b kirkstone https://git.yoctoproject.org/poky poky-rauc-bbb
cd poky-rauc-bbb
Adjust conf/local.conf by appending the following configurations to the end of the file:
MACHINE = "beaglebone-yocto"

# Use systemd as init manager
INIT_MANAGER = "systemd"

# Add RAUC to the image
IMAGE_INSTALL:append = " rauc"
DISTRO_FEATURES:append = " rauc"
Build a minimal bootable image:
bitbake core-image-minimal
The image creation process from scratch is time-consuming, encompassing various Yocto/OpenEmbedded recipes and configurations. Kindly await completion as bitbake diligently executes each tasks.
Flash tmp/deploy/images/beaglebone-yocto/core-image-minimal-beaglebone-yocto.wic.xz to microSD card.
Attach the USB-to-UART adapter to BeagleBone Black, plug the ethernet cable and the microSD card.
Press and hold button S2 while plugging in the 5V DC power supply to turn on BeagleBone Black and boot from microSD card.
BeagleBone black board has an onboard button labeled as S2. It is situated near the microSD card slot. Press and hold it while powering the board to boot from microSD card.
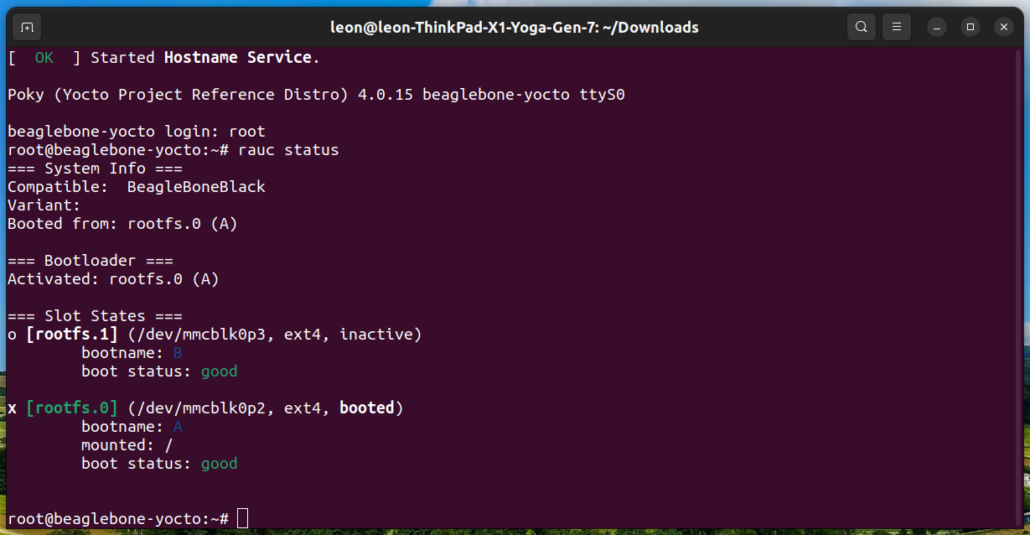
Verify that the system boots successfully, log in as user root without a password and check RAUC status:
rauc status
On the screenshot BeagleBone Black has been booted from RAUC slot rootfs.0 (A) on the microSD card.
NOTE: The meta-rauc-beaglebone layer includes a core-image-minimal.bbappend file, housing essential configurations for RAUC functionality. Apply these configurations similarly to other images intended for use in your embedded Linux device.
Creating a RAUC Update Bundle
A RAUC update bundle comprises the file system image(s) or archive(s) designated for system installation, accompanied by a manifest detailing the images for installation, encompassing options and meta-information. Additionally, it may include scripts designated for execution before, during or after the installation process. To sign and verify the update bundles RAUC uses SSL keys. Layer meta-rauc-beaglebone contains a keyring containing all keys and a recipe for a simple RAUC update bundle for demonstration purposes only.
Follow the steps below to create RAUC update bundle that extends the system by adding the popular text based editor nano:
Add to conf/local.conf:
IMAGE_INSTALL:append = " nano"
Build the RAUC update bundle:
bitbake update-bundle
Following a successful execution, bitbake will produce the update-bundle-beaglebone-yocto.raucb file.
Updating BeagleBone Black with RAUC
Follow the steps below to update core-image-minimal running from a microSD card on BeagleBone Black:
Start a Python 3 web server on the build machine or another computer where the RAUC update bundle (aka update-bundle-beaglebone-yocto.raucb) is available and within the same network as BeagleBone Black, for example:
cd tmp/deploy/images/beaglebone-yocto/
pip3 install --user rangehttpserver
python3 -m RangeHTTPServer
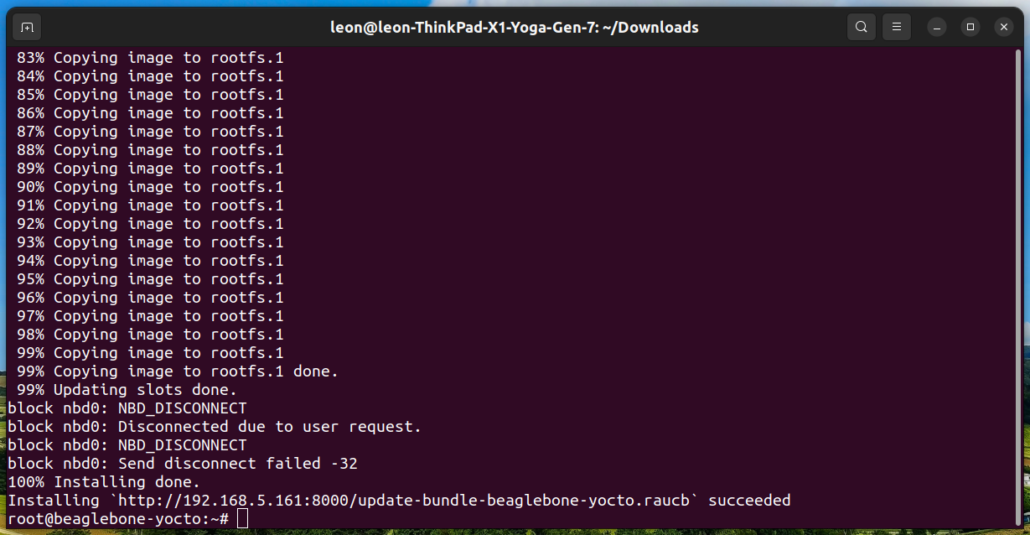
On BeagleBone Black replace <IP> with the actual IP address of the computer on which the HTTP server is running and execute the following command to install the update:
The screenshot show successful installation of the RAUC updated bundle on BeagleBone Black.
Reboot BeagleBone Black to load the updated version:
reboot
NOTE: As alternative, instead of using an HTTP server, you can transfer the update bundle to BeagleBone Black and install it from local storage.
Verify that nano was added to the system:
which nano
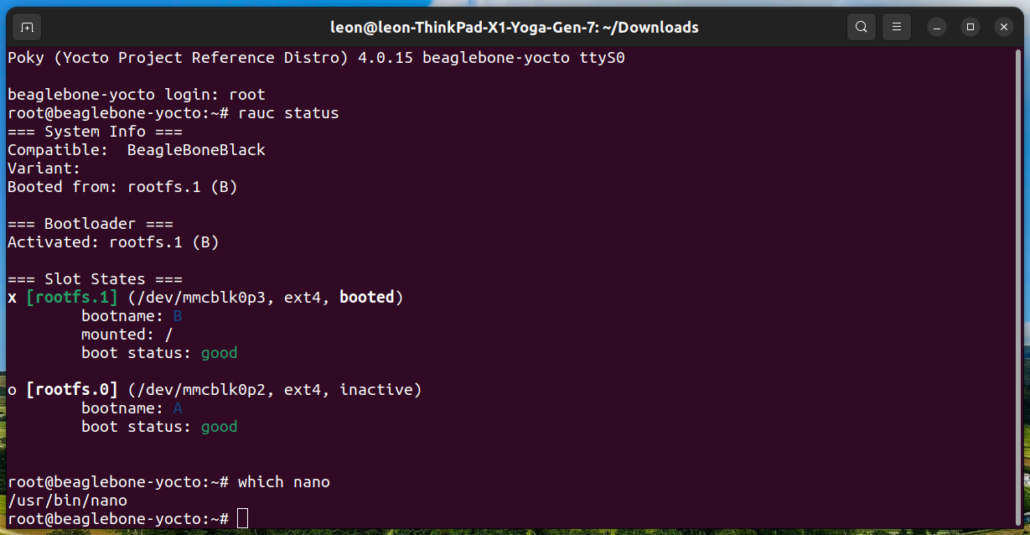
Check RAUC status to confirm the system have booted from the second partition:
rauc status
On the screenshot, after sucessful installation of the RAUC update bundle, BeagleBone Black has been booted from RAUC slot rootfs.1 (B) on the microSD card. This slot contains nano.
In real-world product development, the Yocto Project and OpenEmbedded workflow can be enhanced with a few commands for easy implementation of continuous integration (CI).
From the dawn of OpenEmbedded and the Yocto Project, Konsulko engineers have been community contributors and guides for crafting commercial products. Our expertise spans RAUC, Mender, and various open-source solutions for top-notch software updates. Please get in touch with us to discuss how Konsulko engineers can help your own embedded product development.
https://www.konsulko.com/wp-content/uploads/2024/01/RAUC-BeagleBone-Black-2.png600600Leon Anavihttps://www.konsulko.com/wp-content/uploads/2021/03/KonsulkoGroup-fullcolorlogo-340x156-1.pngLeon Anavi2024-01-30 15:14:162024-04-01 10:26:02Integrating RAUC with Yocto Project on BeagleBone Black
Konsulko Group has had another great year. We’ve helped our customers build new breakthrough embedded products of all sizes, from semiconductors to medical devices to automotive to heavy equipment.
We continue strong relationships with the Linux Foundation, Yocto Project and Automotive Grade Linux. We work with our partners mender.io and PHYTEC, providing support and development for their customers.
Konsulko is growing
We’ve expanded our footprint across the US and Europe, welcoming three outstanding engineers to the team: George McCollister, Darko Alavanja and Bryan Cisneros.
George McCollister has over 25 years of experience in Embedded Systems development. Starting with 8051 microcontrollers and quickly adopting Linux, he has worked on a wide range of technologies from network switches and storage appliances to automated utility fault restoration and process automation. He was a key designer and architect of an industry leading utility automation platform.
Darko Alavanja was deeply involved with robotics as a student, competing in several teams in the Eurobot contest. He designed mechanical components, PCBs, sensor electronics, actuator systems and software used for creating mobile robots. Darko has developed embedded systems for industrial devices such as FPGA-based hardware-in-the-loop equipment, controllers for industrial machinery and protocols for communication gateways.
Bryan Cisneros has developed embedded software, UIs, and test code across various industries, including medical devices, RF modules, and AI-enabled cameras. Before joining Konsulko, Bryan worked in the defense industry developing networked applications for weapons and information systems, focusing on redesigning outdated UIs and programs, and implementing CI/CD pipelines.
Committed to the Open Source community
In addition to our consulting work for our customers, Konsulko Group continues to actively participate in the Open Source community and its conferences around the world.
Konsulko’s senior leadership have been contributors in the Linux kernel and other OSS communities since the late 1990s. The entire Konsulko team has been involved in a number of Open Source projects including U-Boot, Yocto Project, OpenEmbedded and Automotive Grade Linux (AGL).
https://www.konsulko.com/wp-content/uploads/2023/12/2023-THE-YEAR-IN-REVIEW.png12001200Konsulko Grouphttps://www.konsulko.com/wp-content/uploads/2021/03/KonsulkoGroup-fullcolorlogo-340x156-1.pngKonsulko Group2023-12-27 08:03:152023-12-27 13:58:53Konsulko Group: The Year in Review 2023
Formerly known as the Yocto Project Developer Day, the Summit has an expanded scope to include both workshops for engineers building customized Linux distributions and applications, as well as an open forum where maintainers, trainers and users present papers on how the project is evolving and how they are using it.
Leon will examine the technical aspects — dependance on Neat VNC and AML libraries, TLS support and user authentication — followed by a step by step tutorial to demonstrate remote connection from another computer.
The presentation aims to simplify the process of setting up the VNC backend in Weston and empower developers to utilize this powerful feature seamlessly within their projects.
We hope you will join us for this presentation, and all of this new edition of Yocto Project Virtual Summit.
https://www.konsulko.com/wp-content/uploads/2023/10/YoctoVirtualSummit11-2023.png600600Konsulko Grouphttps://www.konsulko.com/wp-content/uploads/2021/03/KonsulkoGroup-fullcolorlogo-340x156-1.pngKonsulko Group2023-11-01 10:12:202023-11-22 09:25:58Konsulko Group engineer to speak at Yocto Project Summit
Yocto Project has received major funding from the Sovereign Tech Fund to aid and drive significant transformation. The funded work improves the long-term sustainability of the project by attracting a new generation of developers.
Konsulko Group is proud of the work done by principal engineer Denys Dmytriyenko and the Yocto Project Technical Steering Committee to help secure the funding. Together, they spent many hours over several months to identify development areas that can be self-contained and measured, then estimated required efforts for the proposal so the funding might be approved.
The work the Sovereign Tech Fund (STF) is commissioning aims to improve the Yocto Project’s efficiency, security, user experience, and developer engagement in these specific areas:
Build Process and Workflow
Core workflow improvements, including enhancements to build tooling and workflows.
Development of the Yocto Project Reference Binary Distribution, focusing on workflow improvements and policies.
Introduction of Patchtest, an automated testing tool for code patches submitted via mailing lists.
Security and Quality Improvements
Strengthening security processes and the security team.
Advancing Software Bill of Materials (SBOMs) for improved transparency.
Addressing tooling issues and enhancing quality-of-life features in Devtool, Recipetool, and Pseudo.
Integration and Usability Enhancements
Updates and improvements to Toaster, a web-based UI for BitBake.
Integration of VSCode with Yocto Project for enhanced developer features and usability.
Layer Management Standardization
Integration of OpenEmbedded Core best practices into Meta-OpenEmbedded.
Development of standard tools for managing Yocto layers, promoting layer tooling standardization.
STF is funded by the German Federal Ministry of Economics and Climate Action (BMWK) and supported by the German Federal Agency for Disruptive Innovation GmbH (SPRIND).
https://www.konsulko.com/wp-content/uploads/2023/10/sovereigntechfund-1.png952952Konsulko Grouphttps://www.konsulko.com/wp-content/uploads/2021/03/KonsulkoGroup-fullcolorlogo-340x156-1.pngKonsulko Group2023-10-16 09:38:542023-10-17 09:13:14Helping Yocto Project secure important new funding from STF
Three Konsulko engineers traveled to Paris (left to right, in créatif senior Frank Tizzoni‘s great caricature): António Oliveira came from Portugal, Darko Alavanja from Serbia, Scott Murray from Canada.
Embedded Recipes was held over two days in late September at Fondation Biermans Lapotre. The event had a nice format: single room, single track. That meant everyone stayed together for its duration which made it easier to meet people.
We talked a little about everything: kernel internals, prototyping tools, software updates, Yocto Project, machine learning…
Scott gave a nice overview of the Automotive Grade Linux project, its history, current work and future plans.
https://www.konsulko.com/wp-content/uploads/2023/10/RecipesParis.png600600Konsulko Grouphttps://www.konsulko.com/wp-content/uploads/2021/03/KonsulkoGroup-fullcolorlogo-340x156-1.pngKonsulko Group2023-10-03 14:10:482023-12-28 08:28:57Konsulko Group in Paris at Embedded Recipes 2023
Held on June 10th and 11th, 2023 in the beautiful city of Plovdiv (Bulgaria), TuxCon 2023 marked the 10th anniversary of this annual local two-day conference. Organized by dedicated volunteers, the event aims to advocate the adoption of open source hardware and foster the use of free and open source software.
Konsulko Group intern Atanas Bunchev participated as a speaker, and demonstrated remote updates and troubleshooting of connected embedded Linux devices using Mender.io. The presentation was in Bulgarian and spread the word about the Yocto Project, OpenEmbedded and various Mender features among the local community.
Mender is an open-source, over-the-air (OTA) software update management platform specifically designed for embedded devices. It provides an efficient way for software updates and management of fleets of connected devices in various industries, such as IoT (Internet of Things), automotive, industrial automation, and healthcare. It provides options for ensuring the resilience of system-wide updates and also for updating individual applications. Furthermore debugging of devices is possible with the troubleshooting package, such as the File Transfer and Remote Terminal Add-ons.
Konsulko Group, a partner of Northern.tech, often works with Mender.io. If you are developing a new product, we would be thrilled to discuss how Konsulko’s engineering expertise and experience can contribute to your project. Or if you are a Linux software developer who is passionate about open source, we invite you to reach out to us regarding potential opportunities to join the Konsulko team.
https://www.konsulko.com/wp-content/uploads/2023/06/TUXCON23-1.png900900Konsulko Grouphttps://www.konsulko.com/wp-content/uploads/2021/03/KonsulkoGroup-fullcolorlogo-340x156-1.pngKonsulko Group2023-06-27 10:43:472023-06-27 10:43:48Konsulko Group updates Embedded Linux devices at TuxCon 2023
Konsulko engineers will be giving two talks at Embedded Open Source Summit (EOSS), a new Linux Foundation umbrella event held in Prague, Czech Republic, June 27-30, 2023. Attending virtually is also an option. Incorporated into EOSS are the Embedded Linux Conference (ELC) and the Automotive Linux Summit Europe (ALS).
The Vehicle Signal Specification (VSS) has been included in the AGL UCB by incorporating the KUKSA.val project. Scott will provide an update on the work done for the upcoming Prickly Pike UCB release.
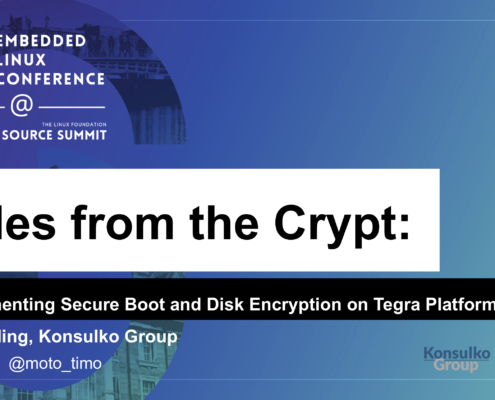
The meta-tegra BSP layer supports the NVIDIA Jetson family of systems-on-module and has an active OpenEmbedded for Tegra community. Tim and Ilies will discuss changes in the latest SDKs including the bootloader and the trusted OS, and how these affect secure boot and disk encryption implementations. They will also discuss changes needed to support over the air updates and cover how the community keeps up with upstream Open Embedded/Yocto Project changes, as well as the roadmap for support for future Jetson platforms and Yocto Project releases.
Please join Scott, Tim, and a good-sized contingent of our engineers in Prague (or virtually). Register here.
https://www.konsulko.com/wp-content/uploads/2023/06/EOSS-1.png11971196Konsulko Grouphttps://www.konsulko.com/wp-content/uploads/2021/03/KonsulkoGroup-fullcolorlogo-340x156-1.pngKonsulko Group2023-06-12 14:26:522023-09-27 08:47:05Konsulko Group to speak at EOSS / ELC / ALS in Prague